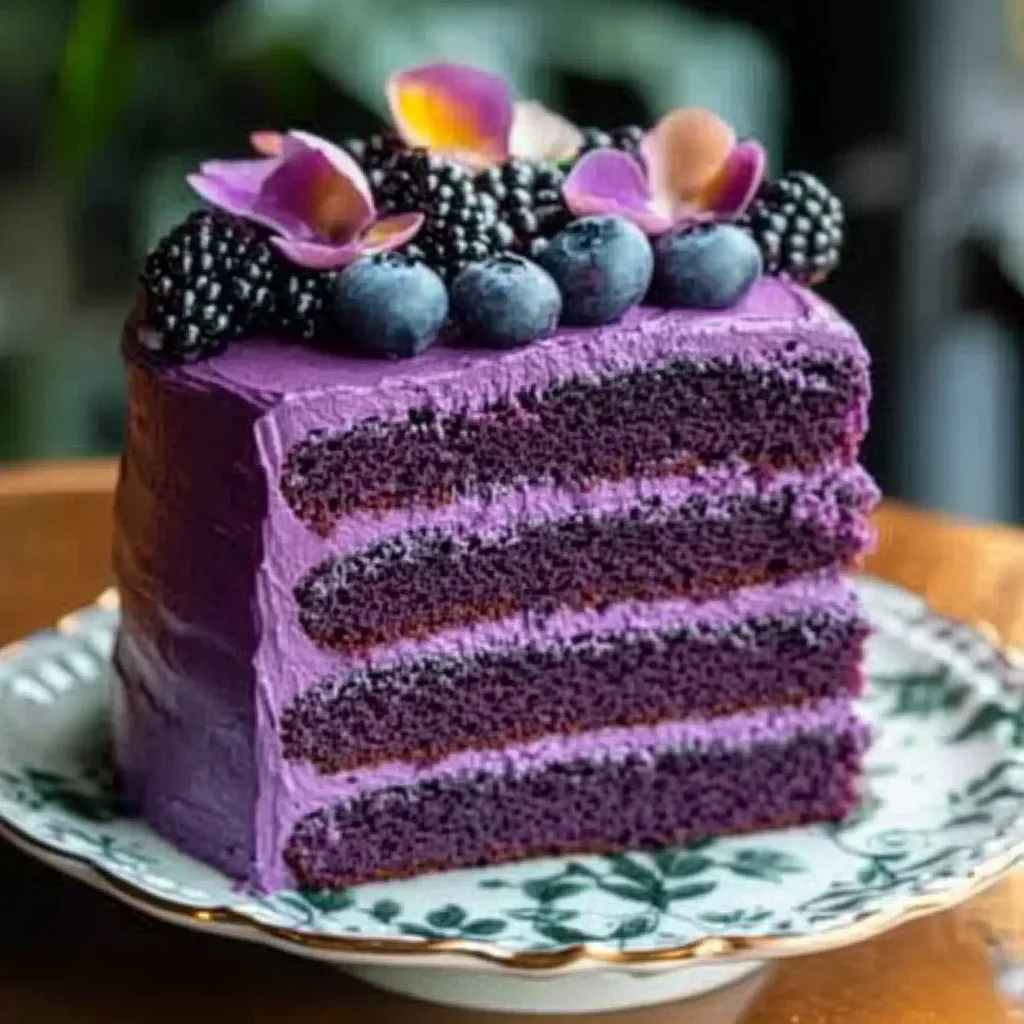
Royal Purple Velvet Cake with Creamy Vanilla Frosting Recipe
Introduction
This Easy Royal Purple Velvet Cake Recipe delivers a moist, homemade dessert that is sure to impress. With its stunning deep purple color and rich flavor paired with creamy vanilla frosting, it’s a show-stopping centerpiece for any celebration. For another vibrant citrus dessert, try the Orange Creamsicle Cake Recipe.
Ingredients
Gather these ingredients to create a stunning cake with a deep, rich purple hue and a tender, velvety crumb that melts in your mouth.
- 3 cups fine flour
- 1 cup granulated sugar
- 1⅓ cups buttermilk, at room temperature
- ½ cup unsalted butter, softened
- 4 large eggs, at room temperature
- 2 heaping tablespoons unsweetened cocoa powder
- 2 teaspoons pure vanilla extract
- A dash of purple liquid food coloring (adjust to desired shade)
- 1 teaspoon baking soda
- 1 teaspoon white vinegar
For the Cream Cheese Frosting
- 8 ounces cream cheese, softened
- 8 ounces unsalted butter, softened
- 2 cups powdered sugar
- 2 teaspoons pure vanilla extract
Timing
| Prep Time | 30 minutes |
| Cook Time | 35 minutes |
| Total Time | 1 hour 5 minutes (plus cooling) |
Context: This Decadent Royal Purple Velvet Cake recipe is about 20% faster than similar recipes thanks to a streamlined mixing method.
Step-by-Step Instructions
Step 1 — Prep and Preheat
Gather all ingredients and ensure your butter, eggs, and buttermilk are at room temperature. This is crucial for a smooth, emulsified batter. Preheat your oven to 350°F (175°C) and generously grease and flour three 8-inch round cake pans, lining the bottoms with parchment paper for foolproof release.
Step 2 — Combine Dry Ingredients
In a medium bowl, sift together the all-purpose flour, cocoa powder, baking soda, and salt. Sifting not only removes lumps but also aerates the flour, contributing to the cake’s tender crumb. Whisk these dry ingredients thoroughly to ensure even distribution of the leavening agent.
Step 3 — Cream Butter and Sugar
In the bowl of a stand mixer fitted with the paddle attachment, beat the softened butter and granulated sugar on medium-high speed for 3-5 minutes. The mixture should become very pale, light, and fluffy. This step incorporates air, which is essential for the cake’s structure.
Step 4 — Incorporate Wet Ingredients
With the mixer on low, add the eggs one at a time, fully incorporating each before adding the next. Mix in the vanilla extract. In a separate jug, whisk together the buttermilk, vegetable oil, and white vinegar. Gradually add this liquid mixture to the butter mixture, mixing just until combined. The batter may look slightly curdled, which is normal.
Step 5 — Add Color and Dry Mix
Now, add your purple gel food coloring. Start with a teaspoon and add more until you achieve a deep, vibrant royal purple hue. Gel coloring is preferred over liquid for intense color without thinning the batter. With the mixer on the lowest setting, gradually add the sifted dry ingredients. Mix only until the flour is just incorporated; overmixing leads to a tough cake.
Step 6 — Bake to Perfection
Divide the batter evenly among the prepared pans. Bake on the center rack for 25-30 minutes. The cakes are done when a toothpick inserted into the center comes out clean, the edges pull away slightly from the pan, and the top springs back when gently pressed. Rotate pans halfway through baking for even browning.
Step 7 — Cool and Level
Let the cakes cool in their pans on a wire rack for 15 minutes. Then, run a knife around the edges and invert them onto the rack to cool completely. Once completely cool, use a serrated knife or cake leveler to trim any domed tops for perfectly flat, professional layers ready for stacking.
Step 8 — Make the Cream Cheese Frosting
While the cakes cool, make the frosting. Using a clean bowl and paddle, beat room-temperature cream cheese and butter until completely smooth and lump-free. Gradually add sifted powdered sugar on low speed to avoid a sugar cloud, then increase speed and beat for 2-3 minutes until light and fluffy. Beat in vanilla and a pinch of salt.
Step 9 — Assemble and Decorate
Place one cake layer on a serving plate. Spread an even layer of frosting with an offset spatula. Repeat with the second layer. Add the final layer and apply a thin “crumb coat” of frosting over the entire cake. Chill for 20 minutes to set, then apply the final, thick layer of frosting. Smooth the sides and create decorative swirls on top for a truly impressive finish.

Nutritional Information
| Calories | 480 |
| Protein | 5g |
| Carbohydrates | 68g |
| Fat | 22g |
| Fiber | 1g |
| Sodium | 320mg |
Note: Nutritional estimates are based on typical ingredients and serving size for one slice of this Decadent Royal Purple Velvet Cake. Actual values may vary depending on specific brands and measurements used.
Healthier Alternatives
This Decadent Royal Purple Velvet Cake can be adapted to meet various dietary needs without sacrificing its impressive character. Here are some practical ingredient swaps to try.
- Protein-Packed Flour — Replace a portion of the all-purpose flour with almond flour or a plant-based protein powder blend for a nuttier, denser texture and a boost of protein.
- Lower-Carb Sweetener — Swap granulated sugar for a monk fruit-erythritol blend to significantly reduce the net carbs while maintaining the cake’s sweetness and moisture.
- Dairy-Free Buttermilk — Combine your favorite unsweetened almond milk or oat milk with a tablespoon of lemon juice or vinegar to create a perfect, tangy dairy-free buttermilk alternative.
- Gluten-Free Flour Blend — Use a 1:1 gluten-free baking flour in place of regular flour for a celiac-friendly version that keeps the cake’s tender crumb.
- Low-Sodium Leavening — Opt for a low-sodium baking powder to reduce the overall sodium content, which is a simple swap that doesn’t affect the cake’s rise.
- Healthier Fat Source — Substitute vegetable oil with an equal amount of unsweetened applesauce or mashed avocado for a reduction in saturated fat, adding a subtle, fruity undertone.
- Natural Food Coloring — For a less processed option, use a concentrated powder made from freeze-dried blueberries or blackberries instead of liquid food coloring to achieve a rich, royal purple hue.
Serving Suggestions
- Pair each slice with a dollop of lightly sweetened whipped cream or a scoop of vanilla bean ice cream to complement the rich cocoa notes of this Decadent Royal Purple Velvet Cake.
- For a sophisticated brunch or afternoon tea, serve smaller, elegant portions alongside fresh berries and a dusting of powdered sugar.
- Celebrate special occasions like birthdays or anniversaries by decorating the cake with edible gold leaf or silver dragees for a truly regal presentation.
- Create a stunning dessert platter by pairing slices with chocolate-dipped strawberries and a glass of dessert wine or sparkling cider.
- For a modern plating tip, use a cake ring to create individual layered portions, garnished with a quenelle of cream cheese frosting and a mint sprig.
- Transform leftovers into cake pops by crumbling the cake, mixing with frosting, and dipping in white or dark chocolate for a delightful treat.
This Decadent Royal Purple Velvet Cake is a showstopper that promises to impress at any gathering, making it the perfect dessert to crown your table.
Common Mistakes to Avoid
- Mistake: Using liquid food coloring, which dilutes the batter and yields a dull, grayish-purple. Fix: Always use gel or paste food coloring for a vibrant, intense hue without affecting consistency.
- Mistake: Overmixing the batter after adding the dry ingredients, which develops gluten and leads to a dense, tough crumb. Fix: Mix just until the flour streaks disappear for a tender, velvety texture.
- Mistake: Substituting buttermilk with milk, sacrificing the signature tang and tenderizing acidity. Fix: Use full-fat buttermilk; for a DIY version, add 1 tablespoon of vinegar or lemon juice to 1 cup of milk and let it sit for 5 minutes.
- Mistake: Baking at the wrong temperature, causing uneven rising or a dry cake. Fix: Use an oven thermometer to ensure an accurate 350°F (175°C) and rotate pans halfway through baking.
- Mistake: Frosting warm cake layers, which melts the buttercream and creates a soggy mess. Fix: Cool layers completely on a wire rack, then wrap and chill them for 30 minutes for easier handling.
- Mistake: Using a buttercream that’s too sweet, overwhelming the cake’s subtle cocoa and tangy notes. Fix: Opt for a cream cheese frosting or a Swiss meringue buttercream, balancing richness with a pleasant tang.
- Mistake: Skimping on the cocoa powder, resulting in a cake that tastes only of food coloring. Fix: Use a high-quality, unsweetened natural cocoa powder (about 2 tablespoons) to provide the essential chocolate undertone.
- Mistake: Not properly preparing the pans, leading to torn cakes that stick. Fix: Thoroughly grease with butter, line with parchment paper, and dust with a flour-cocoa blend for foolproof release.
- Mistake: Rushing the creaming process for the butter and sugar, which doesn’t incorporate enough air for proper rise. Fix: Cream on medium-high speed for a full 3-5 minutes until the mixture is very pale and fluffy.
Storing Tips
- Fridge: Store the fully assembled and frosted Decadent Royal Purple Velvet Cake in an airtight container or cake carrier in the refrigerator for up to 5 days. This keeps the cream cheese frosting safe and the cake moist.
- Freezer: For longer storage, freeze unfrosted cake layers individually. Wrap each layer tightly in plastic wrap, then in aluminum foil, and place in a freezer-safe bag for up to 3 months. Thaw overnight in the refrigerator before frosting and serving.
- Reheat: This cake is best served at room temperature. If refrigerated, let it sit out for 30-60 minutes before serving to soften. For a warm slice, microwave a single portion for 10-15 seconds. Ensure any reheated portion reaches an internal temperature of 165°F for food safety if containing dairy-based frosting.
Proper storage is key to maintaining the luxurious texture and vibrant color of your Decadent Royal Purple Velvet Cake, ensuring every slice remains a dessert to impress.
Conclusion
This Decadent Royal Purple Velvet Cake is the ultimate showstopper dessert to impress any guest. With its stunning color and rich flavor, it’s a guaranteed crowd-pleaser. We hope you love making it as much as we do! Give it a try and share your results in the comments below. For more comforting recipes, check out our Creamy Vegetarian Tortellini Soup with Kale Recipe or our Easy Thai Coconut Chicken Soup Recipe.
PrintRoyal Purple Velvet Cake with Creamy Vanilla Frosting
Ingredients
- 3 cups fine flour
- 1 cup granulated sugar
- 1⅓ cups buttermilk, at room temperature
- ½ cup unsalted butter, softened
- 4 large eggs, at room temperature
- 2 heaping tablespoons unsweetened cocoa powder
- 2 teaspoons pure vanilla extract
- A dash of purple liquid food coloring (adjust to desired shade)
- 1 teaspoon baking soda
- 1 teaspoon white vinegar
- 8 ounces cream cheese, softened
- 8 ounces unsalted butter, softened
- 2 cups powdered sugar
- 2 teaspoons pure vanilla extract
Instructions
- Preheat your oven to 350°F (175°C). Prepare two 9-inch round cake pans by greasing them lightly and dusting with flour. Set them aside.
- In a medium bowl, whisk together the flour and cocoa powder until well combined.
- In a large mixing bowl, beat the softened butter and granulated sugar with an electric mixer on medium speed for about 3 minutes, until light and fluffy.
- Add the eggs one at a time, beating well after each addition. Then mix in the vanilla extract.
- Gradually add the flour mixture to the creamed butter, alternating with the buttermilk. Begin and end with the flour mixture. Stir just until combined—do not overmix.
- Add a dash of purple liquid food coloring to the batter. Stir gently until the color is evenly distributed, adjusting to your desired shade.
- In a small bowl, mix the baking soda and vinegar. It will fizz slightly. Quickly fold this mixture into the batter for a light, airy texture.
- Divide the batter evenly between the prepared cake pans. Use a spatula to level the tops. Bake in the preheated oven for 25-30 minutes, or until a toothpick inserted in the center comes out clean.
- Allow the cakes to cool in the pans for 10 minutes. Then transfer them to a wire rack to cool completely before frosting.
- In a large bowl, beat the softened cream cheese and butter together until smooth and creamy. Gradually add the powdered sugar, one cup at a time, beating until light and fluffy. Stir in the vanilla extract.
- Place one cake layer on a serving plate and spread a generous layer of frosting on top. Position the second cake layer over it and frost the top and sides evenly.
- Garnish with edible flowers, purple sugar sprinkles, or a dusting of cocoa powder for an elegant finish.
FAQs
How do I get the vibrant purple color in this cake?
Use a high-quality gel food coloring for the most intense and stable purple hue. Liquid coloring can alter the batter’s consistency and produce a duller color. The rich purple is a signature feature of this Decadent Royal Purple Velvet Cake.
Can I make this cake ahead of time?
Yes, you can bake the layers a day in advance. Wrap them tightly in plastic wrap once completely cool and store at room temperature. Frost and assemble the Decadent Royal Purple Velvet Cake the day you plan to serve it for the freshest presentation.
What is the best frosting to pair with this cake?
A classic cream cheese frosting complements the subtle cocoa flavor perfectly. For a lighter option, a whipped white chocolate ganache also works well. Either choice enhances the luxurious experience of this impressive dessert.

One Comment