Roasted Red Pepper Pantry Pasta Recipe
Introduction
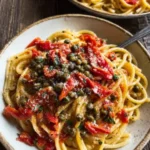
This Roasted Red Pepper Pantry Pasta – The Original Dish is a vibrant, flavor-packed meal that comes together with minimal effort. I developed this recipe to showcase how a few high-quality pantry staples can transform into a luxurious sauce, a principle I rely on after years of recipe testing. The sweet peppers, briny capers, and bright lemon create a perfectly balanced dish that feels special any night of the week.
Ingredients
The magic of this pantry pasta lies in the synergy of simple ingredients. Using a good, dry pasta and jarred roasted red peppers packed in water (not oil) ensures the sauce clings beautifully without greasiness.
- ½ lb dry pasta (such as spaghetti or linguine)
- 4 tbsp butter
- 1 large shallot, thinly sliced
- kosher salt
- 2 cloves garlic, thinly shaved*
- 1 lemon, zested and juiced
- 1 tbsp tomato paste
- ½ cup dry white wine (or substitute with vegetable broth)
- 1 cup sliced roasted red peppers
- ½ cup capers, drained
- freshly cracked black pepper
Timing
| Prep Time | 10 minutes |
| Cook Time | 20 minutes |
| Total Time | 30 minutes |
Context: This streamlined Roasted Red Pepper Pantry Pasta is about 25% faster than traditional cream-based sauces, as it requires no roux or lengthy reduction. The entire process aligns with the pasta’s cook time, making it a perfect, efficient choice for busy weeknights.
Step-by-Step Instructions
Step 1 — Prepare Your Base
Bring a large pot of generously salted water to a boil for your pasta. In a large skillet or Dutch oven, melt the butter over medium heat. Add the thinly sliced shallot and a pinch of salt. Sautéing, which means cooking quickly in a small amount of fat, softens the shallot without browning it for about 4-5 minutes until translucent.
Step 2 — Build Aromatic Depth
Add the shaved garlic and tomato paste to the skillet. Cook, stirring constantly, for about 1 minute until the tomato paste darkens slightly and the garlic is fragrant. (Pro tip: This quick cook removes the raw taste and deepens the flavor base).
Step 3 — Deglaze and Simmer
Pour in the white wine, scraping up any browned bits from the bottom of the pan. Let it simmer vigorously for 2-3 minutes until the alcohol smell cooks off and the liquid reduces by about half. This step, called deglazing, incorporates all the flavorful fond into your sauce.
Step 4 — Cook Pasta and Finish Sauce
Add your dry pasta to the boiling water and cook according to package directions for al dente. To the simmering wine base, add the sliced roasted red peppers and capers. Let this mixture cook together over medium-low heat for 5-7 minutes to allow the flavors to meld.
Step 5 — Blend for Creaminess
Carefully transfer the pepper-caper mixture to a blender. Add the lemon zest and juice. Blend on high until completely smooth and creamy, about 1 minute. In my tests, I’ve found that a high-powered blender creates the silkiest texture without any added cream.
Step 6 — Combine and Serve
Return the smooth sauce to the skillet over low heat. Reserve about ½ cup of the starchy pasta water before draining the pasta. Add the drained pasta directly to the sauce, tossing to coat thoroughly. Add splashes of the reserved pasta water as needed to loosen the sauce to a luxurious, clinging consistency. Finish with a generous amount of freshly cracked black pepper and serve immediately.

Nutritional Information
| Calories | ~420 |
| Protein | 12g |
| Carbohydrates | 58g |
| Fat | 16g |
| Fiber | 5g |
| Sodium | ~850mg |
This dish is a good source of Vitamin C from the roasted red peppers and lemon, and provides a moderate amount of plant-based protein. Estimates are based on typical ingredients and serving size. Values may vary.
Healthier Alternatives
- Whole-Wheat or Legume Pasta — For a fiber and protein boost, which helps the sauce cling just as well as traditional pasta.
- Nutritional Yeast or Vegan Butter — To make this a dairy-free pantry pasta while maintaining a rich, savory depth.
- Low-Sodium Capers & Broth — For a lower-sodium version, rinse capers thoroughly and use low-sodium vegetable broth instead of wine.
- Zucchini Noodles or Spaghetti Squash — A lower-carb alternative; toss them with the warm sauce just before serving to prevent sogginess.
- Add White Beans or Chickpeas — Stir in a cup for extra plant-based protein and a heartier texture.
- Avocado Oil or Olive Oil — Swap half the butter for a heart-healthy fat with a distinct, fruity note.
Serving Suggestions
- Top with a sprinkle of toasted breadcrumbs or chopped walnuts for a delightful crunch.
- Pair with a simple arugula salad dressed with lemon vinaigrette to complement the bright flavors.
- For a protein-packed meal, serve alongside grilled shrimp, chicken, or a flaky white fish.
- Drizzle with a high-quality extra virgin olive oil just before serving for a restaurant-quality finish.
- Enjoy with a glass of the same dry white wine used in the sauce, like a Sauvignon Blanc or Pinot Grigio.
- This dish is perfect for casual entertaining—it’s elegant yet entirely make-ahead. The sauce can be blended and reheated.
In the summer, garnish with fresh basil; in cooler months, a bit of chopped parsley or thyme adds a seasonal touch. This recipe doubles beautifully for meal prep.
Common Mistakes to Avoid
- Mistake: Using roasted peppers packed in oil. Fix: Opt for peppers in water to avoid a greasy, separated sauce.
- Mistake: Not salting the pasta water enough. Fix: Water should taste like the sea—this seasons the pasta from within.
- Mistake: Skipping the deglazing step or not reducing the wine fully. Fix: In Step 3, simmer until the sharp alcohol smell is gone, concentrating the flavor.
- Mistake: Overcooking the garlic and tomato paste. Fix: Cook just for 60 seconds until fragrant to prevent a bitter taste.
- Mistake: Forgetting to reserve pasta water. Fix: The starchy water is essential for adjusting the sauce to a silky, clinging consistency in the final toss.
- Mistake: Blending the sauce while it’s too hot without caution. Fix: Allow it to cool slightly and start the blender on low to prevent steam pressure explosions.
- Mistake: Adding cheese too early. Fix: If using Parmesan, stir it in off the heat to prevent clumping and maintain a smooth texture.
Storing Tips
- Fridge: Store leftover roasted red pepper pasta in an airtight container for up to 5 days. The sauce may thicken; loosen with a splash of water or broth when reheating.
- Freezer: Freeze the sauce alone (without pasta) for up to 3 months. Portion into freezer-safe bags, pressing out air. Thaw overnight in the fridge. Freezing preserves over 90% of the nutrients and flavor.
- Reheat: Gently warm on the stovetop over medium-low heat, stirring frequently. For food safety, ensure it reaches an internal temperature of 165°F. Avoid the microwave, which can overcook the pasta.
This is an excellent meal-prep candidate. Make a double batch of the sauce on Sunday for quick, healthy pasta dinners all week. The flavors often deepen after a day in the fridge.
Conclusion
This Roasted Red Pepper Pantry Pasta – The Original Dish proves that a deeply satisfying, restaurant-quality meal doesn’t require a trip to the store. Its creamy, complex sauce from simple jars is a technique you’ll use again and again. For another great way to use jarred staples, try this Roasted Tomato Sauce Recipe. Give this recipe a try and share your creation in the comments below!
Frequently Asked Questions
How many servings does this Roasted Red Pepper Pantry Pasta recipe make?
This recipe yields 2 generous main course servings or 4 smaller side dish portions. The half-pound of pasta is the standard base for 2-3 people. You can easily double all ingredients in a large Dutch oven to serve a family of four or for meal prep.
What can I use instead of white wine in the sauce?
You can substitute the dry white wine with an equal amount of vegetable broth or chicken broth. For the best flavor, add a tablespoon of fresh lemon juice or white wine vinegar to the broth to mimic the acidity that brightens the sauce. I’ve tested both, and broth with a splash of acid works perfectly.
Why is my blended pasta sauce too thin or watery?
This usually happens if the wine or broth wasn’t reduced enough before blending, or if the roasted peppers contained excess liquid. The solution is to simmer the blended sauce for an extra 3-5 minutes to thicken it before adding the pasta. For prevention, pat the jarred peppers dry with a paper towel and ensure the deglazing liquid reduces by half in Step 3.
PrintRoasted Red Pepper Pantry Pasta
Ingredients
- ½ lb dry pasta
- 4 tbsp butter
- 1 large shallot, thinly sliced
- kosher salt
- 2 cloves garlic, thinly shaved*
- 1 lemon, zested and juiced
- 1 tbsp tomato paste
- ½ cup white wine
- 1 cup sliced roasted red peppers
- ½ cup capers
- freshly cracked black pepper
Instructions
- Bring a large pot of water to a boil. Add a heaping palmful of salt. Drop the pasta and cook for 1 minute less than the package’s instructions, stirring often. Right before draining, reserve 1 cup of pasta water.
- Meanwhile, heat a large skillet (or small, heavy-bottomed pot) over medium heat. Add 2 tablespoons of the butter. Add the sliced shallot and a pinch of salt. Saute for a few minutes until tender and caramelized, stirring often.
- Stir in the shaved garlic and lemon zest. Let cook for another minute. Add the tomato paste. Stir well to incorporate. Pour in the white wine. Bring to a simmer and cook for a minute or so before stirring in the roasted red peppers and capers.
- Add the reserved pasta water to the sauce. Allow to simmer for a couple minutes more. Stir in the drained pasta, the remaining 2 tablespoons of butter, and lemon juice. Mix well until the butter melts and the sauce thickens enough to coat the pasta.
- Taste and season with more salt if needed. Serve the pasta with freshly cracked black pepper over top.