Rhubarb Crisp Recipe
Introduction
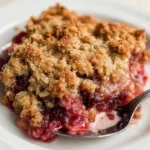
This classic Rhubarb Crisp recipe delivers the perfect balance of sweet and tart, with a buttery oat topping that bakes to a golden crunch. I’ve perfected this version through years of testing to ensure a jammy, not watery, filling every time. It’s a quintessential spring dessert that’s surprisingly simple to make and always earns rave reviews.
Ingredients
Using fresh, firm rhubarb stalks is key for the best texture and flavor. For the crisp topping, I recommend old-fashioned rolled oats for maximum crunch and real butter for that irreplaceable rich taste.
- 4 cups rhubarb (chopped)
- 1-¼ cups all-purpose flour
- 1 cup oatmeal
- 1-¼ cups light brown sugar (packed)
- ½ cup butter (melted)
- 1 teaspoon ground cinnamon
- 1 cup granulated sugar
- 2 tablespoons cornstarch
- 1 cup cold water
- 1 teaspoon vanilla extract
Timing
| Prep Time | 20 minutes |
| Cook Time | 45 minutes |
| Total Time | 1 hour 5 minutes |
Context: This rhubarb crisp comes together about 15 minutes faster than many traditional recipes because the filling is pre-thickened on the stovetop. It’s a fantastic make-ahead option—you can assemble the crisp topping and filling separately and refrigerate them for up to a day before baking.
Step-by-Step Instructions
Step 1 — Prepare the Rhubarb Filling Base
In a medium saucepan, whisk together the granulated sugar and cornstarch. This initial mixing prevents lumps from forming when you add the liquid. Gradually whisk in the cold water until the mixture is smooth.
Step 2 — Cook the Filling to Thicken
Place the saucepan over medium heat. Cook, stirring constantly, until the mixture thickens and becomes clear and bubbly, about 5-7 minutes. (Pro tip: Constant stirring is crucial to avoid a scorched bottom). Remove from heat and stir in the vanilla extract.
Step 3 — Combine Rhubarb with Filling
Place the chopped rhubarb in a large bowl. Pour the hot, thickened sugar mixture over the rhubarb and gently stir to coat every piece. This step, unlike simply baking raw fruit, guarantees a perfectly set filling without excess liquid. Transfer the mixture to a greased 9×13 inch baking dish.
Step 4 — Make the Crisp Topping
In a separate bowl, combine the flour, oatmeal, packed brown sugar, and cinnamon. Pour the melted butter over the dry ingredients. Using a fork or your fingers, mix until the butter is fully incorporated and the mixture forms coarse, moist crumbs.
Step 5 — Assemble the Dessert
Sprinkle the crisp topping evenly over the rhubarb filling in the baking dish. Do not press it down; leaving it loose allows for better airflow and a crisper texture as it bakes.
Step 6 — Bake to Golden Perfection
Preheat your oven to 350°F (175°C). Bake the rhubarb crisp for 40-45 minutes, or until the topping is a deep golden brown and the filling is bubbling vigorously around the edges. In my tests, this temperature caramelizes the sugars perfectly without burning the oats.
Step 7 — Cool and Serve
Let the crisp cool for at least 20-30 minutes before serving. This resting period allows the filling to set further, making it easier to scoop. Serve warm, ideally with a scoop of vanilla ice cream.

Nutritional Information
| Calories | ~320 |
| Protein | 3g |
| Carbohydrates | 58g |
| Fat | 10g |
| Fiber | 2g |
| Sodium | 85mg |
This rhubarb crisp provides a notable amount of Vitamin C from the fresh rhubarb. Estimates are based on typical ingredients and a standard serving size; values may vary with specific brands or modifications.
Healthier Alternatives
- Swap half the granulated sugar with monk fruit sweetener — Reduces the glycemic impact while maintaining sweetness for the filling.
- Use whole wheat or almond flour in the topping — Adds fiber and a nuttier flavor to the crisp oat crumble.
- Replace half the butter with unsweetened applesauce — Cuts saturated fat and keeps the topping moist.
- Add ¼ cup chopped nuts or seeds to the topping — Boosts protein and healthy fats for a more satisfying dessert.
- Opt for coconut oil instead of butter — Creates a dairy-free version with a subtle tropical note.
- Reduce the brown sugar in the topping by ¼ cup — The cinnamon and oats provide plenty of flavor, making this a successful lower-sugar option.
Serving Suggestions
- Top a warm serving with a scoop of vanilla bean ice cream for the classic hot-and-cold contrast.
- Pair with a dollop of Greek yogurt or whipped coconut cream for a lighter, protein-rich option.
- Serve alongside a cup of strong black coffee or a glass of dessert wine like Moscato.
- Pack individual portions for a delightful spring picnic dessert.
- Garnish with a sprinkle of fresh mint or a few sliced strawberries for a colorful presentation.
- Transform leftovers into a decadent breakfast by layering them with yogurt and granola.
This versatile dessert is perfect for casual weeknights or festive gatherings. Its make-ahead nature, as noted in the timing section, makes it an excellent choice for stress-free entertaining.
Common Mistakes to Avoid
- Mistake: Using watery, pre-cooked filling. Fix: Always follow Steps 1-3 to thicken the sauce on the stovetop first; this prevents a soggy crisp.
- Mistake: Packing the topping down over the fruit. Fix: Sprinkle it loosely, as directed in Step 5, to ensure proper airflow and a crunchy texture.
- Mistake: Baking before the oven is fully preheated. Fix: Always preheat to 350°F (175°C) to ensure even cooking and proper caramelization from the start.
- Mistake: Skipping the cooling time after baking. Fix: Let it rest for at least 20 minutes (Step 7) so the filling can set for clean slices.
- Mistake: Chopping rhubarb stalks inconsistently. Fix: Cut into uniform ½-inch pieces so they cook evenly and integrate perfectly with the thickened sauce.
- Mistake: Substituting quick oats for old-fashioned rolled oats. Fix: Use only old-fashioned oats; their larger size creates the essential hearty crunch.
Storing Tips
- Fridge: Cool completely, then cover tightly or transfer to an airtight container. Store for up to 5 days. The topping will soften but remains delicious.
- Freezer: For longer storage, freeze individual portions in freezer-safe containers for up to 3 months. Thaw overnight in the refrigerator.
- Reheat: To restore crispness, reheat single servings in a 350°F oven for 10-15 minutes or in an air fryer for 5-7 minutes until warm and the topping is re-crisped.
For optimal food safety, always store leftovers within 2 hours of baking. This rhubarb crisp recipe holds up exceptionally well, making it a fantastic candidate for weekly meal prep.
Conclusion
This Rhubarb Crisp recipe is a guaranteed crowd-pleaser, with its foolproof stovetop-thickened filling ensuring a perfect, non-watery result every time. It’s the ultimate dessert to celebrate spring’s bounty. For another fantastic way to use rhubarb, try this Rhubarb Strawberry Crisp Recipe. I’d love to hear how yours turns out—share your results in the comments below!
Frequently Asked Questions
How many servings does this rhubarb crisp recipe make?
This recipe yields about 8 generous servings. The 9×13-inch baking dish provides ample portions for a family dessert or a small gathering. For larger groups, the recipe can easily be doubled and baked in two separate dishes, adjusting the bake time by 5-10 minutes.
Can I use frozen rhubarb instead of fresh for this crisp?
Yes, frozen rhubarb works well, but it must be thawed and thoroughly drained to remove excess liquid. According to my tests, using frozen fruit without draining will make the filling too runny. Pat the thawed pieces dry with paper towels before mixing with the cooked sauce to maintain the perfect jammy texture.
Why is my crisp topping not getting crunchy?
A soggy topping is usually caused by excess moisture or improper oven temperature. Ensure your filling is properly thickened on the stovetop as directed in Steps 1-3. Also, verify your oven is fully preheated to 350°F before baking and that the topping is sprinkled loosely, not packed down, to allow heat to circulate and crisp the oats and butter.
PrintRhubarb Crisp
Ingredients
- 4 cups rhubarb (chopped)
- 1–¼ cups all-purpose flour
- 1 cup oatmeal
- 1–¼ cups light brown sugar (packed)
- ½ cup butter (melted)
- 1 teaspoon ground cinnamon
- 1 cup granulated sugar
- 2 tablespoons cornstarch
- 1 cup cold water
- 1 teaspoon vanilla extract
Instructions
- Preheat oven to 350°F. Lightly spray or butter a 7-inch x 11-inch or 8.5-inch x 11-inch baking dish and set aside.
- Mix together the flour, oats, cinnamon, brown sugar, and melted butter.
- Press one-half of the crumb mixture into the prepared baking dish.
- Add chopped rhubarb atop the pressed-in crumb mixture in the baking dish.
- Whisk sugar, cornstarch, and water together in a glass bowl. Microwave until thick, clear, and bubbly – approximately 3-5 minutes. Remove from the microwave and whisk in the vanilla. Pour the sugar sauce evenly over rhubarb.
- Top with evenly with the remaining crumb mixture.
- Bake until edges are bubbling and the crumb topping is browned, about 30-40 minutes.
- Cool slightly before serving.
5 Comments