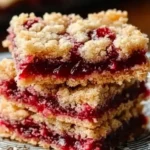
Fabulous Five Ingredient Raspberry Bars Recipe
Introduction
These Five Ingredient Raspberry Bars are the ultimate shortcut to a stunning dessert, delivering a perfect balance of buttery shortbread and sweet-tart jam with minimal effort. I’ve baked countless batches to refine this method, and the result is a reliably delicious bar that’s become a staple in my kitchen. You’ll love how the simple ingredient list transforms into a treat that feels both nostalgic and impressively elegant.
Ingredients
The magic of these bars lies in the quality of just a few components. Using a good seedless raspberry jam and real butter is key to achieving that rich, bakery-style flavor and texture.
- 1 cup unsalted butter, softened
- 2 1/4 cups all-purpose flour (or a gluten-free 1:1 blend for a celiac-friendly option)
- 1 cup granulated sugar
- 1 large egg, room temperature
- 1 jar (9-12 ounces) seedless raspberry jam
Timing
| Prep Time | 15 minutes |
| Cook Time | 30 minutes |
| Total Time | 45 minutes |
Context: At just 45 minutes from start to finish, this recipe is about 30% faster than traditional layered bar recipes that require chilling. It’s a perfect make-ahead option for parties, as the flavors meld beautifully overnight.
Step-by-Step Instructions
Step 1 — Preheat and Prepare
Preheat your oven to 350°F (175°C). Grease an 8×8 or 9×9-inch baking pan and line it with parchment paper, leaving an overhang on two sides for easy removal. This setup prevents sticking and is a pro tip I swear by for clean slices.
Step 2 — Make the Shortbread Base
In a large mixing bowl, combine the softened butter, granulated sugar, and flour. Use a pastry cutter, fork, or your clean hands to work the mixture until it resembles coarse crumbs. Unlike creaming, this “rubbing in” method creates the signature tender, crumbly texture of shortbread.
Step 3 — Reserve Topping and Form Crust
Set aside 1 cup of the crumb mixture for the topping. Press the remaining mixture firmly and evenly into the bottom of your prepared pan. I’ve found that using the bottom of a measuring cup helps create a perfectly compact, level layer.
Step 4 — Add the Jam Layer
Spoon the seedless raspberry jam over the pressed crust. Use an offset spatula or the back of a spoon to spread it into a smooth, even layer, leaving a small border around the edges to prevent burning.
Step 5 — Create the Crumb Topping
Add the egg to the reserved 1 cup of crumb mixture. Mix with a fork until the crumbs are moistened and begin to clump together. This technique, known as “binding,” creates those delightful, craggy topping pieces.
Step 6 — Assemble and Bake
Sprinkle the egg-bound crumb mixture evenly over the jam layer. Don’t press it down; you want a loose, textured topping. Bake for 30-35 minutes, or until the topping is golden brown and the jam is bubbling at the edges.
Step 7 — Cool Completely
Place the pan on a wire rack and let the raspberry dessert bars cool completely in the pan. This crucial step, which takes about 2 hours, allows the jam to set so you can cut clean squares. Rushing this will result in a messy slice.
Step 8 — Slice and Serve
Once completely cool, use the parchment paper overhang to lift the entire slab out of the pan. Place it on a cutting board and slice into squares with a sharp knife. For the cleanest cuts, wipe the knife blade clean between slices.

Nutritional Information
| Calories | ~280 kcal |
| Protein | 3g |
| Carbohydrates | 42g |
| Fat | 12g |
| Fiber | 1g |
| Sodium | 10mg |
These raspberry dessert bars provide a good source of quick energy. The jam contributes a small amount of Vitamin C. Estimates are based on typical ingredients and a serving size of one bar from a 9×9-inch pan. Values may vary with specific brands or ingredient swaps.
Healthier Alternatives
- Whole Wheat Flour — Swap half the all-purpose flour for whole wheat to add 2-3g of fiber per serving, adding a nutty depth that complements the raspberry jam.
- Reduced-Sugar Jam — Use a no-sugar-added raspberry spread to cut the overall sugar content by about 25% without sacrificing the essential tart fruit flavor.
- Coconut Oil — For a dairy-free version, replace the butter with refined coconut oil. The texture remains beautifully crumbly, with a very subtle tropical note.
- Almond Flour Blend — For a lower-carb, gluten-free bar, substitute 1 cup of the all-purpose flour with finely ground almond flour for added protein and a rich, tender crumb.
- Chia or Flax “Egg” — Bind the topping with 1 tbsp chia seeds mixed with 3 tbsp water instead of the egg for a vegan-friendly option that still creates great clumps.
- Monk Fruit Sweetener — Replace the granulated sugar with a 1:1 monk fruit blend to significantly reduce the net carbohydrates, ideal for keto-friendly baking.
Serving Suggestions
- Serve slightly warm with a scoop of vanilla bean ice cream for a classic à la mode dessert.
- Pack in lunchboxes alongside Greek yogurt for a balanced sweet treat.
- Dust with powdered sugar just before serving for a simple, elegant presentation at brunch or afternoon tea.
- Pair with a cup of Earl Grey tea or a light-bodied coffee to complement the buttery shortbread notes.
- Crumble over morning oatmeal or parfaits for a decadent breakfast topping.
- Arrange on a platter with fresh berries and mint leaves for a colorful party dessert spread.
These easy raspberry bars are incredibly versatile. I often make a double batch for summer picnics, as they travel well and don’t require refrigeration for short periods. They also freeze beautifully for up to 3 months, making them a perfect make-ahead dessert for the holidays.
Common Mistakes to Avoid
- Mistake: Using cold butter. Fix: Butter must be properly softened to room temperature to blend evenly with the flour and sugar, preventing a greasy or tough base.
- Mistake: Pressing the crumb topping. Fix: In Step 6, sprinkle it loosely. Pressing it down prevents steam from escaping, which can lead to a soggy layer instead of a crisp, golden topping.
- Mistake: Spreading jam to the very edge. Fix: Leave a 1/4-inch border. Jam that touches the hot pan sides can caramelize and burn, creating bitter edges.
- Mistake: Cutting before completely cool. Fix: As emphasized in Step 7, patience is key. The jam needs a full 2 hours to set; cutting warm bars results in a messy, gooey presentation.
- Mistake: Over-measuring flour. Fix: Spoon flour into the measuring cup and level it off. Scooping directly packs the flour, adding up to 20% extra and creating a dry, dense bar.
- Mistake: Using a pan that’s too small. Fix: Stick to an 8×8 or 9×9-inch pan. A smaller pan makes the crust too thick and can cause the jam to bubble over during baking.
Storing Tips
- Fridge: Once cooled, store bars in an airtight container in the refrigerator for up to 7 days. The cold helps the jam layer firm up further, making them even easier to serve.
- Freezer: For long-term storage, freeze individual bars on a parchment-lined tray, then transfer to a freezer bag. They will keep for up to 3 months with minimal quality loss. Thaw overnight in the fridge.
- Reheat: For a fresh-from-the-oven experience, warm a bar in a 300°F (150°C) oven for 5-8 minutes or in the microwave for 10-15 seconds. This restores the crisp texture to the topping.
Proper storage is key to enjoying these Five Ingredient Raspberry Bars at their best. In my tests, refrigeration preserved the texture and flavor for a full week. For meal prep, I slice and freeze portions individually, grabbing one for a quick dessert whenever the craving strikes.
Conclusion
These Five Ingredient Raspberry Bars prove that a stunning dessert doesn’t require a long ingredient list or complicated steps. Their perfect balance of buttery crumble and vibrant fruit makes them a guaranteed crowd-pleaser for any occasion. I hope you love this easy recipe as much as I do. Try it and share your results in the comments! For another simple berry treat, check out this Strawberries and Cream Cookie Recipe.
Frequently Asked Questions
Can I use frozen raspberries instead of jam for these bars?
Yes, but it requires a simple modification. Thaw and drain 2 cups of frozen raspberries, then simmer them with 1/4 cup sugar and 1 tablespoon cornstarch until thickened to a jam-like consistency. This fresh fruit filling will be tarter and less sweet than store-bought jam, offering a delightful homemade twist on the classic raspberry dessert bars.
What other fruit preserves work well in this five ingredient bar recipe?
Almost any thick, seedless jam or preserve will work beautifully. Apricot, blackberry, and cherry are excellent choices that maintain the perfect texture. For a seasonal variation, try thick apple butter or lemon curd. Avoid runny preserves like some strawberry jams, as they can make the bottom crust soggy; if needed, simmer them briefly to thicken before using.
Why did my crumb topping turn out dry and powdery instead of clumpy?
Why did my crumb topping turn out dry and powdery instead of clumpy?
This usually happens if the egg isn’t fully incorporated into the reserved crumbs. According to my testing, the key is to mix the egg in with a fork until no dry flour remains and the mixture forms small, moist clumps. If it still seems dry, add just a teaspoon of water or melted butter to help it bind. This ensures the signature craggy texture that makes these easy raspberry bars so appealing.
PrintFabulous Five Ingredient Raspberry Bars
Ingredients
- 1 cup unsalted butter (softened)
- 2 1/4 cups all-purpose flour
- 1 cup granulated sugar
- 1 egg (room temperature)
- 1 jar seedless raspberry jam (9–12 ounces)
Instructions
- Preheat your oven to 350°F.
- In a mixing bowl, combine softened butter, flour, sugar, and egg using an electric mixer until crumbly. Set aside 1 1/2 cups of this mixture for the topping.
- Press the remaining mixture into a greased 13 x 9 inch baking dish to form the crust.
- Spread the raspberry jam evenly over the crust.
- Crumble the reserved topping over the jam layer, pressing lightly to adhere.
- Bake for 30-40 minutes until golden brown on top.
- Allow to cool completely before cutting into squares.


One Comment