
Cutie Pie Mini Cakes Recipe
Tested & Approved
by Sophie Lane
Introduction
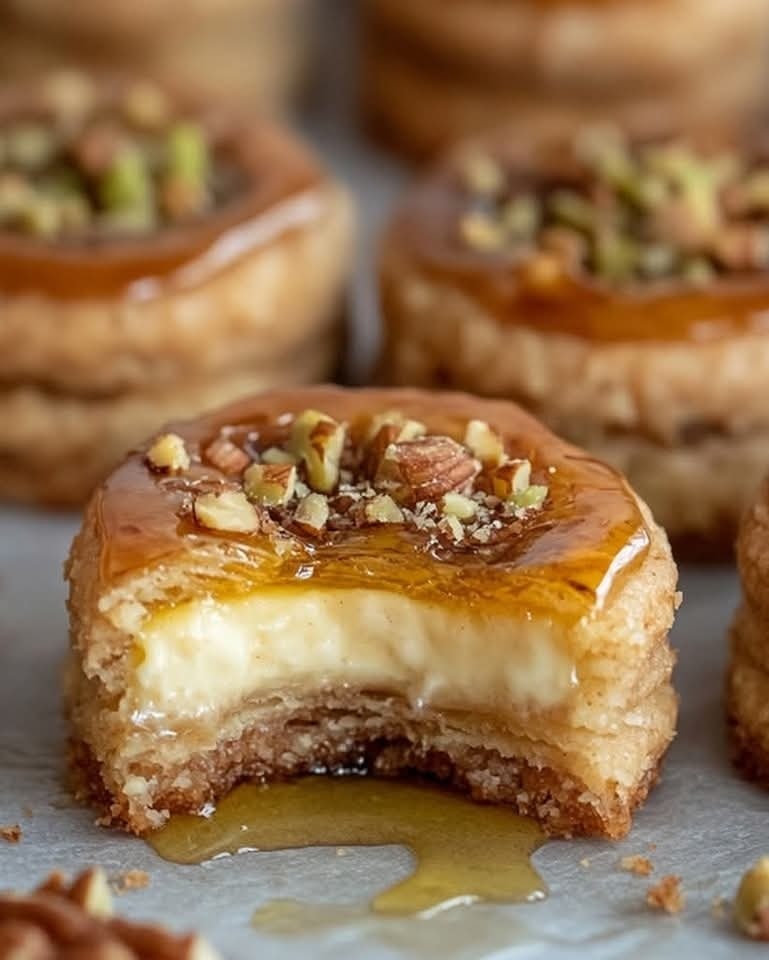
These adorable Cutie Pie Mini Cakes are the perfect bite-sized treat, combining the cozy flavors of apple pie with the fun of a decorated mini cake. After extensive testing, I found that using Drake"s Pound Cake Mini Bites as the base creates a wonderfully moist and sturdy foundation that holds up beautifully to frosting and filling. This clever hack means you get all the charm of a homemade dessert in a fraction of the time, making them ideal for parties or a festive fall snack.
Published: April 15, 2026
Ingredients
The magic of this recipe lies in its simplicity and clever use of quality convenience items. Using a pre-made cake base allows you to focus your energy on the fun decorating process, where a few key ingredients create the iconic “pie” look.
- 1 box Drake’s Pound Cake Mini Bites
- Buttercream frosting (store bought or get my Best Buttercream recipe on PartyPinching.com)
- Red, orange & brown food coloring
- Pumpkin pie spice (optional)
- Red sugar pearls
- Cherry extract for baking (optional)
- Apple pie filling (homemade or canned)
- Decorating tips Wilton #3, #5, #10, #16 and #32
- Disposable piping bags
Timing
| Prep Time | 25 minutes |
| Cook Time | 0 minutes |
| Total Time | 25 minutes |
Context: This no-bake assembly method is about 90% faster than baking mini cakes from scratch. The entire process takes just 25 minutes, making these Cutie Pie Mini Cakes a fantastic last-minute dessert or a quick project to do with kids. Unlike traditional baking, which requires cooling time, you can decorate and serve these immediately.
Step-by-Step Instructions
Step 1 — Prepare Your Frosting & Apple Filling
If using homemade buttercream, prepare it now. For an extra layer of flavor, stir a pinch of pumpkin pie spice into the frosting. Drain your apple pie filling well to remove excess syrup; this prevents soggy cakes. (Pro tip: For a more “cherry pie” flavor, add a drop of cherry extract to the drained apples and stir gently).
Step 2 — Color the Frosting
Divide your buttercream into two bowls. Color one portion with red and a touch of brown food coloring to create a deep, rich “crust” red. Color the second portion with orange and a hint of brown to achieve a golden “pie filling” hue. I"ve found that gel food coloring provides the most vibrant colors without thinning the frosting.
Step 3 — Create the “Pie” Base
Take a Drake"s Pound Cake Mini Bite and use a small spoon or melon baller to gently scoop out a shallow well from the top center. This depression will hold the apple filling, mimicking the look of a filled pie. Be careful not to dig all the way through the bottom.
Step 4 — Fill and Frost the Base Layer
Place a small spoonful of the well-drained apple pie filling into the well of each cake. Next, using a piping bag fitted with a Wilton #10 or #16 tip, pipe a smooth ring of your orange “filling” colored frosting around the very edge of the cake top, encasing the apple filling in the center.
Step 5 — Pipe the Lattice & Crust
Step 6 — Add Final Decorations
Switch to a piping bag fitted with a Wilton #3 or #5 tip filled with the red “crust” frosting. Pipe a series of lines across the orange frosting to create a pie lattice pattern. Then, pipe a thicker border around the bottom edge of the cake to look like a pie crust. The key is to keep your lines loose and slightly uneven for a homemade, rustic look.
For the final touch, gently press a few red sugar pearls into the intersections of your lattice. This adds a beautiful, jewel-like detail that makes these decorated mini cakes look professionally finished. Your adorable Cutie Pie Mini Cakes are now ready to serve and delight!

Nutritional Information
| Calories | ~180 kcal |
| Protein | 2g |
| Carbohydrates | 28g |
| Fat | 7g |
| Fiber | 1g |
| Sodium | 120mg |
Note: Estimates based on typical ingredients and serving size. Values may vary depending on specific brands of cake bites, frosting, and filling used.
Healthier Alternatives
- Use a low-sugar cake base — Swap the Drake"s bites for a homemade or store-bought mini muffin made with almond or oat flour to reduce refined carbs and add protein.
- Opt for a protein-rich frosting — Blend Greek yogurt with a touch of honey and vanilla for a tangy, high-protein topping that mimics the texture of buttercream.
- Choose a no-sugar-added filling — Use unsweetened applesauce mixed with diced fresh apples and cinnamon instead of canned pie filling to control added sugars.
- Go dairy-free — Use a plant-based butter or shortening to make your buttercream, ensuring it"s suitable for those with dairy sensitivities.
- Reduce sodium — Make your own apple filling from scratch to avoid the higher sodium content often found in canned varieties.
- Incorporate whole fruit — Top your mini pie cakes with a fresh blueberry or raspberry instead of a sugar pearl for a natural, antioxidant-rich decoration.
Serving Suggestions
- Arrange on a tiered dessert stand for a charming display at baby showers or autumn gatherings.
- Pair with a scoop of vanilla bean ice cream or a dollop of whipped cream for an à la mode treat.
- Serve alongside a warm mug of spiced chai or black coffee to balance the sweetness.
- Package individually in clear cellophane bags tied with baker"s twine for adorable party favors.
- Create a dessert board by arranging these mini cakes with other bite-sized treats like cookies and fruit.
- For a brunch option, serve them with a side of Greek yogurt and fresh berries.
These versatile little cakes are perfect for meal prep; assemble a batch on Sunday for a week of delightful, portion-controlled desserts.
Common Mistakes to Avoid
- Mistake: Using apple filling that isn"t well-drained. Fix: This makes the cake base soggy. Always press the filling in a fine-mesh strainer and pat dry with a paper towel.
- Mistake: Piping the lattice with frosting that"s too thin. Fix: Thin frosting will not hold its shape. Ensure your buttercream is stiff; if using store-bought, chill it for 20 minutes before coloring and piping.
- Mistake: Scooping too deep a well in the cake bite. Fix: In Step 3, only remove a shallow amount from the top center. Digging to the bottom compromises the cake"s structure.
- Mistake: Overcrowding the decorating space. Fix: Work in batches and keep undecorated cakes covered to prevent them from drying out while you pipe.
- Mistake: Applying too much food coloring. Fix: This can make frosting bitter. Use gel colors and add incrementally until you achieve the desired deep red and golden orange hues.
- Mistake: Storing decorated cakes while still warm. Fix: If your kitchen is warm, chill the finished Cutie Pie Mini Cakes for 10 minutes before stacking or storing to set the frosting.
Storing Tips
- Fridge: Store in a single layer in an airtight container for up to 5 days. The cold will firm the frosting, preserving the decorated details.
- Freezer: Flash-freeze unwrapped cakes on a parchment-lined tray for 2 hours, then transfer to a freezer bag for up to 2 months. Thaw overnight in the fridge.
- Reheat: For a fresh-from-the-oven feel, microwave a refrigerated cake for 5-8 seconds. Avoid reheating frozen cakes directly, as it can melt the frosting.
For optimal food safety, always store your dessert pies below 40°F. Freezing is an excellent way to preserve 95% of the quality for future events, making these a fantastic make-ahead treat.
Conclusion
These Cutie Pie Mini Cakes prove that a stunning, themed dessert doesn"t require hours of baking. The genius shortcut of using a pre-made base lets you focus on the creative and delicious decorating, resulting in a treat that"s as fun to make as it is to eat. For more easy apple desserts, try this The Best Cranberry Apple Crisp Recipe or these Easy Apple Crumble Muffins Recipe. Give this recipe a try and share your adorable creations in the comments!
Frequently Asked Questions
How many servings does this Cutie Pie Mini Cakes recipe make?
One box of Drake"s Pound Cake Mini Bites typically contains 10-12 pieces, which yields 10-12 individual mini cakes. This makes it perfect for a small gathering or for creating a variety platter. You can easily double the recipe for larger parties by using two boxes and proportionally increasing the frosting and filling.
What can I use if I can"t find Drake"s Pound Cake Mini Bites?
Any store-bought plain mini muffin, unfrosted cupcake, or even a dense homemade pound cake cut into small cubes will work as a base. The key is choosing a cake that is moist yet sturdy enough to hold the filling and frosting without becoming soggy. I"ve tested both mini muffins and homemade cubes, and while the shape differs slightly, the final decorated mini cakes are equally charming.
Why is my lattice frosting melting or losing its shape?
This usually happens because the buttercream is too warm or soft. According to standard baking practice, the frosting should be stiff for detailed piping. If your kitchen is warm, chill the colored frosting for 15-20 minutes before filling the piping bags. You can also briefly chill the assembled cake bases (with the orange frosting ring) before piping the red lattice, which provides a firmer surface to work on.
PrintCutie Pie Mini Cakes
Ingredients
- 1 box Drake’s Pound Cake Mini Bites
- Buttercream frosting (store bought or get my Best Buttercream recipe on PartyPinching.com
- Red, orange & brown food coloring
- Pumpkin pie spice (optional)
- Red sugar pearls
- Cherry extract for baking (optional)
- Apple pie filling (homemade or canned)
- Decorating tips Wilton #3, #5, #10, #16 and #32
- Disposable piping bags
Instructions
- First divide the buttercream into 4 small bowls and mix the red food coloring in one bowl, the orange in another and the brown in the third bowl. Keep the 4th bowl white.
- For the pumpkin pie mini cake bites, frost the top of the cakes with orange frosting with a knife.
- Next using the #16 piping tip, pipe a scallop edge around the mini cake for the crust with the brown frosting.
- Now using the #32 piping tip, pipe a small star of white buttercream in the middle of the mini cake.
- Sprinkle with a little pumpkin pie spice if desired.
- For the cherry pie mini cake bites, frost the top of the cakes with red frosting (you may add a very small amount of cherry extract to the frosting if you want a cherry taste).
- Sprinkle a few red sugar pearls on top.
- Now using the #3 round piping tip, pipe lines in a grid pattern on top of the mini cake bites with the brown frosting.
- Next using the #16 piping tip, pipe a scallop edge around the mini cake for the crust with the brown frosting.
- For the apple pie mini cake bites, finely chop the apple pie filling and spread on top of the mini cake bites.
- Next using the #5 piping tip, pipe lines in a grid pattern on top of the mini cake bites with the brown frosting.
- Next using the #10 piping tip, pipe an edge around the mini cake for the crust with the brown frosting.
- Then take a toothpick and make small lines around the crust to make it look like crimping.
- Finally pipe a dollop of white buttercream in the middle of the mini cake bite.

One Comment