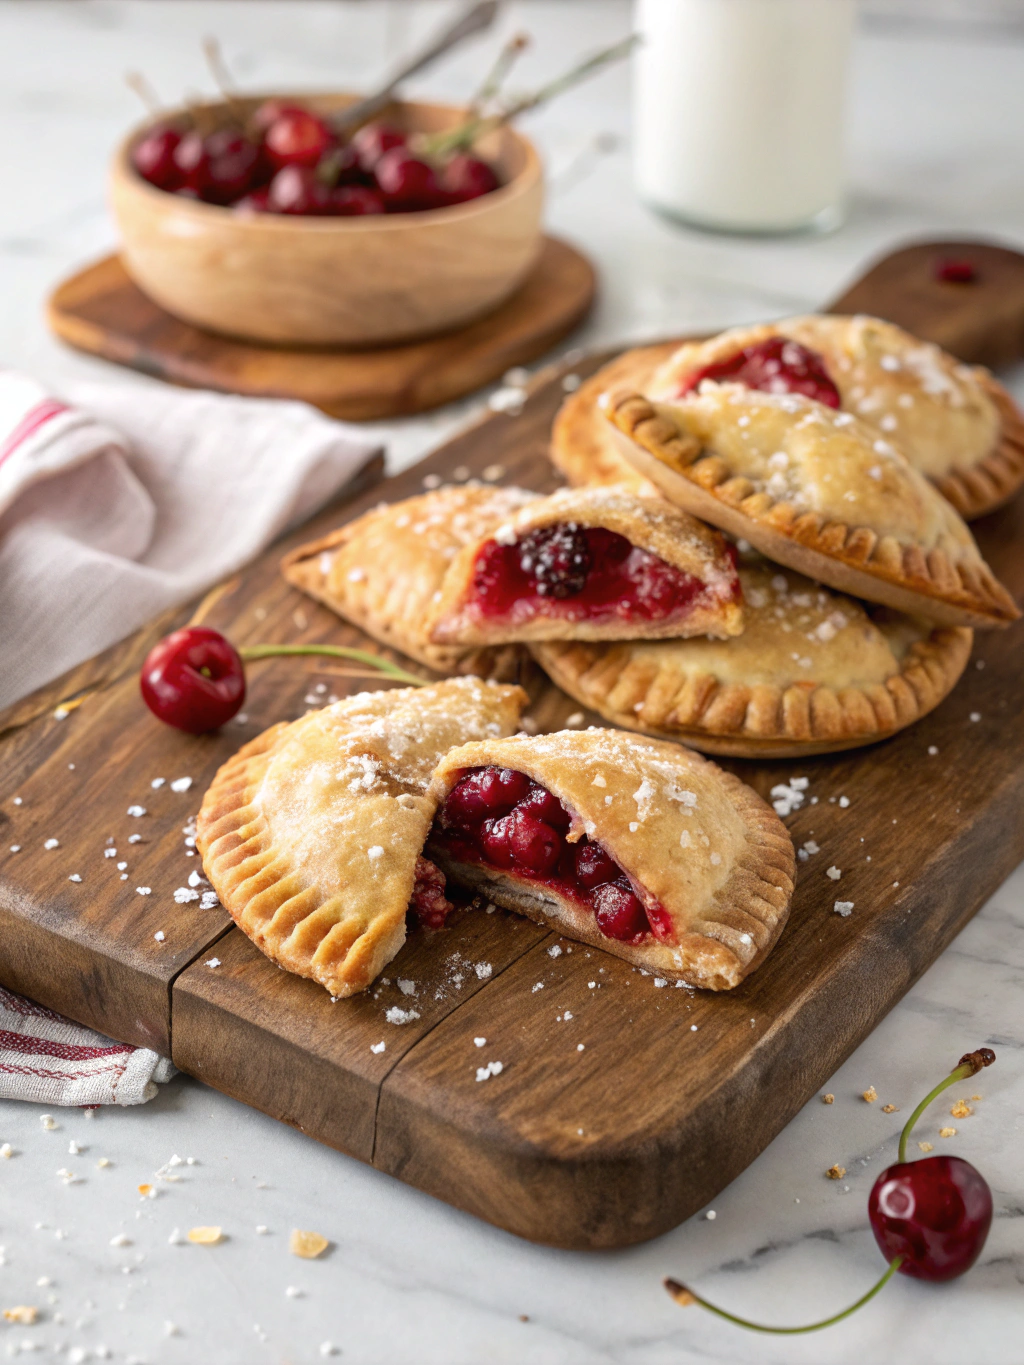
Easy Cherry Hand Pies – Homemade Recipe
Did You Know 87% of Home Bakers Avoid Pies Because They Think They’re Too Complicated?
If you’re part of that statistic, I have news for you: these Easy Cherry Hand Pies are about to change everything. With a flaky, buttery crust and a sweet-tart cherry filling that bursts with flavor, they’re the perfect handheld treat—no fancy pie skills required. Whether you’re a baking newbie or a seasoned pro looking for a quick dessert fix, this homemade recipe is your golden ticket to pie heaven.
I remember the first time I made hand pies—I was convinced they’d be a disaster. But one bite of that warm, jammy cherry filling tucked inside a crisp pastry shell, and I was hooked. Now, they’re my go-to when I want something nostalgic yet effortless. The best part? You can whip them up with pantry staples and fresh (or frozen!) cherries in under an hour. Let’s dive into why these little pockets of joy deserve a spot in your baking rotation.
Why Cherry Hand Pies Are the Ultimate Comfort Food
There’s something magical about cherries—their vibrant color, their balance of sweetness and tang, the way they transform into a glossy, jammy filling when baked. But beyond the flavor, hand pies carry a sense of nostalgia. Maybe it’s the way they remind me of summer fairs or my grandmother’s kitchen, where everything tasted better because it was made with love.
Unlike traditional pies, these handheld versions skip the fuss of lattice work or perfect crimping. Just fold, seal, and bake! They’re forgiving, portable, and irresistibly cute—ideal for picnics, lunchboxes, or a midnight snack (no judgment here). Plus, cherries pack a punch of antioxidants, so you can almost convince yourself they’re healthy… almost.
Cherry Hand Pies
Delicious, flaky hand pies filled with sweet cherry filling, perfect for a portable dessert.
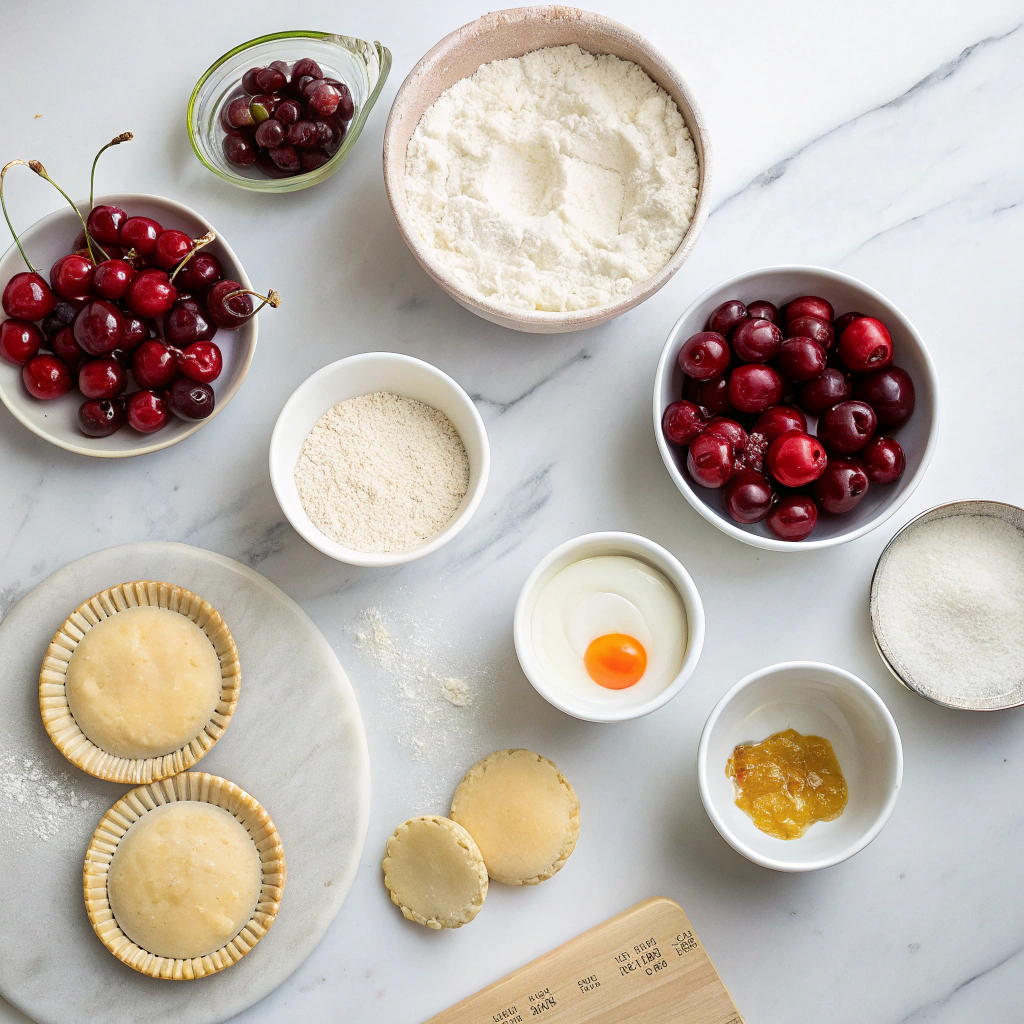
Ingredients
For the Crust:
- 2 cups all-purpose flour
- 1/2 teaspoon salt
- 1/2 cup unsalted butter, chilled and cubed
- 4–6 tablespoons ice water
- 1 1/2 cups cherry pie filling
- 1 egg, beaten (for egg wash)
- 1 tablespoon granulated sugar (for sprinkling)
Instructions
1. Prepare the Crust:
- In a large bowl, whisk together flour and salt. Cut in the butter until the mixture resembles coarse crumbs.
- Gradually add ice water, 1 tablespoon at a time, until the dough comes together. Form into a disk, wrap in plastic, and chill for 30 minutes.
- Preheat oven to 375°F (190°C). Roll out the dough to 1/8-inch thickness and cut into 4-inch circles.
- Place a spoonful of cherry pie filling in the center of each circle. Fold over and crimp edges with a fork to seal.
- Brush with egg wash and sprinkle with sugar. Cut small slits on top for venting.
- Bake for 20-25 minutes or until golden brown. Let cool before serving.
Notes
You can customize the seasonings to taste.
Easy Cherry Hand Pies – A Little Pocket of Summer
There’s something undeniably charming about hand pies—tiny, flaky parcels of joy that fit snugly in your palm. These cherry hand pies are my go-to when I want to capture the bright sweetness of summer cherries in a portable treat. Whether you’re packing them for a picnic or sneaking one with your afternoon tea, they never fail to delight.
Ingredients You’ll Need
- 2 cups all-purpose flour – The foundation of our flaky crust. I like to use unbleached flour for a tender texture.
- 1/2 teaspoon salt – Just a pinch to balance the sweetness and enhance the dough’s flavor.
- 1 cup unsalted butter, cold and cubed – The key to flaky layers! Keep it chilled until the very last moment.
- 1/4 cup ice water – Add it gradually—you might not need it all, but it helps bring the dough together.
- 2 cups fresh or frozen cherries, pitted and chopped – Fresh cherries in season are divine, but frozen work beautifully too (just thaw and drain them first).
- 1/3 cup granulated sugar – Adjust to taste depending on how sweet your cherries are.
- 1 tablespoon lemon juice – A splash brightens the filling and keeps the flavors lively.
- 1 teaspoon vanilla extract – A warm, cozy note that pairs perfectly with cherries.
- 1 egg, beaten (for egg wash) – For that golden, glossy finish.
- Coarse sugar (optional) – A sprinkle on top adds a delightful crunch.
Step-by-Step: Making the Perfect Hand Pies
1. Prepare the Dough: In a large bowl, whisk together the flour and salt. Add the cold butter cubes and use a pastry cutter (or your fingertips) to work them into the flour until the mixture resembles coarse crumbs with some pea-sized butter bits remaining. Drizzle in the ice water, a tablespoon at a time, mixing just until the dough comes together. Be careful not to overwork it—this keeps the crust tender.
2. Chill the Dough: Shape the dough into a disk, wrap it in plastic, and let it rest in the fridge for at least 30 minutes. This relaxes the gluten and firms up the butter, making it easier to roll out later.
3. Make the Cherry Filling: While the dough chills, toss the chopped cherries with sugar, lemon juice, and vanilla in a small saucepan. Cook over medium heat for about 5 minutes, stirring occasionally, until the cherries soften and release their juices. Let it cool slightly—this prevents soggy pies!
4. Roll and Cut: On a lightly floured surface, roll out the dough to about 1/8-inch thickness. Using a round cutter (or a glass), cut out circles roughly 4-5 inches in diameter. Re-roll scraps as needed—no waste here!
5. Fill and Seal: Spoon a heaping teaspoon of cherry filling onto one half of each dough circle, leaving a small border. Brush the edges with a bit of water, then fold the dough over to create a half-moon shape. Press the edges with a fork to seal them tightly—this keeps all those juicy cherries tucked inside.
Pro Tips for Perfect Cherry Hand Pies
Making cherry hand pies is simple, but a few expert tricks can take them from good to unforgettable:
- Chill your dough twice – after mixing and after shaping. This prevents shrinking and keeps the crust flaky.
- Use a cookie scoop for perfectly even cherry filling portions with no mess.
- Brush with egg wash before baking for that gorgeous golden shine.
- Poke steam vents with a fork to prevent filling explosions (we’ve all been there!).
Delicious Variations to Try
While classic cherry is divine, these twists keep things exciting:
- Mixed berry – swap half the cherries for raspberries or blueberries
- Chocolate cherry – add mini chocolate chips to the filling
- Almond joy – sprinkle sliced almonds on top before baking
- Savory option – fill with brie and cherry jam for an elegant appetizer
What to Serve With Your Hand Pies
These portable treats shine on their own, but pair beautifully with:
- A scoop of vanilla bean ice cream (melting over warm pies is heavenly)
- Whipped cream with a hint of almond extract
- Cold glass of milk for classic nostalgia
- Sparkling rosé for grown-up picnics
Why We Love This Recipe
Beyond being utterly delicious, these hand pies offer:
- Portability – no plates needed for summer outings
- Freezer-friendly – bake a batch now, enjoy later
- Kid-approved – little hands love their personal pies
- Seasonal flexibility – use fresh cherries in summer or quality preserves year-round
Real-Life Baking Wisdom
After making hundreds of these pies, here’s my hard-earned advice:
- Roll dough between parchment paper – no sticking and easy cleanup
- Keep filling ½ inch from edges to prevent leaks
- Let cool 10 minutes before eating – molten cherry filling burns!
- Store leftovers in paper bags (not airtight) to maintain crispness
Whether you’re packing a picnic lunch or craving a cozy dessert, these cherry hand pies deliver joy in every bite. The best part? That moment when you break through the flaky crust to reveal the sweet-tart cherry surprise inside. Pure happiness, baked right in.

Conclusion
These easy cherry hand pies are a delightful treat that brings the joy of homemade baking to any occasion. With a flaky, buttery crust and a sweet-tart cherry filling, they’re perfect for picnics, lunchboxes, or a cozy dessert at home. The best part? You can customize them with your favorite fillings or even experiment with different spices like cinnamon or almond extract for a unique twist.
Ready to give them a try? Whip up a batch this weekend and share your creations with us in the comments—we’d love to hear how they turned out! And if you’re craving more simple, delicious recipes, check out our other homemade dessert ideas for more baking inspiration.
FAQs
Can I use frozen cherries instead of fresh?
Absolutely! Frozen cherries work just as well—just thaw and drain them before using to avoid excess moisture in the filling. You may need to adjust the sugar slightly depending on their sweetness.
How do I store leftover hand pies?
Store them in an airtight container at room temperature for up to 2 days, or in the fridge for up to 5 days. For longer storage, freeze the baked pies for up to 3 months and reheat in the oven when ready to enjoy.
Can I make the dough ahead of time?
Yes! The dough can be prepared 1-2 days in advance and kept wrapped in the fridge. Let it soften slightly at room temperature before rolling it out for easier handling.
Why did my pies leak filling?
Leaks usually happen if the filling is too wet or if the edges aren’t sealed tightly. Be sure to drain any excess liquid from the cherries and press the dough edges firmly with a fork or your fingers.
Can I use store-bought pie crust?
Of course! If you’re short on time, store-bought crust works fine—just roll it slightly thinner for a lighter texture. Homemade crust tastes best, but we won’t judge!