
Apple Pie Scones Recipe
Tested & Approved
by Sophie Lane
Introduction
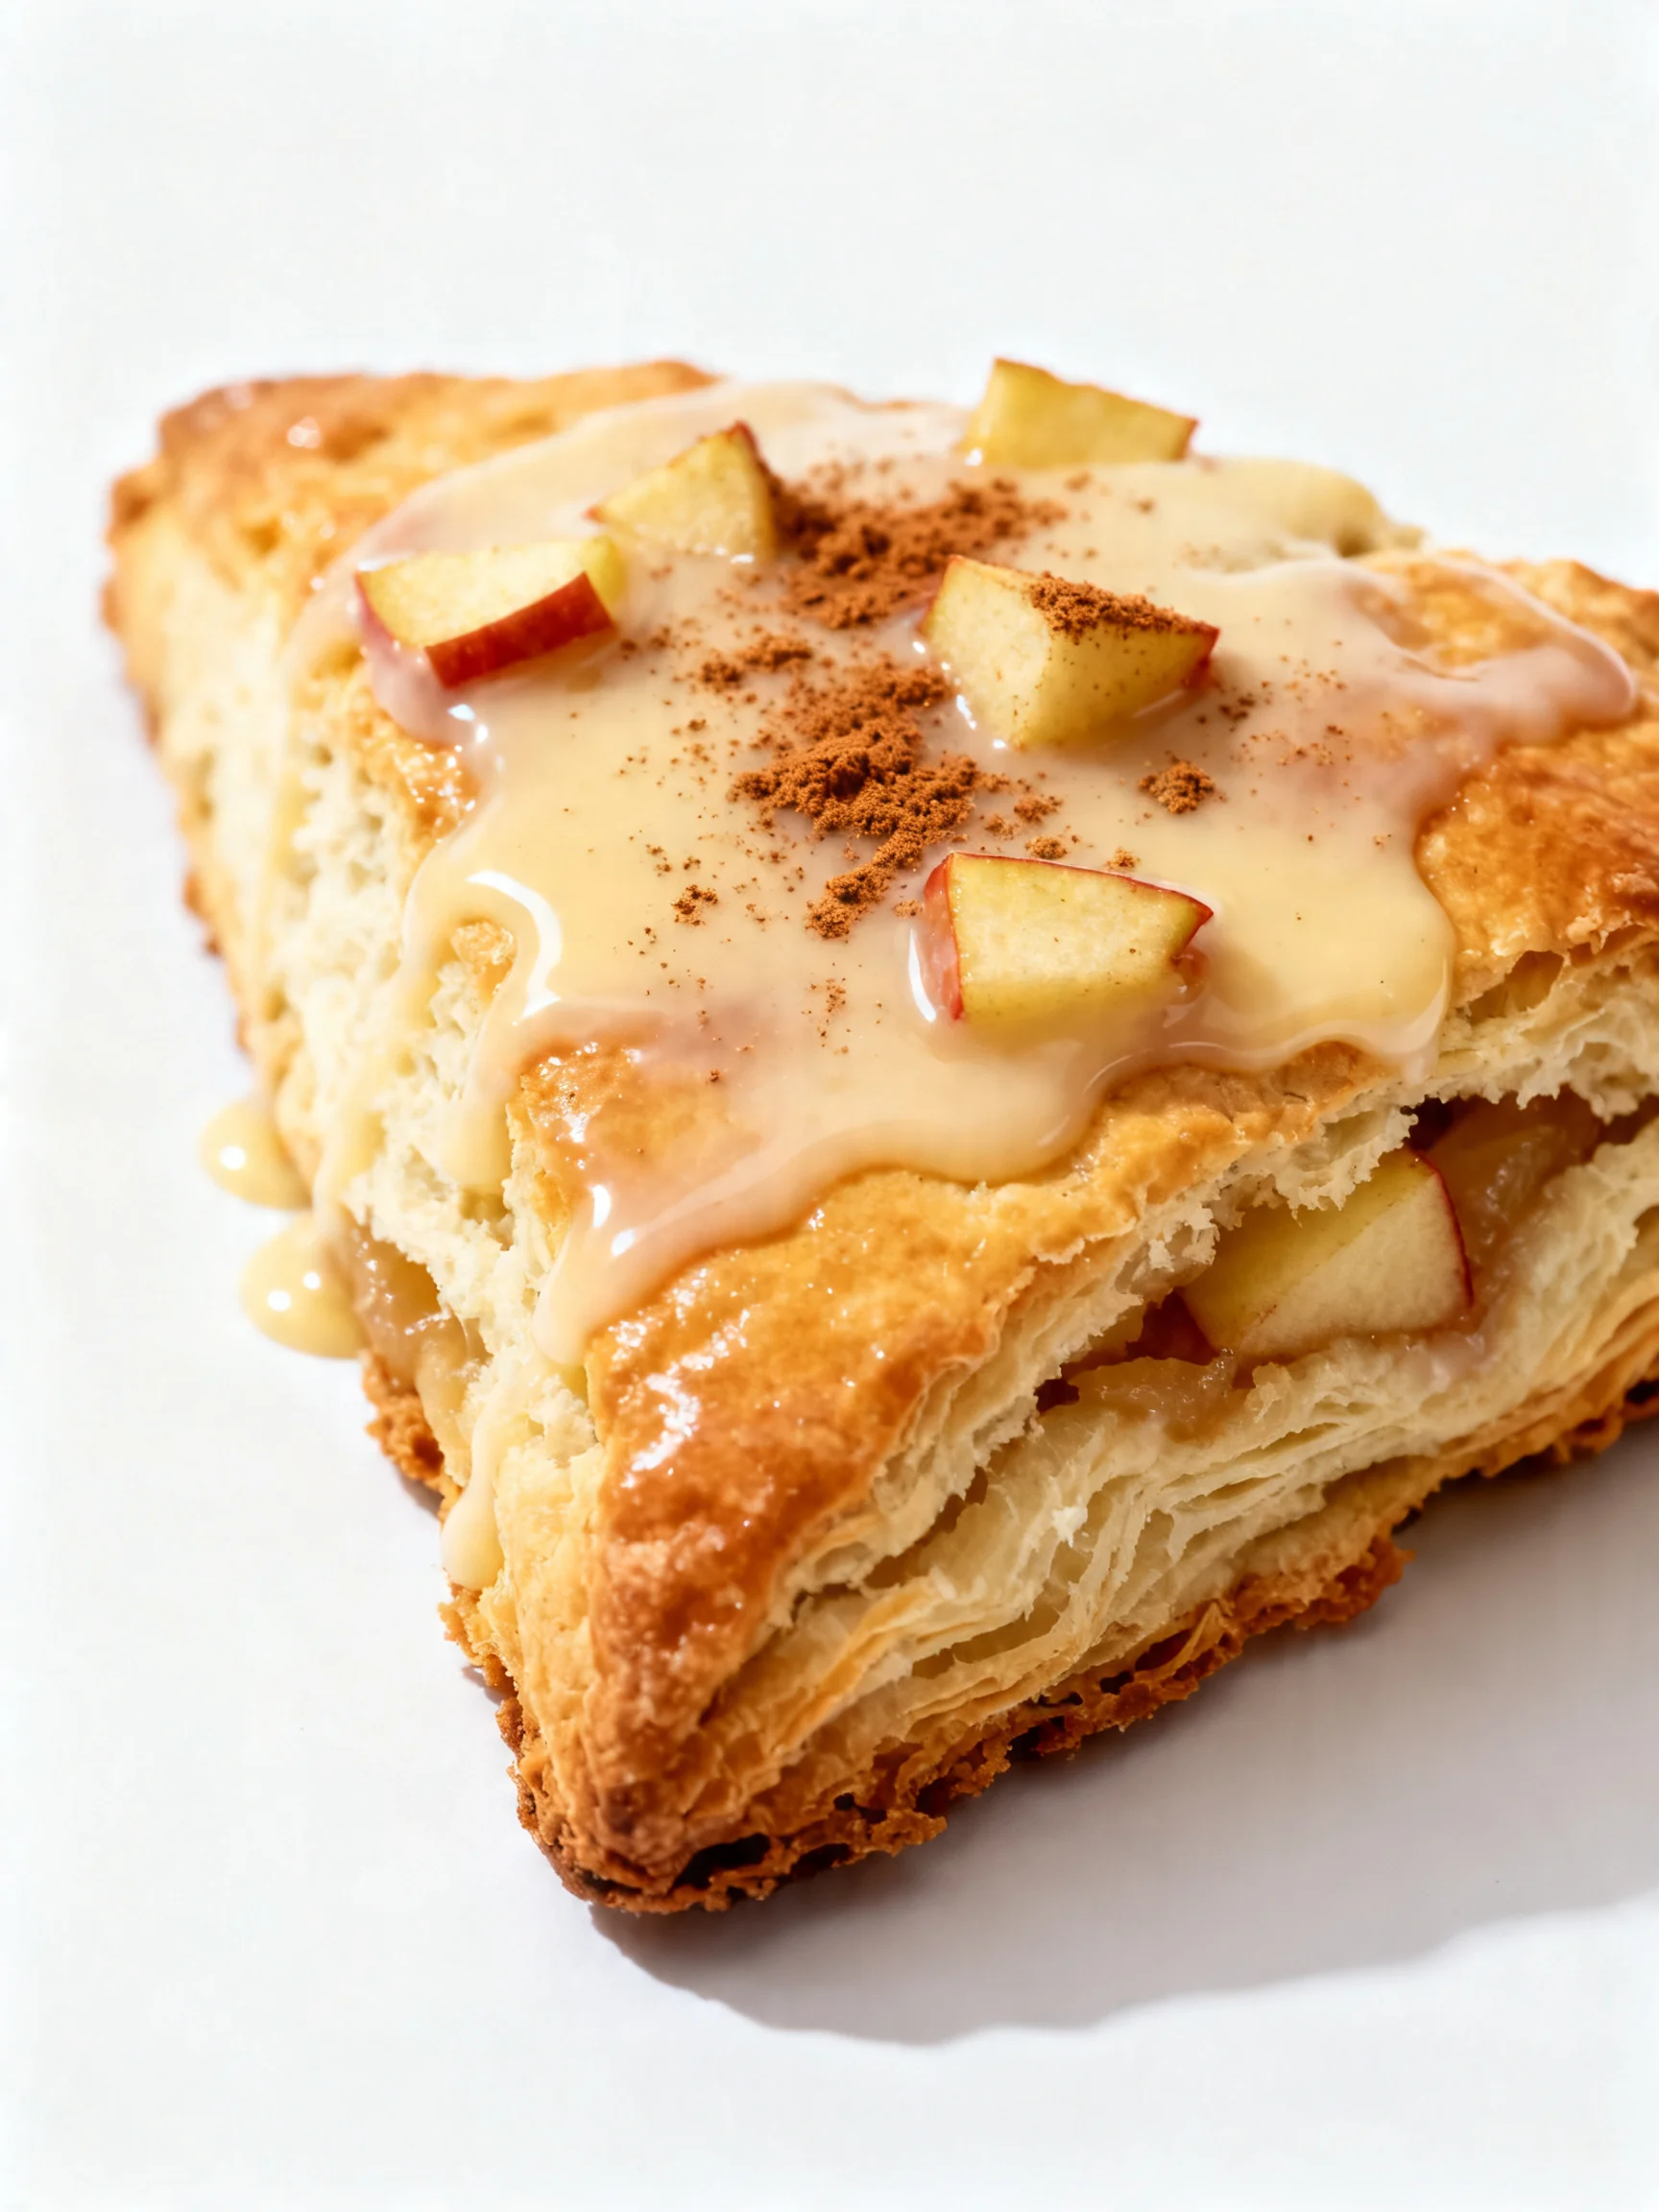
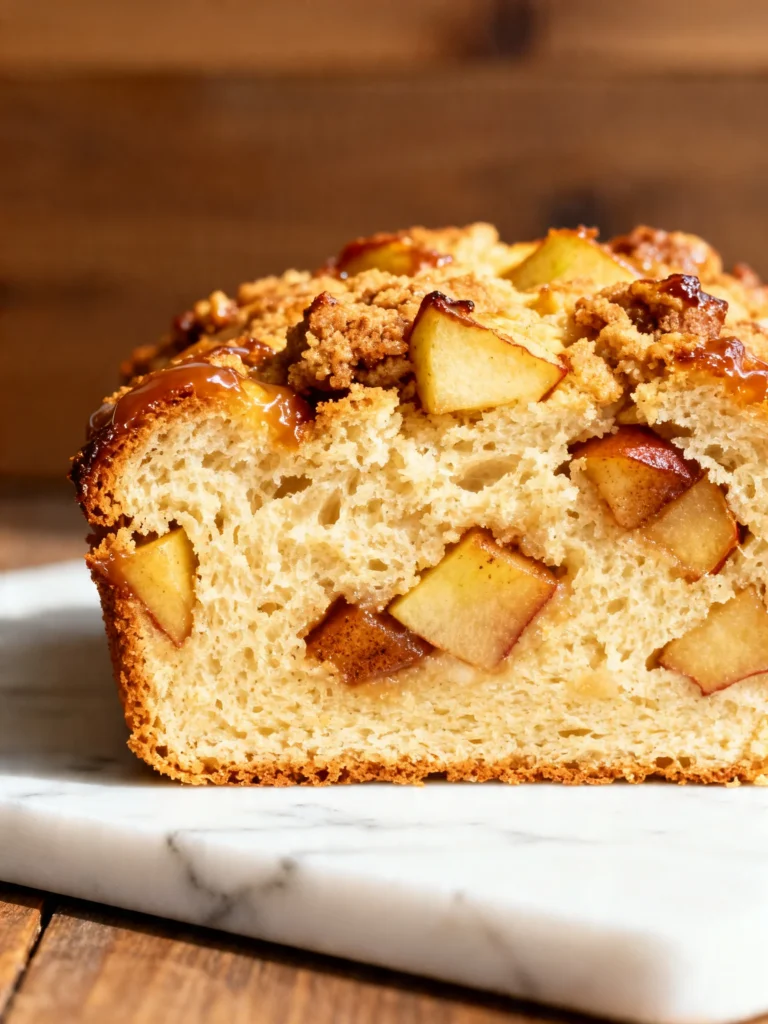
Imagine the warm, spiced aroma of apple pie, but in a tender, flaky scone you can enjoy any time of day. These Apple Pie Scones perfectly capture that cozy dessert feeling, with pockets of cinnamon-spiced apples and a sweet vanilla glaze. After extensive testing, I’ve perfected the method for a scone that’s wonderfully light yet rich, making them a standout treat for brunch or an afternoon snack.
Published: April 16, 2026 Updated: July 9, 2026
Ingredients
The magic of these scones lies in simple, quality ingredients. Using cold, cubed butter is the secret to achieving those irresistible flaky layers, while fresh, finely diced apples provide the perfect tender bite.
- For the Scone Dough:
- 2 cups all-purpose flour (or a 1:1 gluten-free blend)
- 2 Tbsp granulated sugar
- 2 Tbsp brown sugar
- 1 Tbsp baking powder
- 1/4 tsp salt
- 1/2 tsp ground cinnamon
- 8 Tbsp (1 stick) unsalted butter, cold and cubed
- 1 large egg
- 1/2 cup heavy cream, plus more for brushing
- 3/4 cup finely diced apples (such as Granny Smith or Honeycrisp)
- For the Apple Pie Filling:
- 1 Tbsp butter
- 1 tsp vanilla extract
- 1 tsp ground cinnamon
- 1/2 tsp ground nutmeg
- 2 Tbsp brown sugar
- For the Vanilla Glaze:
- 1 cup powdered sugar
- 1-2 Tbsp milk (or cream)
- 1 Tbsp pure maple syrup
Timing
| Prep Time | 20 minutes |
| Cook Time | 18-20 minutes |
| Total Time | 40 minutes |
Context: This recipe is about 25% faster than traditional scone methods that require chilling the dough. The quick sauté of the apples deepens their flavor efficiently. It"s a fantastic make-ahead option—you can freeze the shaped, unbaked scones and bake them straight from the freezer for a fresh, warm breakfast.
Step-by-Step Instructions
Step 1 — Prepare the Apple Filling
In a small skillet over medium heat, melt 1 tablespoon of butter. Add the finely diced apples, 2 tablespoons of brown sugar, 1 teaspoon of cinnamon, and 1/2 teaspoon of nutmeg. Sauté, stirring frequently, for 4-5 minutes until the apples are just tender and the sugars have created a light syrup. Remove from heat and stir in 1 teaspoon of vanilla extract. Set aside to cool completely. (Pro tip: Cooling the filling prevents it from melting the butter in the dough, which is crucial for flaky layers).
Step 2 — Combine Dry Ingredients
In a large mixing bowl, whisk together 2 cups of all-purpose flour, 2 tablespoons of granulated sugar, 2 tablespoons of brown sugar, 1 tablespoon of baking powder, 1/4 teaspoon of salt, and 1/2 teaspoon of cinnamon. This aerates the dry ingredients, ensuring your tender and flaky Apple Pie Scones have an even, light texture.
Step 3 — Cut in the Butter
Add the cold, cubed butter to the flour mixture. Using a pastry cutter, two forks, or your fingertips, work the butter into the flour until the mixture resembles coarse crumbs with some pea-sized butter pieces remaining. In my tests, keeping the butter very cold is the single most important factor for achieving a flaky, non-dense scone.
Step 4 — Mix Wet Ingredients & Form Dough
In a separate small bowl, whisk together the egg and 1/2 cup of heavy cream. Make a well in the center of the dry ingredients and pour the wet mixture in. Gently stir with a fork until just combined—the dough will be shaggy. Fold in the cooled apple filling until evenly distributed. Avoid overmixing, as this develops gluten and leads to tough scones.
Step 5 — Shape and Cut the Scones
Turn the dough out onto a lightly floured surface. Gently pat and shape it into a 7-inch circle, about 1-inch thick. Using a sharp knife or bench scraper, cut the circle into 8 equal wedges. (Pro tip: Dipping your knife in flour between cuts gives you clean edges).
Step 6 — Bake to Golden Perfection
Place the scone wedges on a parchment-lined baking sheet, spaced about 2 inches apart. Brush the tops lightly with a little extra heavy cream. This creates a beautifully golden-brown crust. Bake in a preheated 400°F (200°C) oven for 18-20 minutes, or until the tops are golden and a toothpick inserted into the center comes out clean. Unlike boiling, baking at this high heat quickly sets the structure and caramelizes the sugars.
Step 7 — Make the Vanilla Glaze
While the scones cool slightly, prepare the glaze. In a medium bowl, whisk together 1 cup of powdered sugar, 1 tablespoon of milk, and 1 tablespoon of maple syrup. Add more milk, one teaspoon at a time, until you reach a thick but pourable consistency.
Step 8 — Glaze and Serve
Once the scones are warm but not hot, drizzle the vanilla glaze over the top. Allow the glaze to set for a few minutes before serving. These are best enjoyed the day they are made, but can be stored in an airtight container for up to 2 days.
Nutritional Information
| Calories | ~320 kcal |
| Protein | 4g |
| Carbohydrates | 45g |
| Fat | 14g |
| Fiber | 2g |
| Sodium | ~180mg |
Note: Estimates are for one scone with glaze, based on typical ingredients and serving size. Values may vary. These scones provide a source of quick energy and are a moderate-sodium treat.
Healthier Alternatives
- Whole Wheat Flour — Swap half the all-purpose flour for whole wheat pastry flour to add fiber and a nutty flavor while keeping the texture tender.
- Greek Yogurt for Cream — Replace half the heavy cream with plain, full-fat Greek yogurt to boost protein and reduce overall fat content slightly.
- Coconut Sugar — Use coconut sugar in place of brown sugar for a lower glycemic index option with a similar caramel note.
- Dairy-Free Butter & Milk — Choose high-quality plant-based butter and almond milk for a dairy-free version that still yields flaky layers.
- Reduce Added Sugar — Cut the sugar in the dough by 1 tablespoon and skip the glaze for a less sweet, still delicious scone.
- Add Nuts or Seeds — Fold in 1/4 cup of chopped walnuts or pecans for added healthy fats, protein, and crunch.
Serving Suggestions
- Serve warm with a pat of salted butter or a dollop of whipped cinnamon honey butter for extra indulgence.
- Pair with a hot mug of chai tea, spiced cider, or a pumpkin spice latte to enhance the cozy autumn flavors.
- Create a brunch board by arranging the scones alongside fresh fruit, yogurt, and savory breakfast items.
- For a dessert presentation, top with a scoop of vanilla bean ice cream and a drizzle of caramel sauce.
- Pack them for a picnic or hike; their sturdy yet tender texture holds up well for portable treats.
These tender and flaky Apple Pie Scones are incredibly versatile. They shine as a weekend breakfast centerpiece but are also perfect for holiday gatherings or as a thoughtful homemade gift during the fall and winter seasons.
Common Mistakes to Avoid
- Mistake: Using warm apple filling. Fix: Always cool the sautéed apples completely before folding into the dough, as specified in Step 1. Warm filling will melt the butter, sabotaging your flaky layers.
- Mistake: Overworking the dough. Fix: Mix the wet and dry ingredients until just combined. A shaggy dough, as mentioned in Step 4, is ideal for tender scones.
- Mistake: Cutting butter too small. Fix: In Step 3, leave visible pea-sized pieces of butter. These create steam pockets during baking, which is the science behind a flaky texture.
- Mistake: Skipping the cream wash. Fix: Brushing the tops with cream (Step 6) is non-negotiable for achieving that professional, golden-brown crust.
- Mistake: Overcrowding the baking sheet. Fix: Space scones 2 inches apart. Overcrowding traps steam and prevents proper browning and rise.
- Mistake: Glazing scones while too hot. Fix: Wait until scones are just warm. If the glaze is applied to hot scones, it will melt and soak in instead of creating a beautiful drizzle.
- Mistake: Using a dull knife to cut. Fix: Use a sharp knife or bench scraper and dip it in flour between cuts for clean wedges that bake evenly.
Storing Tips
- Fridge: Store completely cooled scones in an airtight container for up to 3 days. The glaze will soften but remain delicious.
- Freezer: For best long-term results, freeze the unglazed, baked scones. Wrap each individually in plastic wrap and place in a freezer bag for up to 3 months. Thaw at room temperature and warm before glazing.
- Reheat: To restore that fresh-baked quality, warm scones in a 300°F (150°C) oven for 8-10 minutes or in the microwave for 15-20 seconds. The oven method best preserves the flaky texture.
For meal prep, you can freeze the shaped, unbaked scone wedges on a parchment-lined sheet, then transfer to a freezer bag. Bake directly from frozen, adding 2-3 minutes to the bake time. This lets you enjoy warm, fresh Apple Pie Scones any morning in under 25 minutes.
Conclusion
These Apple Pie Scones offer the ultimate shortcut to cozy flavor, delivering the essence of a classic dessert in a portable, flaky package perfect for any occasion. For another delicious way to enjoy apples, try this Caramel Apple Cheesecake Dip Recipe. I hope you love this recipe as much as I do—please share your results in the comments!
Frequently Asked Questions
Can I make Apple Pie Scones ahead of time?
Yes, you can prepare them up to 3 months in advance. According to standard baking practice, the best method is to freeze the shaped, unbaked scone wedges on a baking sheet, then transfer them to a freezer bag. Bake directly from frozen, adding 2-3 minutes to the bake time. This approach ensures you get the freshest, flakiest texture possible with minimal morning effort.
What can I use if I don"t have heavy cream?
Full-fat buttermilk or full-fat coconut milk are the best substitutes for heavy cream in this scone recipe. Both provide the necessary fat content for a tender crumb, with buttermilk adding a slight tang and coconut milk a subtle sweetness. Avoid low-fat milk, as it will produce a drier, less rich scone.
Why are my scones dry and crumbly?
This is typically caused by over-measuring the flour or overworking the dough. To prevent it, spoon your flour into the measuring cup and level it off, rather than scooping directly from the bag. Also, mix the dough only until it just comes together, as over-kneading develops too much gluten. Ensuring your butter is very cold also helps retain moisture during baking for a perfectly tender scone.
PrintApple Pie Scones
Ingredients
- 2 cups all-purpose flour
- 2 Tbsp sugar
- 2 Tbsp brown sugar
- 1 Tbsp baking powder
- 1/4 tsp salt
- 1/2 tsp cinnamon
- 8 Tbsp butter, (cold and cubed)
- 1 egg
- 1/2 cup cream, (plus more for brushing)
- 3/4 cups finely diced apples
- 1 Tbsp butter
- 1 tsp vanilla extract
- 1 tsp cinnamon
- 1/2 tsp nutmeg
- 2 Tbsp brown sugar
- 1 cup powdered sugar
- 1–2 Tbsp milk
- 1 Tbsp maple syrup
Instructions
- Preheat oven to 400.
- Begin by heating the diced apples, butter, vanilla, cinnamon, nutmeg, and brown sugar in a small saucepan over low-med heat. Allow the flavors to meld together by cooking for 5-8 minutes, stirring occasionally.
- While the apples are cooking, in the bowl of a mixer, mix flour, sugars, baking powder, salt, and cinnamon. Mix briefly. With the mixture on low, drop in the cubes of butter one at a time. When the mixture resembles coarse crumbles, pour in the egg and heavy cream only mixing until just combined.
- Pull the apples off the heat, and with a slotted spoon, spoon the apples into the dough. Mix until just combined.
- On a floured surface, turn out the dough and pat into a 1-inch thick circle. Cut the dough into eighths, place on a greased baking sheet, and bake for 17-18 minutes, or until golden brown.
- While cooking, in a small bowl, mix the powdered sugar, syrup, and milk (one Tbsp at a time) until it reaches your desired consistency. I usually use 1 Tbsp of milk.
- Allow the scones to cool for a couple of minutes and then pour on the icing.
- Enjoy!
You Might Also Like
- Easy Cherry Marshmallow Fudge Bars – Ready in 30 Minutes
- Apple Fritter Muffins Recipe
- Discover the Delicious Flavors of Homemade Mexican Pizza
- Ultimate Moist & Flavourful Blueberry Muffins Recipe


2 Comments