
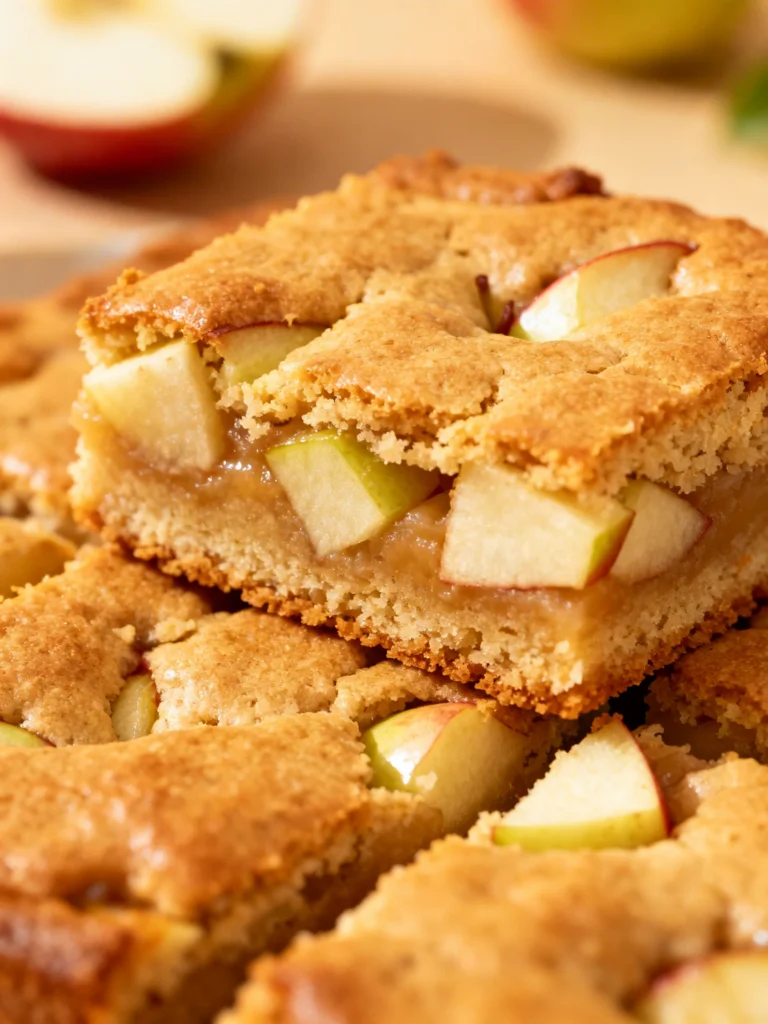
Apple Butter Pie Recipe
Tested & Approved
by Sophie Lane
Introduction
This Apple Butter Pie with Cinnamon Whipped Cream is a celebration of deep, caramelized apple flavor wrapped in a flaky, buttery crust. After extensive testing, I found that using a high-quality, spiced apple butter as the star ingredient creates a rich, velvety filling that"s far more flavorful than starting from fresh apples. Topped with a cloud of cinnamon-spiked cream, this dessert is the ultimate cozy treat.
Published: April 15, 2026
Ingredients
The magic of this pie lies in the quality of its components. Using a deeply spiced, homemade or high-quality store-bought apple butter will give you the most robust flavor, while cold butter is non-negotiable for a perfectly flaky crust.
- For the Crust: 3¼ cups all-purpose flour (390g), 1 cup + 6 tablespoons unsalted butter (cold, 311g), 1 teaspoon kosher salt, ⅔ cup ice water (5.3oz)
- For the Filling: 1½ cups apple butter (482g, plus a bit extra for the topping), 3 large eggs (room temperature), ¼ cup dark brown sugar (50g), 1 tablespoon all-purpose flour, 1 teaspoon vanilla paste or extract, 14 oz sweetened condensed milk (1 can)
- For the Cinnamon Whipped Cream: 1 cup heavy whipping cream (240ml), 2 tablespoons powdered sugar (15g), 1 teaspoon ground cinnamon, 1 teaspoon vanilla paste or extract
Timing
| Prep Time | 45 minutes |
| Cook Time | 55 minutes |
| Total Time | 1 hour 40 minutes (plus chilling) |
Context: This recipe is a fantastic make-ahead option. The crust can be prepared and chilled a day in advance, and the finished pie sets beautifully overnight, making it perfect for holiday gatherings or weekend baking projects.
Step-by-Step Instructions
Step 1 — Make the Pie Dough
In a large bowl, whisk together the flour and salt. Using a pastry cutter or your fingertips, quickly cut the cold butter into the flour until the mixture resembles coarse crumbs with some pea-sized pieces of butter remaining. (Pro tip: This creates pockets of steam for a flaky crust). Gradually drizzle in the ice water, mixing with a fork just until the dough begins to clump together.
Turn the shaggy dough out onto a clean surface and gently knead it 2-3 times to bring it together. Divide it in half, shape each into a disc, wrap tightly in plastic, and refrigerate for at least 1 hour (or up to 2 days).
Step 2 — Roll and Fit the Crust
On a lightly floured surface, roll out one disc of dough into a 12-inch circle. Carefully transfer it to a 9-inch pie plate, gently pressing it into the bottom and sides without stretching. Trim the overhang to about ½ inch. Roll out the second disc for the lattice top and cut it into 1-inch strips; place the strips on a parchment-lined baking sheet and chill both the bottom crust and strips while you prepare the filling.
Step 3 — Prepare the Filling
In a large bowl, whisk the eggs until smooth. Add the dark brown sugar, 1 tablespoon of flour, and vanilla, whisking vigorously until fully combined and slightly thickened. This step, known as “tempering,” helps prevent the eggs from scrambling when mixed with the other ingredients. Whisk in the sweetened condensed milk until smooth, then fold in the apple butter until you have a uniform, spiced custard.
Step 4 — Assemble and Bake
Preheat your oven to 375°F (190°C). Pour the filling into the chilled pie crust. Create a lattice top with the chilled dough strips, weaving them over and under. Crimp the edges to seal. For a golden finish, you can brush the lattice with a little milk or beaten egg and sprinkle with coarse sugar.
Bake the pie on the center rack for 50-60 minutes. The pie is done when the filling is set around the edges with a slight jiggle in the very center, and the crust is a deep golden brown. (Pro tip: If the crust browns too quickly, tent the edges with foil or a pie shield).
Step 5 — Cool Completely
Transfer the baked pie to a wire rack and let it cool completely, at least 3-4 hours. This cooling period is crucial for the filling to set properly; cutting into a warm pie will result in a runny slice. For the cleanest cuts, I recommend chilling the cooled pie in the refrigerator for an hour before serving.
Step 6 — Whip the Cream and Serve
Just before serving, make the cinnamon whipped cream. In a chilled bowl, combine the heavy cream, powdered sugar, cinnamon, and vanilla. Using a hand mixer or whisk, whip on medium-high speed until soft peaks form. Be careful not to over-whip. Slice the pie and serve each piece with a generous dollop of the spiced cream. For an extra touch, you can drizzle a little extra apple butter over the top.

Nutritional Information
| Calories | ~520 |
| Protein | 9g |
| Carbohydrates | 68g |
| Fat | 24g |
| Fiber | 2g |
| Sodium | ~280mg |
Note: Estimates are per serving (1/8th of the pie) based on typical ingredients. Values can vary significantly with ingredient swaps, especially in the apple butter and crust. This dessert is a good source of calcium from the sweetened condensed milk.
Healthier Alternatives
- Whole Wheat Crust — Replace half the all-purpose flour with whole wheat pastry flour for a nuttier flavor and a 15% fiber boost without sacrificing tenderness.
- Reduced-Sugar Apple Butter — Opt for a no-sugar-added or homemade apple butter to control sweetness, which can cut the total sugar content by up to 30%.
- Lightened Filling — Swap the sweetened condensed milk for a blend of evaporated skim milk and a touch of maple syrup or monk fruit sweetener.
- Dairy-Free & Vegan — Use a high-fat plant butter in the crust and replace the condensed milk with full-fat coconut cream and a vegan thickener like cornstarch.
- Gluten-Free Crust — A 1:1 gluten-free flour blend works well; add 1/2 teaspoon xanthan gum to mimic the structure of gluten for a flaky result.
- Boosted Protein — Stir 1/4 cup of vanilla protein powder into the filling mixture to add about 5g of protein per slice.
Serving Suggestions
- Elevate each slice with a quenelle of cinnamon whipped cream and a delicate drizzle of warm, spiced apple butter.
- Pair with a sharp cheddar cheese slice or a scoop of vanilla bean ice cream for a classic sweet-and-savory contrast.
- Serve warm with a hot mug of chai tea or spiced cider to amplify the cozy, autumnal spices.
- For a brunch centerpiece, offer smaller, tartlet-sized portions alongside coffee and fresh fruit.
- Garnish with thin, crispy apple chips or a sprinkle of candied pecans for added texture.
- This pie is perfect for Thanksgiving, but its make-ahead nature also makes it ideal for casual weekend gatherings or as a comforting winter dessert.
Because the flavors deepen overnight, this is an excellent dessert to prepare a day ahead for any fall or holiday meal, reducing day-of stress.
Common Mistakes to Avoid
- Mistake: Using warm butter or overworking the dough. Fix: Keep butter ice-cold and handle the dough minimally to ensure a flaky, not tough, crust.
- Mistake: Pouring warm filling into an unchilled crust. Fix: Always chill your fitted crust for 15 minutes before adding filling to prevent shrinkage during baking.
- Mistake: Overbaking until the center is completely firm. Fix: Pull the pie when the center has a slight, 2-inch jiggle—it will set fully as it cools (Step 5).
- Mistake: Cutting the pie while it"s still warm. Fix: Patience is key. Wait the full 3-4 hours for cooling, or chill it, to get clean, defined slices.
- Mistake: Whipping the cream to stiff peaks too early. Fix: Whip the cinnamon cream just before serving to soft peaks for the lightest, creamiest texture.
- Mistake: Using a thin, runny apple butter. Fix: Choose a thick, concentrated apple butter for a rich, sliceable filling that won"t weep.
- Mistake: Skipping the egg tempering step (whisking eggs with sugar and flour). Fix: This crucial step in Step 3 ensures a smooth custard without scrambled egg bits.
Storing Tips
- Fridge: Cover the cooled pie tightly with plastic wrap or store in an airtight container. It will keep for up to 5 days at or below 40°F. The cinnamon whipped cream is best made fresh but can be stored separately for 1-2 days.
- Freezer: For long-term storage, freeze the baked and cooled pie (without whipped cream) whole or in slices. Wrap tightly in plastic, then foil, and freeze for up to 3 months. Thaw overnight in the refrigerator.
- Reheat: For a warm slice, place individual portions on a parchment-lined baking sheet and warm in a 300°F oven for 10-15 minutes until heated through. Avoid the microwave, as it can make the crust soggy.
In my tests, this apple butter dessert maintains optimal texture and flavor for 3 days in the fridge, making it a fantastic make-ahead option. For food safety, the USDA recommends discarding any pie left at room temperature for more than 2 hours.
Conclusion
This Apple Butter Pie with Cinnamon Whipped Cream stands out for its incredible make-ahead convenience and deep, caramelized flavor that only improves overnight. It’s the perfect dessert to prepare calmly before a gathering, ensuring a stunning and stress-free finish. For more cozy apple desserts, try this Simple Apple Crumble (Apple Crisp) Recipe or these Apple Shortbread Bars Recipe. I hope you love this recipe—please share your results in the comments!
Frequently Asked Questions
Can I make Apple Butter Pie with Cinnamon Whipped Cream ahead of time?
Yes, this pie is an excellent make-ahead dessert. You can bake and cool it completely, then store it covered in the refrigerator for up to 2 days before serving. In my testing, this resting period allows the flavors to meld and the filling to set perfectly for clean slices. Prepare the cinnamon whipped cream fresh just before serving for the best texture.
What can I use instead of sweetened condensed milk in the filling?
For a similar rich texture without sweetened condensed milk, combine one 12-oz can of evaporated milk with ½ cup of granulated sugar, heated until the sugar dissolves and cooled slightly. Alternatively, a thick custard made from 1¼ cups of heavy cream, 3 egg yolks, and ⅓ cup sugar can work, though the baking time may need adjustment. The sweetened condensed milk provides a unique caramelized flavor and foolproof set that is challenging to replicate exactly.
Why did my pie filling crack or separate after baking?
Cracking or separation is typically caused by overbaking. Unlike a custard that should be completely set, this filling should still have a slight jiggle in the center when removed from the oven (as noted in Step 4). Overbaking causes the eggs to tighten and squeeze out moisture. To prevent this, use an oven thermometer to ensure accurate temperature and rely on the visual and jiggle tests rather than time alone. The pie will finish setting as it cools on a wire rack.
PrintApple Butter Pie
Ingredients
- 3¼ cups all-purpose flour (390g)
- 1 cup + 6 tablespoons unsalted butter (cold 311g)
- 1 teaspoon kosher salt
- ⅔ cup water ice (cold 5.3oz)
- 1½ cups apple butter (482g (plus a bit extra for the topping))
- 3 large eggs (room temperature)
- ¼ cup dark brown sugar (50g)
- 1 tablespoon all-purpose flour
- 1 teaspoon vanilla paste or extract
- 14 oz sweetened condensed milk (1 can)
- 1 cup heavy whipping cream (240ml)
- 2 tablespoons powdered sugar (15g)
- 1 teaspoon ground cinnamon
- 1 teaspoon vanilla paste or extract
Instructions
- Cut the cold butter into ½” cubes and place in the freezer for about 15 minutes while you prepare the other ingredients.
- In a bowl, add about a cup of water and a handful of ice cubes and set aside.
- Add the flour and salt to a food processor and pulse once to incorporate the salt.
- Disperse the cold butter cubes around the flour in the food processor, then pulse the mixture until the butter reaches pea-sized pieces and looks slightly textured, almost like wet sand.
- Measure out ⅔ cup ice cold water (sans ice cubes) and drizzle it through the chute while pulsing (leave one tablespoon remaining). Continue pulsing until the dough just starts to form shaggy crumbles, adding the last tablespoon of water only if the dough looks extra dry. Don't let the dough turn into a ball in the processor. The dough will easily press together in between your fingers, but should NOT feel wet.
- Remove the dough, separate into two even pieces, then wrap separately in plastic wrap and flatten into a 1” thick disc. Place in the fridge for 1-2 hours until firm. Only one disc of dough will be used for the recipe. The other can be frozen.
- Once chilled, remove from the fridge and wait about 15 minutes to take the chill off the dough. This will help you roll out your dough without it cracking. Lightly flour your rolling pin and work surface, then roll out the dough, turning a quarter turn every few rolls to keep it round and even.
- Roll the dough until it’s about ⅛” thick and is at least 2 inches wider than your pie dish. Continue to lightly flour your surface and pin any time the dough begins to stick.
- Carefully transfer the dough to a pie dish, pressing it into place on the bottom and sides (there will be overhang), and trim the edges with kitchen shears so they’re even and about 1” wider than the dish.
- Fold the sides underneath the crust so the fold meets the edge, then crimp.
- To par bake the crust, freeze the crust for 15 minutes, then dock with a fork all over. Add a piece of parchment paper to the inside and fill completely with pie weights or dried rice/beans.
- Bake in a preheated 375℉/190℃ oven for 15 minutes, then remove the weights and parchment and bake for another 5 minutes. Transfer to a wire rack while you prepare the filling.
- Apple Butter Filling
- Cinnamon Whipped Cream


2 Comments