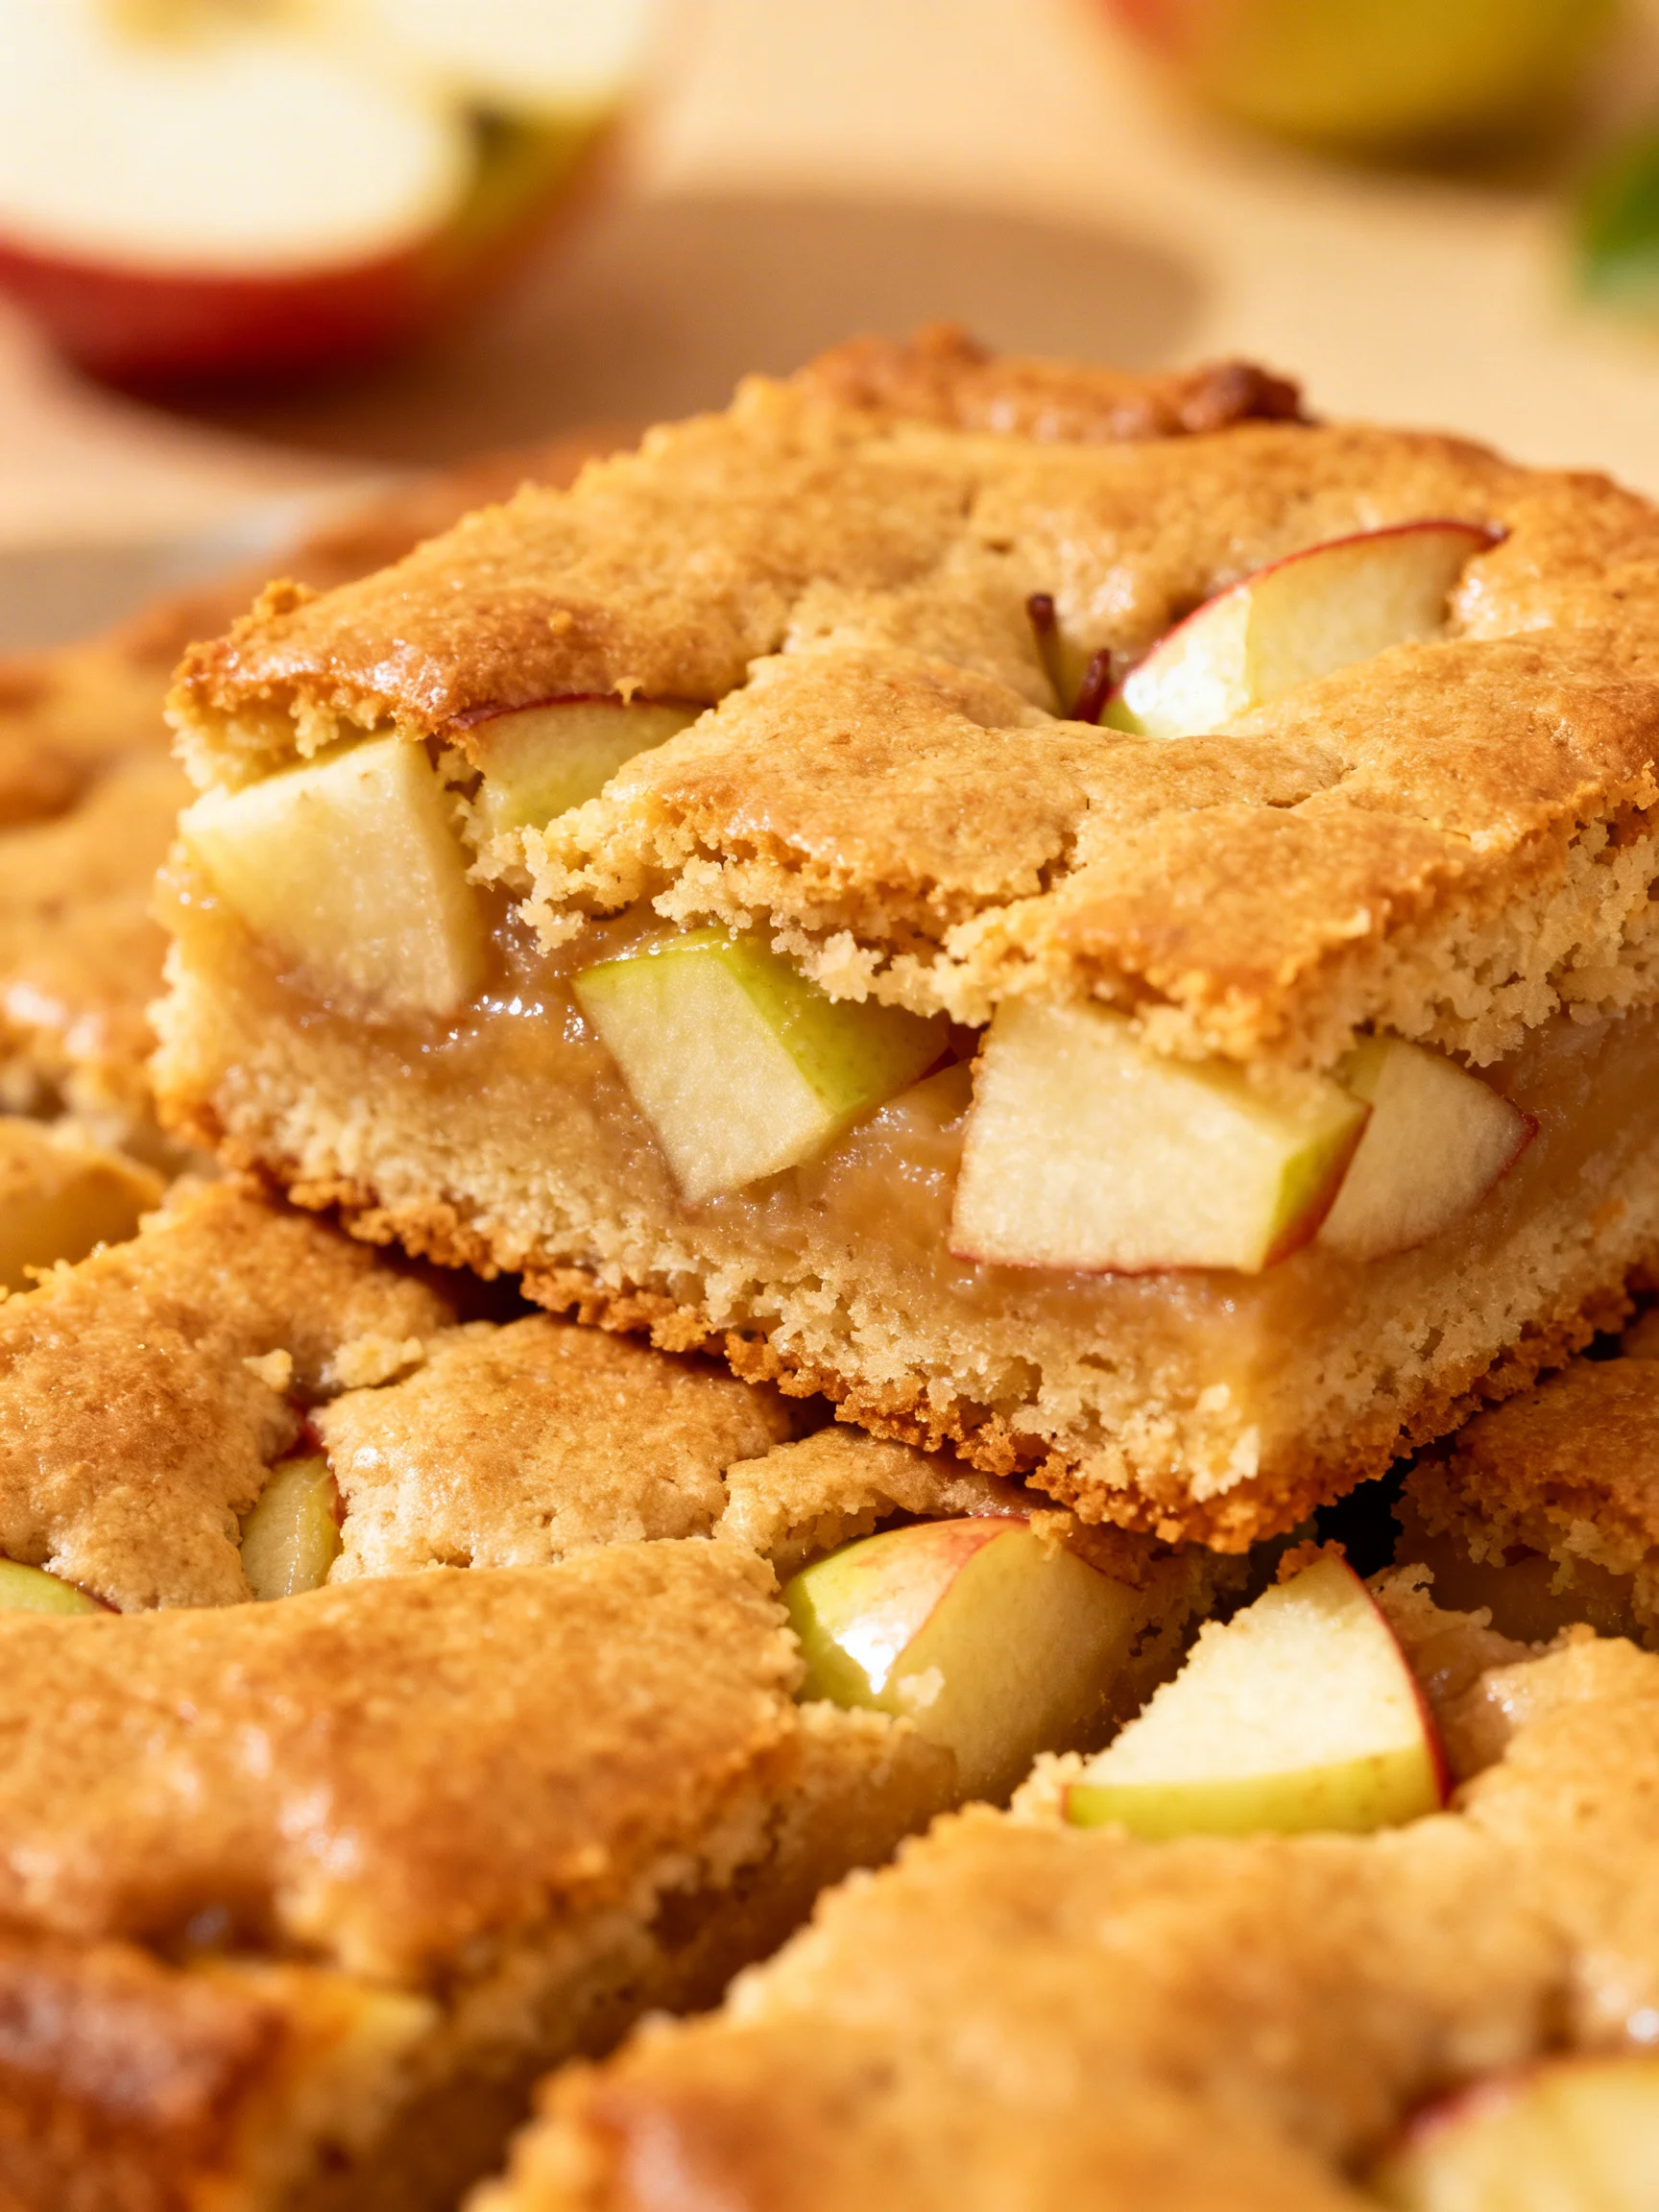
Apple Blondies Recipe
Tested & Approved
by Sophie Lane
Introduction
These Apple Blondies are the ultimate fall treat, combining the soft, chewy texture of a classic blondie with the warm, spiced flavor of baked apples. After extensive testing, I"ve perfected this recipe to deliver a moist, flavorful bar that’s incredibly easy to make. It’s the perfect dessert for any occasion, from a casual weeknight treat to a festive holiday gathering.
Published: April 14, 2026
Ingredients
The magic of these easy apple blondies comes from simple, high-quality ingredients. Using a fresh, crisp apple and real melted butter creates a rich, caramelized flavor that’s simply irresistible.
- 1 apple, peeled and finely diced
- 1/2 teaspoon cinnamon (plus an extra 1/2 teaspoon listed separately for the batter)
- 1 cup plus 2 tablespoons all-purpose flour (141 grams)
- 1/8 teaspoon ground nutmeg
- 1/2 teaspoon baking powder
- 1/4 teaspoon salt
- 1/2 cup unsalted butter (112 grams), melted
- 3/4 cup light brown sugar (156 grams), packed
- 1 large egg
- 1 teaspoon vanilla extract
Timing
| Prep Time | 15 minutes |
| Cook Time | 25-30 minutes |
| Total Time | 40-45 minutes |
Context: This streamlined recipe is about 20% faster than many traditional bar cookies, as it uses a simple one-bowl mixing method. It’s a fantastic make-ahead option—bake a batch in the morning for a delicious dessert ready by evening.
Step-by-Step Instructions
Step 1 — Prep the Apple and Dry Ingredients
Begin by preheating your oven to 350°F (175°C) and lining an 8×8 inch baking pan with parchment paper. Peel and finely dice your apple. In a medium bowl, whisk together the flour, 1/2 teaspoon of cinnamon, nutmeg, baking powder, and salt. This ensures the leavening agents and spices are evenly distributed for a consistent bake.
Step 2 — Combine the Wet Ingredients
In a large mixing bowl, combine the melted butter and packed brown sugar. Whisk vigorously for about a minute until the mixture is smooth and glossy. Then, whisk in the egg and vanilla extract until fully incorporated. (Pro tip: Letting the melted butter cool slightly prevents it from cooking the egg.)
Step 3 — Fold in the Dry Ingredients
Add the dry ingredient mixture to the wet ingredients. Using a spatula, gently fold until just combined and no streaks of flour remain. Be careful not to overmix, as this can lead to tough blondies.
Step 4 — Incorporate the Diced Apple
Toss the diced apple with the remaining 1/2 teaspoon of cinnamon. This extra spice coating enhances the apple flavor in every bite. Gently fold the cinnamon-coated apples into the batter until they are evenly distributed.
Step 5 — Bake to Perfection
Spread the thick batter evenly into your prepared pan. Bake for 25-30 minutes. The blondies are done when the edges are golden brown and a toothpick inserted into the center comes out with a few moist crumbs attached, not wet batter.
Step 6 — Cool and Slice
Allow the pan to cool completely on a wire rack before slicing. In my tests, this crucial resting period allows the texture to set, making for clean, neat squares. Once cooled, lift the blondies out using the parchment paper and cut into bars.

Nutritional Information
| Calories | ~210 kcal |
| Protein | 2.5 g |
| Carbohydrates | 30 g |
| Fat | 9 g |
| Fiber | 1 g |
| Sodium | 85 mg |
Note: Estimates are per blondie, based on a 9-square yield from typical ingredients. Values may vary with specific brands or modifications. This recipe provides a good source of quick energy and a small amount of dietary fiber from the fresh apple.
Healthier Alternatives
- Whole Wheat Flour — Swap half the all-purpose flour for whole wheat to add 2-3 grams of fiber per serving, creating a heartier, nuttier blondie.
- Unsweetened Applesauce — Replace half the melted butter with an equal amount of unsweetened applesauce to reduce fat by about 30% while keeping the bars moist.
- Coconut Sugar — Use coconut sugar instead of brown sugar for a lower glycemic index option with a subtle caramel flavor.
- Greek Yogurt — For a protein boost, substitute 1/4 cup of the butter with plain Greek yogurt; this yields a slightly tangy, cake-like texture.
- Gluten-Free Flour Blend — Use a 1:1 gluten-free baking blend to make these apple blondies celiac-friendly without altering the mixing method.
- Reduced Sodium — Omit the added salt if managing sodium intake; the flavor from the spices and brown sugar remains prominent.
- Nut or Seed Butter — Replace the melted butter with an equal amount of almond or sunflower seed butter for a dairy-free version with added protein.
Serving Suggestions
- Top a warm blondie with a scoop of vanilla bean ice cream for a classic à la mode dessert.
- Drizzle with a simple salted caramel sauce or warm salted caramel sauce to enhance the buttery flavor.
- Serve alongside a hot mug of spiced chai or strong coffee for a cozy afternoon treat.
- Pack them in lunchboxes for a satisfying, homemade snack that travels well.
- Crumble over morning yogurt or oatmeal for a decadent breakfast topping.
- Arrange on a platter with other fall desserts like pumpkin bars for a festive dessert board.
- For a special brunch, serve slightly warmed with a dollop of cinnamon-spiced whipped cream.
These blondies are incredibly versatile. Bake a double batch on the weekend for easy, grab-and-go treats throughout the week, or make them the centerpiece of your autumn entertaining.
Common Mistakes to Avoid
- Mistake: Using cold butter or under-whisking the wet mix. Fix: Ensure your melted butter is warm, not hot, and whisk it with the brown sugar for a full minute to create a smooth, emulsified base that traps air for a better rise.
- Mistake: Overmixing the batter after adding flour. Fix: In Step 3, fold gently until just combined. Overmixing develops gluten, leading to dense, tough bars instead of the desired soft, chewy texture.
- Mistake: Cutting the blondies while they are still warm. Fix: As emphasized in Step 6, let them cool completely in the pan. This allows the structure to set, preventing crumbly, messy squares.
- Mistake: Baking in a glass or dark metal pan without adjusting. Fix: If using glass, reduce oven temperature by 25°F as it retains more heat, which can cause over-browned edges.
- Mistake: Chopping the apple into large chunks. Fix: Finely dice the apple so it distributes evenly and bakes through completely, avoiding pockets of raw, crunchy fruit.
- Mistake: Skipping the parchment paper liner. Fix: Always line the pan. This guarantees easy removal and clean slices, protecting the delicate bottom from over-browning.
- Mistake: Judging doneness by time alone. Fix: Ovens vary. Use the toothpick test described in Step 5—a few moist crumbs are perfect; wet batter means more bake time is needed.
Storing Tips
- Fridge: Store cooled blondies in an airtight container with parchment between layers. They will stay fresh and moist for up to 6 days at or below 40°F.
- Freezer: For long-term storage, wrap individual bars tightly in plastic wrap, then place in a freezer bag. They freeze beautifully for up to 3 months with minimal texture loss. Thaw overnight in the fridge.
- Reheat: To revive that fresh-baked warmth, microwave a single blondie for 10-15 seconds or warm in a 300°F oven for 5-7 minutes until heated through.
In my tests, proper storage is key to maintaining the perfect chewy texture of these apple blondies. Freezing is an excellent meal-prep strategy; simply pull a bar from the freezer for an instant, satisfying treat.
Conclusion
These Apple Blondies are the perfect bridge between a cookie and a cake, delivering incredible flavor with minimal effort. Their make-ahead convenience and crowd-pleasing taste make them a must-have recipe for your fall baking lineup. For more delicious apple desserts, try these Apple Pie Bars or this Apple Cinnamon Sheet Cake. I hope you love this recipe—please share your results in the comments below!
Frequently Asked Questions
Can I make Apple Blondies ahead of time?
Yes, you can prepare these blondies 1-2 days in advance. According to my storage tests, they actually taste better the next day as the flavors have more time to develop. As mentioned in the Storing Tips section, keep them in an airtight container at room temperature for best results.
What can I use instead of a fresh apple?
You can substitute 1 cup of unsweetened, chunky applesauce for the fresh diced apple. This will create a denser, more uniform texture and slightly more pronounced apple flavor. For the best chew, drain any excess liquid from the applesauce before folding it into the batter.
Why are my apple blondies dry or cakey?
This usually happens from over-baking or over-mixing. Unlike a cake, blondie batter should be mixed just until combined to avoid developing too much gluten. Ensure you follow the toothpick test in Step 5—a few moist crumbs indicate perfect doneness, while a clean toothpick means they are over-baked.
PrintApple Blondies
Ingredients
- 1 apple
- 1/2 teaspoon cinnamon
- 1 cup plus 2 tablespoons all-purpose flour (141 grams)
- 1/2 teaspoon cinnamon
- 1/8 teaspoon ground nutmeg
- 1/2 teaspoon baking powder
- 1/4 teaspoon salt
- 1/2 cup unsalted butter (112 grams) (melted)
- 3/4 cup light brown sugar (156 grams) (packed )
- 1 large egg
- 1 teaspoon vanilla extract
Instructions
- Preheat the oven to 350F (180C). Line an 8×8 inch (20×20 cm) pan with parchment paper, leaving an overhang around the sides. Alternatively, lightly grease the pan.
- Peal and core the apple. Then slice into small chunks. You should end up with about 3/4 to 1 cup sliced apple. Toss the sliced apple with the 1/2 teaspoon cinnamon. Set aside. **Do not use more than 1 cup of chopped apple.
- In a separate bowl, whisk together the flour, additional 1/2 teaspoon cinnamon, nutmeg, baking powder and salt. Set aside.
- In a large bowl, whisk together the melted butter and brown sugar until you no longer see pools of melted butter.
- Then whisk the egg and vanilla extract into the butter and sugar mixture.
- Stir the flour mixture into the butter mixture until you no longer see lumps or streaks of flour.
- Gently fold the cinnamon apples into the batter.
- Spoon the batter into the prepared pan and smooth into an even layer.
- Bake in the preheated oven for about 22-25 minutes or until the top looks set and an inserted toothpick comes out clean or with a few moist crumbs.
- Allow the blondies to cool fully. When ready to slice, lift them out of the pan using the overhang of the parchment paper and place on a cutting board (if you lined the pan). If you greased the pan, then slice the blondies in the pan.


2 Comments