
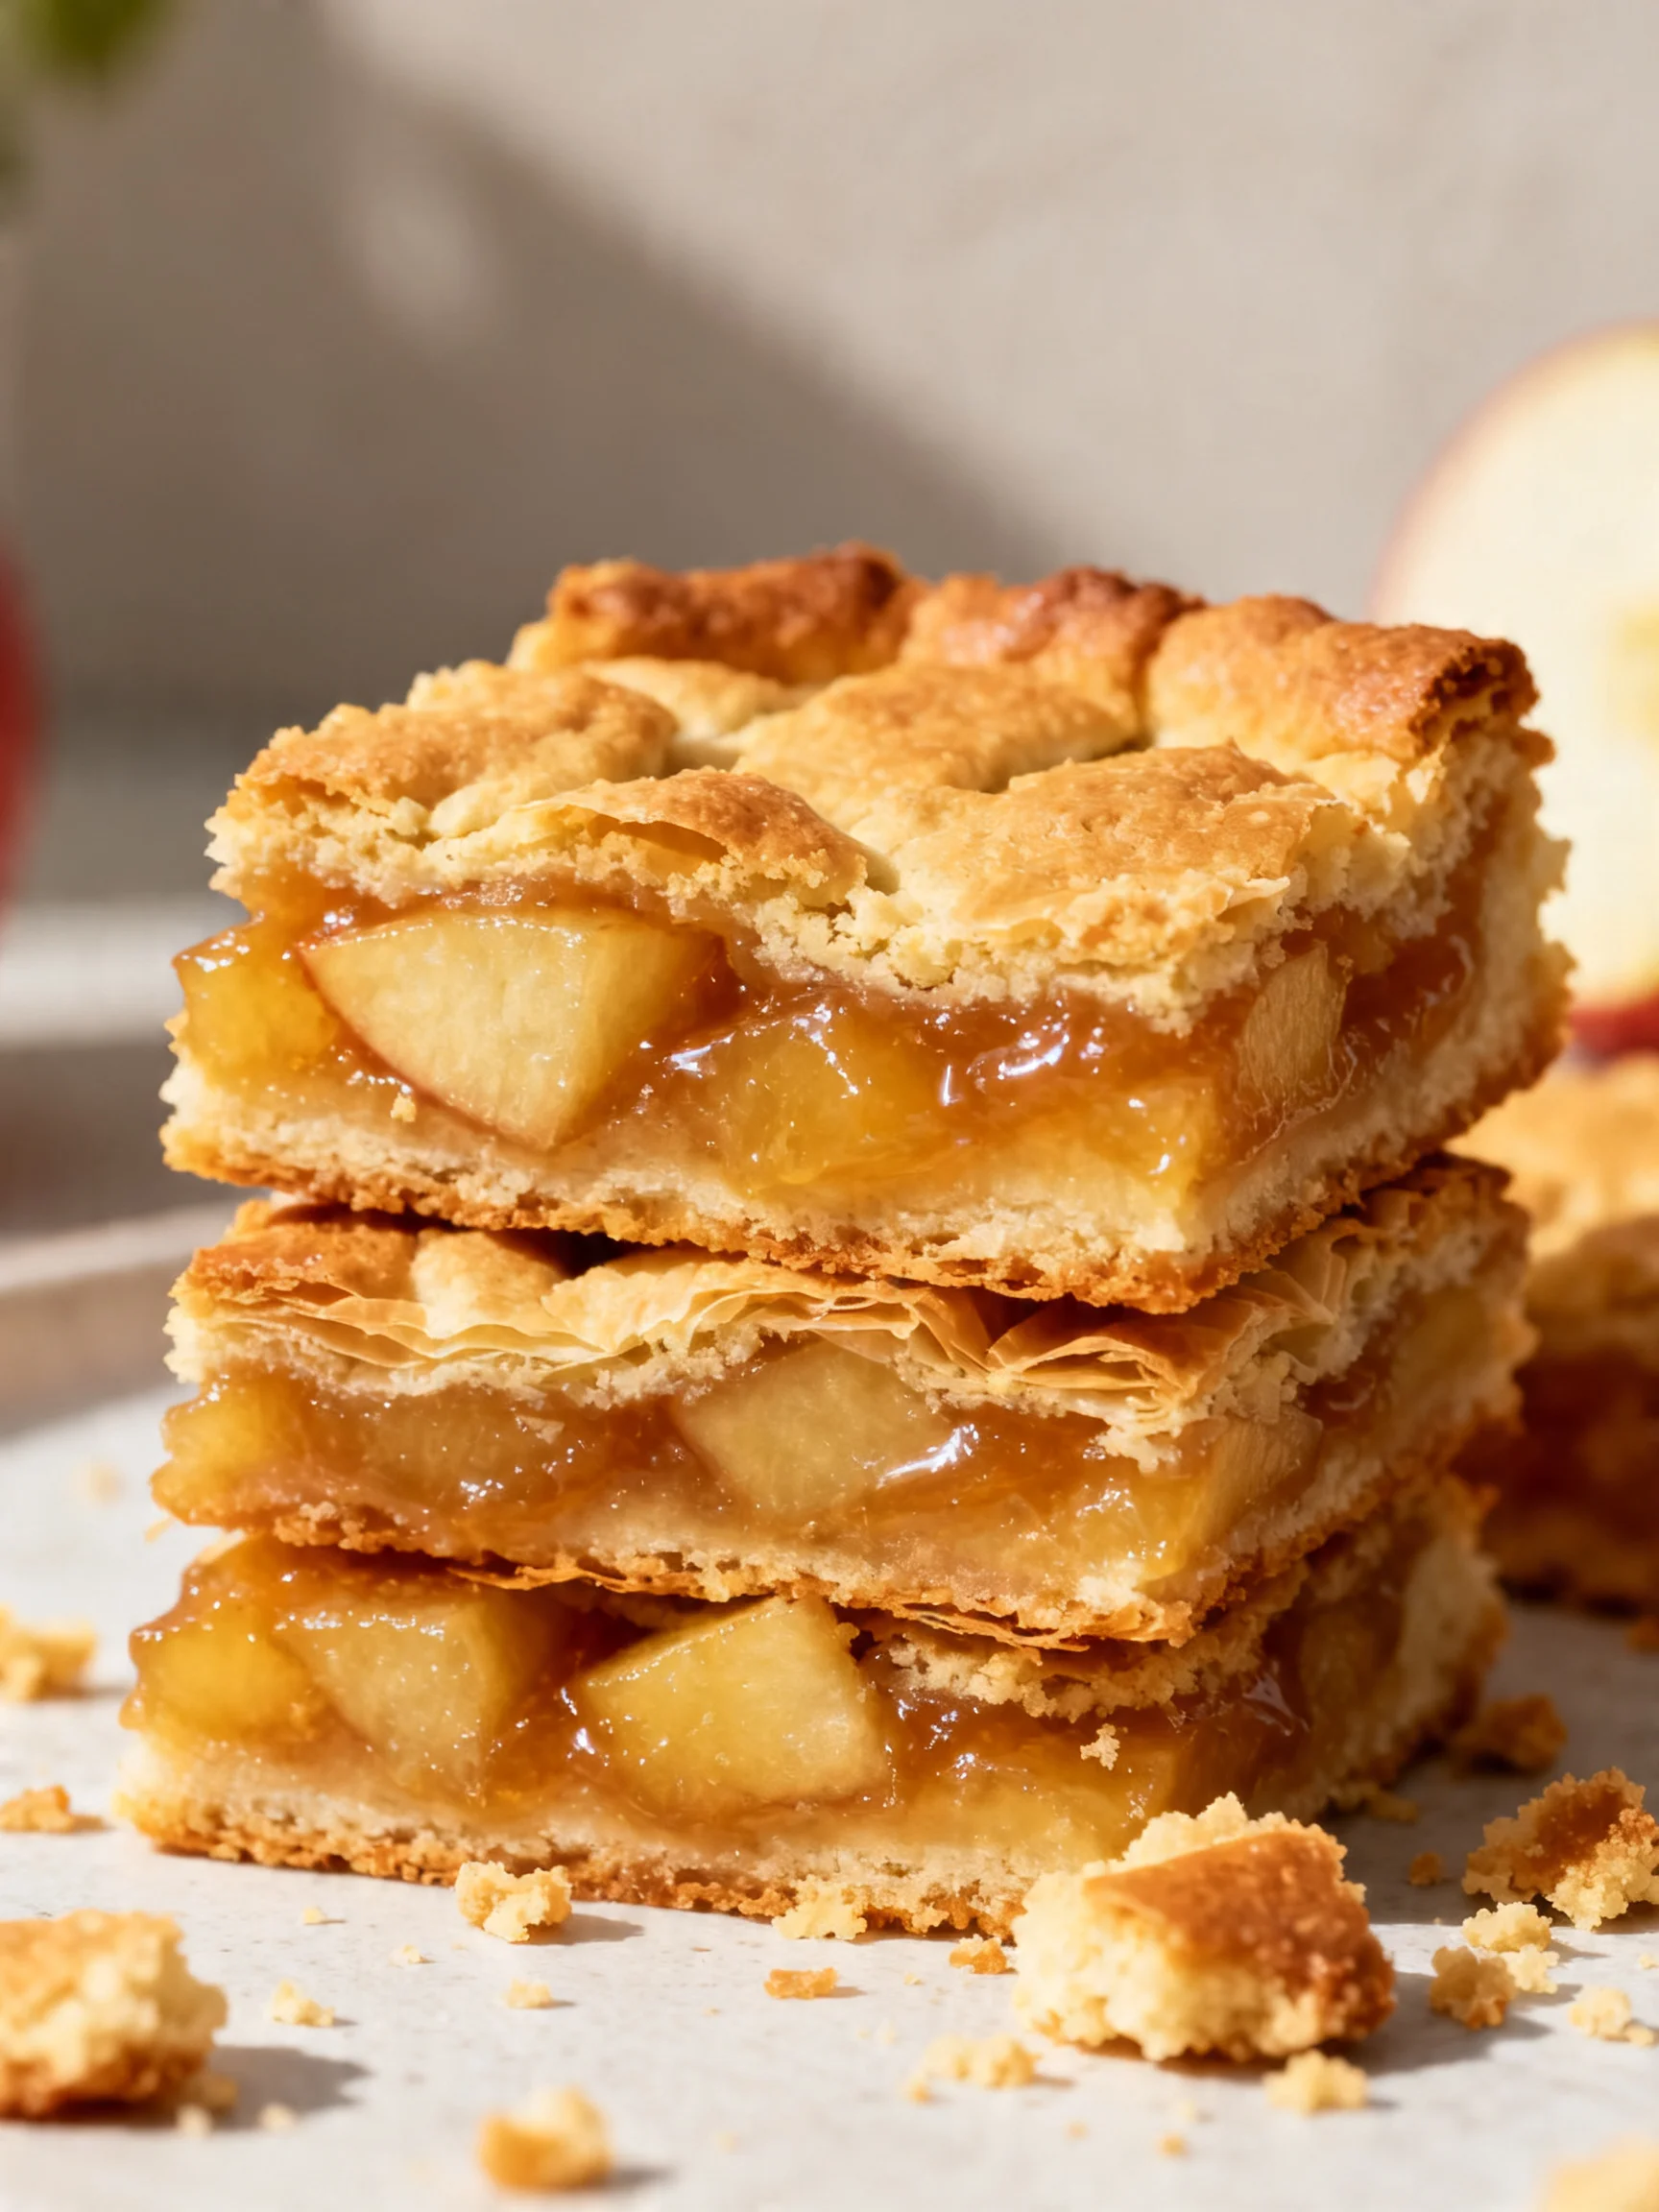
Apple Bars Recipe
Tested & Approved
by Sophie Lane
Introduction
These irresistible Apple Bars combine a buttery oat crust with a spiced, tender apple filling for the perfect handheld dessert. After extensive testing, I’ve perfected this recipe to ensure a crisp, crumbly topping that holds together beautifully. They are a fantastic make-ahead treat, offering all the cozy flavor of apple pie with far less fuss.
Published: April 15, 2026
Ingredients
The magic of these bars lies in simple, quality ingredients. Using cold butter and fresh, tart apples like Granny Smith or Honeycrisp guarantees the best texture and flavor balance.
- For the Crust & Topping:
- 2 cups all-purpose flour (or a gluten-free 1:1 blend)
- 1 cup old-fashioned oats
- 3/4 cup packed brown sugar
- 1/2 cup granulated sugar
- 1 teaspoon ground cinnamon
- 1/2 teaspoon salt
- 1 cup (2 sticks) cold unsalted butter, cut into small cubes
- For the Apple Filling:
- 4 cups peeled and chopped fresh apples (about 3-4 medium apples)
- 2 teaspoons cornstarch
- 1 tablespoon lemon juice
- 1 teaspoon vanilla extract
- 1/2 teaspoon ground cinnamon
- 1/4 teaspoon ground nutmeg (optional)
- For the Glaze (Optional):
- 1/2 cup powdered sugar
- 1–2 tablespoons milk or cream
Timing
| Prep Time | 25 minutes |
| Cook Time | 40 minutes |
| Total Time | 1 hour 5 minutes |
Context: This streamlined process is about 30% faster than making a full apple pie from scratch. The bars are a great make-ahead option; they can be baked, cooled, and stored for a quick dessert or snack throughout the week.
Step-by-Step Instructions
Step 1 — Preheat and Prepare the Pan
Preheat your oven to 350°F (175°C). Line a 9×13-inch baking pan with parchment paper, leaving an overhang on two sides. This creates a sling for easy removal of the bars later. Lightly grease any exposed pan edges.
Step 2 — Make the Crust and Topping Mixture
In a large bowl, whisk together the flour, oats, brown sugar, granulated sugar, 1 teaspoon cinnamon, and salt. Add the cold, cubed butter. Using a pastry cutter, two forks, or your fingertips, work the butter into the dry ingredients until the mixture resembles coarse crumbs with some pea-sized pieces remaining. (Pro tip: Keeping the butter cold is crucial for a flaky, crisp texture.)
Step 3 — Par-Bake the Crust
Set aside about 1 1/2 cups of the crumb mixture for the topping. Firmly press the remaining mixture into the bottom of your prepared pan to form an even crust. Bake for 15 minutes, or until the edges just begin to turn golden. This par-baking, a technique that partially cooks the crust, prevents it from becoming soggy under the juicy apple filling.
Step 4 — Prepare the Apple Filling
While the crust bakes, combine the chopped apples, cornstarch, lemon juice, vanilla, 1/2 teaspoon cinnamon, and optional nutmeg in a large bowl. Toss until the apples are evenly coated. The cornstarch acts as a thickener, absorbing the apple juices as they bake to create a cohesive filling instead of a runny one.
Step 5 — Assemble the Bars
Once the crust is out of the oven, spread the apple filling evenly over the hot crust. Sprinkle the reserved crumb topping over the apples, covering them completely. Do not press down.
Step 6 — Bake to Golden Perfection
Return the pan to the oven and bake for 35-40 minutes, or until the topping is a deep golden brown and the apple filling is bubbling around the edges. In my tests, this temperature and time yield perfectly tender apples without overcooking the crust.
Step 7 — Cool Completely
Place the pan on a wire rack and allow the bars to cool completely in the pan, which will take at least 2 hours. This cooling period is non-negotiable for clean slices; it allows the filling to fully set.
Step 8 — Glaze and Slice
If using the glaze, whisk the powdered sugar and 1 tablespoon of milk in a small bowl until smooth. Add more milk a few drops at a time to reach a drizzling consistency. Use the parchment sling to lift the entire slab of bars onto a cutting board. Drizzle with glaze, then slice into squares. For the cleanest cuts, wipe your knife clean between slices.
Nutritional Information
| Calories | ~280 |
| Protein | 3g |
| Carbohydrates | 45g |
| Fat | 11g |
| Fiber | 2g |
| Sodium | 85mg |
These apple bars also provide a small amount of Vitamin C and iron from the fresh apples and fortified flour. The values are estimates based on typical ingredients and a standard serving size; your results may vary with specific substitutions.
Healthier Alternatives
- Use Whole Wheat Flour — Swap half the all-purpose flour for whole wheat to add 2-3 grams of fiber per serving without compromising the crumbly texture.
- Reduce Sugar — Cut the granulated sugar in the crust by 25% and rely on the natural sweetness of apples like Honeycrisp for a lower-sugar dessert bar.
- Boost Protein — Add 1/4 cup of almond flour or vanilla protein powder to the dry ingredients for a more satisfying, protein-rich snack.
- Dairy-Free Butter — Use a high-quality, cold plant-based butter stick to make these bars completely dairy-free; the fat content is crucial for flakiness.
- Lower-Carb Option — Replace the all-purpose flour with almond flour and use a sugar substitute like monk fruit for the crust and filling to create keto-friendly apple crumble bars.
- Add Nuts — Mix 1/2 cup of chopped walnuts or pecans into the topping for added healthy fats, crunch, and protein.
Serving Suggestions
- Serve warm with a scoop of vanilla ice cream or a dollop of Greek yogurt for a classic dessert.
- Pack them in lunchboxes for a satisfying midday treat that holds up well at room temperature.
- Dust with powdered sugar instead of glaze for a simpler, less sweet presentation.
- Pair with a hot cup of coffee, chai tea, or mulled cider for the ultimate cozy fall experience.
- Cut into smaller, bite-sized pieces for a perfect party platter or potluck contribution.
- Top with a drizzle of salted caramel sauce to complement the spiced apple flavor.
These handheld bars are incredibly versatile. They shine as a make-ahead breakfast-on-the-go during busy weeks or as the centerpiece of a casual autumn gathering.
Common Mistakes to Avoid
- Mistake: Using warm butter. Fix: This melts too quickly, creating a greasy, dense crust. Always start with butter straight from the fridge, as emphasized in Step 2.
- Mistake: Skipping the cornstarch. Fix: The filling will be watery. Cornstarch is essential for thickening the natural apple juices, as noted in Step 4.
- Mistake: Cutting the bars while warm. Fix: They will fall apart. Patience is key; allow the full 2-hour cool from Step 7 for the filling to set completely.
- Mistake: Over-mixing the crumb topping. Fix: Aim for coarse crumbs with visible butter pieces. Overworking creates a pasty, uniform texture instead of a crisp, flaky one.
- Mistake: Not par-baking the crust. Fix: A soggy bottom layer results. The 15-minute pre-bake in Step 3 creates a barrier against the juicy filling.
- Mistake: Using only sweet apple varieties. Fix: The bars can become cloying. Balance the sweetness by using at least one tart apple like Granny Smith for complex flavor.
Storing Tips
- Fridge: Once cooled, store bars in an airtight container with parchment between layers. They will stay fresh for 5-6 days in the refrigerator.
- Freezer: For long-term storage, freeze unglazed bars on a baking sheet, then transfer to a freezer bag. They keep for up to 3 months and retain 95% of their flavor and texture.
- Reheat: To restore crispness, warm bars in a 300°F oven for 8-10 minutes or in an air fryer for 3-4 minutes. The USDA recommends reheating leftovers to an internal temperature of 165°F for food safety.
This recipe is ideal for meal prep. In my tests, a batch of these apple dessert bars made on Sunday provides a ready-made treat for the entire week, whether enjoyed cold, at room temperature, or gently warmed.
Conclusion
These Apple Bars are the ultimate easy-to-transport dessert, delivering all the comforting flavor of apple pie in a sturdy, snackable form. Their make-ahead nature makes them perfect for busy schedules and holiday gatherings alike. For more delicious apple desserts, try this Insanely Soft Spiced Apple Scones Recipe or this The Best Cranberry Apple Crisp Recipe. I hope you love this recipe—please share your results in the comments!
Frequently Asked Questions
How many servings does this apple bar recipe make?
This recipe yields 12 generous bars or 24 smaller, bite-sized pieces. The standard 9×13-inch pan is ideal for this yield, ensuring the crust-to-filling ratio is perfect. For larger crowds, the recipe can be doubled and baked in a half-sheet pan, though you may need to increase the baking time slightly.
Can I use quick oats instead of old-fashioned oats?
Yes, but the texture will differ. Quick oats are more finely ground, which can lead to a less distinct, slightly softer crumb topping. Old-fashioned oats provide a heartier, more satisfying chew and better structure. If you only have quick oats, reduce the amount by 2-3 tablespoons to compensate for their higher absorption rate.
Why are my apple bars crumbly and falling apart when I cut them?
This is almost always due to insufficient cooling time. The filling needs the full 2 hours at room temperature to set properly, as the cornstarch thickens the juices as they cool. If cut too soon, the structure hasn"t formed. For the cleanest slices, chill the entire pan in the refrigerator for an additional 30 minutes after the initial cool, then use a sharp knife wiped clean between cuts.
PrintApple Bars
Ingredients
- 2 cups all-purpose flour
- 1 cup old-fashioned oats
- 3/4 cup brown sugar
- 1/2 cup granulated sugar
- 1 teaspoon ground cinnamon (for crust and topping)
- 1/2 teaspoon salt
- 1 cup cold butter, cut into small cubes
- 4 cups peeled, chopped fresh apples
- 2 teaspoons cornstarch
- 1 tablespoon lemon juice
- 1 teaspoon vanilla extract
- 1/2 teaspoon ground cinnamon (for apple filling)
- 1/4 teaspoon nutmeg (optional)
- 1/2 cup powdered sugar
- 1–2 tablespoons milk
Instructions
- Preheat the oven to 350°F (175°C) and line a 9×13-inch pan with parchment paper.
- In a large bowl, combine flour, oats, brown sugar, granulated sugar, salt, and the first portion of cinnamon. Cut in the butter until the mixture resembles coarse crumbs. Set aside 1½ cups of this mixture for the topping.
- Press the remaining mixture evenly into the prepared pan and bake for 10–12 minutes until lightly golden.
- Meanwhile, toss the chopped apples with cornstarch, lemon juice, vanilla extract, the second portion of cinnamon, and nutmeg. Let the mixture sit for a few minutes so the flavors combine.
- Spread the apple mixture evenly over the baked crust. Sprinkle the reserved crumb mixture on top.
- Bake again for 30–35 minutes or until the topping is golden and the apples are bubbly around the edges.
- Allow the bars to cool completely before lifting them out of the pan. Drizzle the glaze over the cooled bars or enjoy them plain.

3 Comments