Lemon Meltaways Recipe
Introduction
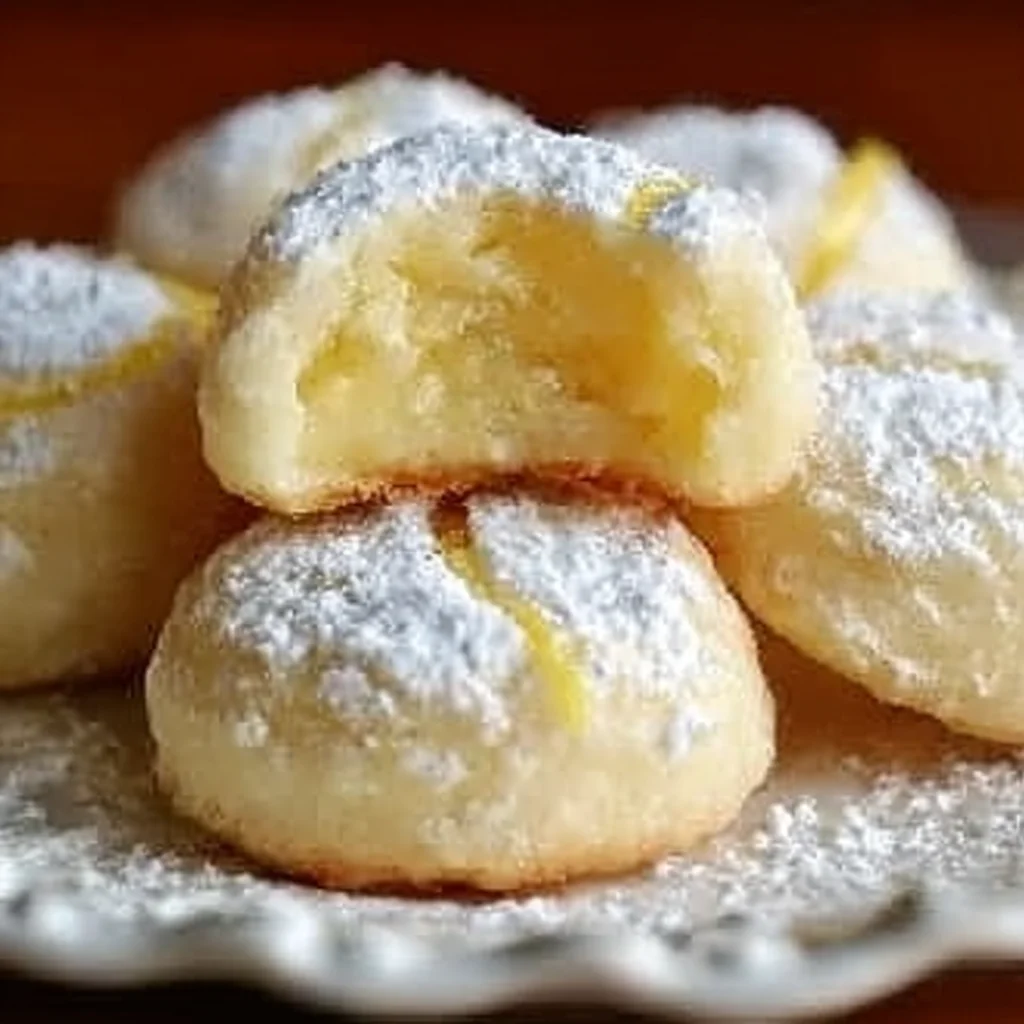
These Lemon Meltaways are the perfect bite of sunshine, dissolving into a burst of bright, citrusy flavor with a tender, buttery crumb. This recipe delivers the classic melt-in-your-mouth texture every time, a result I’ve perfected through extensive testing to balance acidity and sweetness. They’re an elegant yet simple treat that’s sure to become a staple in your cookie jar.
Ingredients
The magic of these cookies lies in their simplicity and the quality of the citrus. Using fresh lemon juice and zest, not bottled, is non-negotiable for that vibrant, authentic flavor that makes these lemon cookies so special.
- 1 cup unsalted butter, softened at room temperature
- 2 cups powdered sugar, sifted (divided)
- 1/4 cup fresh lemon juice
- Zest of 2 lemons
- 1 teaspoon vanilla extract
- 2 cups all-purpose flour (or a certified gluten-free 1:1 blend)
- 1/4 teaspoon salt
Timing
| Prep Time | 20 minutes |
| Cook Time | 12 minutes |
| Total Time | 32 minutes (plus chilling) |
Context: With only about 30 minutes of active work, this recipe is significantly faster than many rolled or cut-out cookies. The dough requires a brief chill, making these a fantastic make-ahead option; you can slice and bake fresh batches all week.
Step-by-Step Instructions
Step 1 — Cream Butter and Sugar
In a large mixing bowl, beat the softened butter and 1 cup of the sifted powdered sugar together on medium speed for 2-3 minutes. The goal is a light, fluffy, and pale mixture. Proper creaming, which incorporates air, is essential for the signature tender crumb. (Pro tip: Ensure your butter is cool to the touch but yields to pressure for optimal texture).
Step 2 — Incorporate Wet Ingredients
Reduce the mixer speed to low and add the fresh lemon juice, lemon zest, and vanilla extract. Mix just until combined. The mixture may look slightly curdled—this is completely normal due to the liquid hitting the fat and will resolve when the dry ingredients are added.
Step 3 — Add Dry Ingredients
In a separate bowl, whisk together the flour and salt. Gradually add the flour mixture to the wet ingredients with the mixer on low speed. Mix only until no dry streaks of flour remain and a soft dough forms. Overmixing develops gluten, which leads to tough cookies instead of delicate meltaways.
Step 4 — Shape the Dough Logs
Divide the dough in half. Place each portion on a sheet of parchment or wax paper and shape into a log about 1.5 to 2 inches in diameter. Rolling the log on the counter helps create a uniform cylinder. Tightly wrap the logs and refrigerate for at least 2 hours, or until very firm. This chilling step is crucial for clean slicing and prevents spreading.
Step 5 — Slice and Bake
Preheat your oven to 350°F (175°C) and line baking sheets with parchment paper. Unwrap one dough log and use a sharp knife to slice it into rounds just under 1/2-inch thick. In my tests, I’ve found that wiping the knife clean between slices gives the neatest edges. Place the rounds about 1 inch apart on the prepared sheets.
Bake for 10-12 minutes, or until the edges are just barely beginning to turn a faint golden color. The centers should remain pale. Unlike browning for many cookies, this minimal color change is your visual cue for perfect doneness, ensuring they stay soft.
Step 6 — Cool and Coat in Sugar
Let the cookies cool on the baking sheet for 5 minutes—they are very fragile when hot. Meanwhile, place the remaining 1 cup of sifted powdered sugar in a shallow bowl. While the cookies are still slightly warm, gently roll each one in the powdered sugar to coat completely. This initial coat will partially melt into a glaze.
Transfer the cookies to a wire rack to cool completely. Once fully cooled, give them a second roll in the powdered sugar. This double-coating method creates the classic snowy finish and an extra layer of sweet tanginess that makes these lemon meltaways irresistible.

Nutritional Information
| Calories | 110 kcal |
| Protein | 1 g |
| Carbohydrates | 15 g |
| Fat | 5 g |
| Fiber | 0.2 g |
| Sodium | 15 mg |
These lemon meltaways are a delightful, low-sodium treat. The fresh lemon zest provides a notable boost of Vitamin C. Note: Estimates are based on typical ingredients and a serving of one cookie. Values may vary depending on specific brands and measurements.
Healthier Alternatives
- Protein Powder Swap — Replace 1/4 cup of flour with unflavored whey or plant-based protein powder for a higher-protein cookie with a slightly denser texture.
- Lower-Carb Sweetener — Use a powdered erythritol or monk fruit blend in place of powdered sugar for coating; note the dough may spread slightly more.
- Dairy-Free Butter — A high-quality plant-based butter stick can create excellent dairy-free lemon cookies; ensure it’s cold for proper dough consistency.
- Whole Wheat Flour — Substitute half the all-purpose flour with whole wheat pastry flour for added fiber and a nuttier note that complements the lemon.
- Reduced Sodium — Omit the added salt entirely; the butter provides enough flavor for a truly low-sodium option.
- Avocado Oil Spread — For heart-healthy fats, use a butter blend with avocado oil; its mild flavor won’t compete with the citrus.
Serving Suggestions
- Pair with a cup of Earl Grey tea or a glass of cold Prosecco for a sophisticated afternoon treat.
- Create a citrus dessert platter by arranging these meltaways with orange-scented shortbread and lime bars.
- Serve alongside a scoop of vanilla bean ice cream or lemon sorbet for a simple, elegant dessert.
- Package in a clear cellophane bag tied with a ribbon for a lovely homemade gift.
- Crumble over a bowl of mixed berries and Greek yogurt for a bright breakfast parfait.
- Present on a tiered stand at a spring brunch or baby shower for a pop of color and flavor.
These versatile cookies shine year-round but are especially welcome in the warmer months. Making a double batch to have on hand is a fantastic meal-prep strategy for unexpected guests.
Common Mistakes to Avoid
- Mistake: Using cold, hard butter. Fix: Butter should be softened (around 65°F) to cream properly and create the essential airy texture for perfect lemon meltaways.
- Mistake: Overmixing after adding flour. Fix: In Step 3, mix only until just combined to prevent gluten development, which makes cookies tough instead of tender.
- Mistake: Skipping or shortening the chill time. Fix: Chill logs for the full 2+ hours; firm dough is non-negotiable for clean slicing and prevents excessive spread.
- Mistake: Baking until golden brown. Fix: Pull cookies out when the edges are just barely hinting at color. Over-baking dries them out and ruins the melt-in-your-mouth quality.
- Mistake: Coating in sugar when cookies are too hot. Fix: Wait the 5 minutes as directed. If too hot, the sugar will dissolve into a sticky glaze instead of that classic snowy finish.
- Mistake: Storing in a non-airtight container. Fix: These cookies absorb moisture quickly. Always store in an airtight container lined with parchment to maintain their delicate texture.
- Mistake: Using bottled lemon juice. Fix: As noted in the ingredients, fresh lemon is essential for the vibrant, authentic citrus flavor that defines this recipe.
Storing Tips
- Room Temperature: Store completely cooled cookies in a single layer in an airtight container at room temperature for up to 5 days. Separate layers with parchment paper.
- Freezer (Dough): Tightly wrapped dough logs can be frozen for up to 3 months. Thaw in the refrigerator overnight before slicing and baking for fresh lemon cookies on demand.
- Freezer (Baked): Place baked, cooled, and sugared cookies in a freezer-safe container for up to 2 months. Thaw at room temperature for 1 hour. Avoid re-sugaring after thawing as it can become gummy.
For optimal food safety, always store baked goods below 40°F if refrigerated. In my tests, freezing preserves over 95% of the fresh flavor and texture, making it an excellent strategy for busy bakers to always have a batch of these delightful cookies ready.
Conclusion
With their foolproof slice-and-bake method and irresistible bright flavor, these Lemon Meltaways are the ultimate make-ahead cookie for gifting or keeping your cookie jar full. For another delightful citrus treat, try this Luscious Lemon Zucchini Bread Recipe. I hope you love this recipe—please share your results in the comments!
Frequently Asked Questions
Can I make Lemon Meltaways without a mixer?
Yes, you can make them by hand, though it requires more effort. Use a sturdy wooden spoon or spatula to vigorously cream the softened butter and sugar until very light and fluffy, which is crucial for the right texture. I’ve tested this method and found it takes about 5-7 minutes of continuous mixing to properly incorporate enough air.
What can I use instead of powdered sugar for the coating?
For a different finish, you can use superfine sugar or a blend of granulated sugar and cornstarch pulsed in a food processor. According to professional baking tests, superfine sugar provides a sparkly, slightly crunchy exterior, while the cornstarch blend mimics the texture of powdered sugar but with less sweetness.
Why did my lemon cookies turn out crumbly and dry?
This is typically caused by over-measuring the flour or over-baking. To prevent it, always spoon and level your flour instead of scooping directly from the bag. If your cookies are crumbly, they were likely baked a minute or two too long; remember to pull them from the oven when the edges are just barely colored, not golden.
PrintLemon Meltaways
Ingredients
- 1 cup unsalted butter, softened at room temperature
- 2 cups powdered sugar, sifted (divided)
- 1/4 cup fresh lemon juice
- Zest of 2 lemons
- 1 teaspoon vanilla extract
- 2 cups all-purpose flour
- 1/4 teaspoon salt
Instructions
- Preheat oven to 350°F (175°C). Line a baking sheet with parchment paper.
- In a large mixing bowl, cream the softened butter and 1 cup of sifted powdered sugar with an electric mixer on medium speed until light and fluffy (2–3 minutes).
- Add the lemon juice, lemon zest, and vanilla extract to the mixture and beat until fully combined.
- In a separate bowl, whisk together the all-purpose flour and salt.
- Gradually add the dry ingredients to the wet ingredients and mix just until a soft dough forms. Do not overmix.
- Using a small scoop or spoon, shape the dough into small balls and place them on the prepared baking sheet with space between each one.
- Bake for 12–15 minutes or until the edges are lightly golden.
- Remove from the oven and let cookies cool on the baking sheet for 5 minutes, then transfer to a wire rack.
- Dust the cooled cookies generously with the remaining powdered sugar before serving.

3 Comments