Italian Grinder Sliders Recipe
Introduction
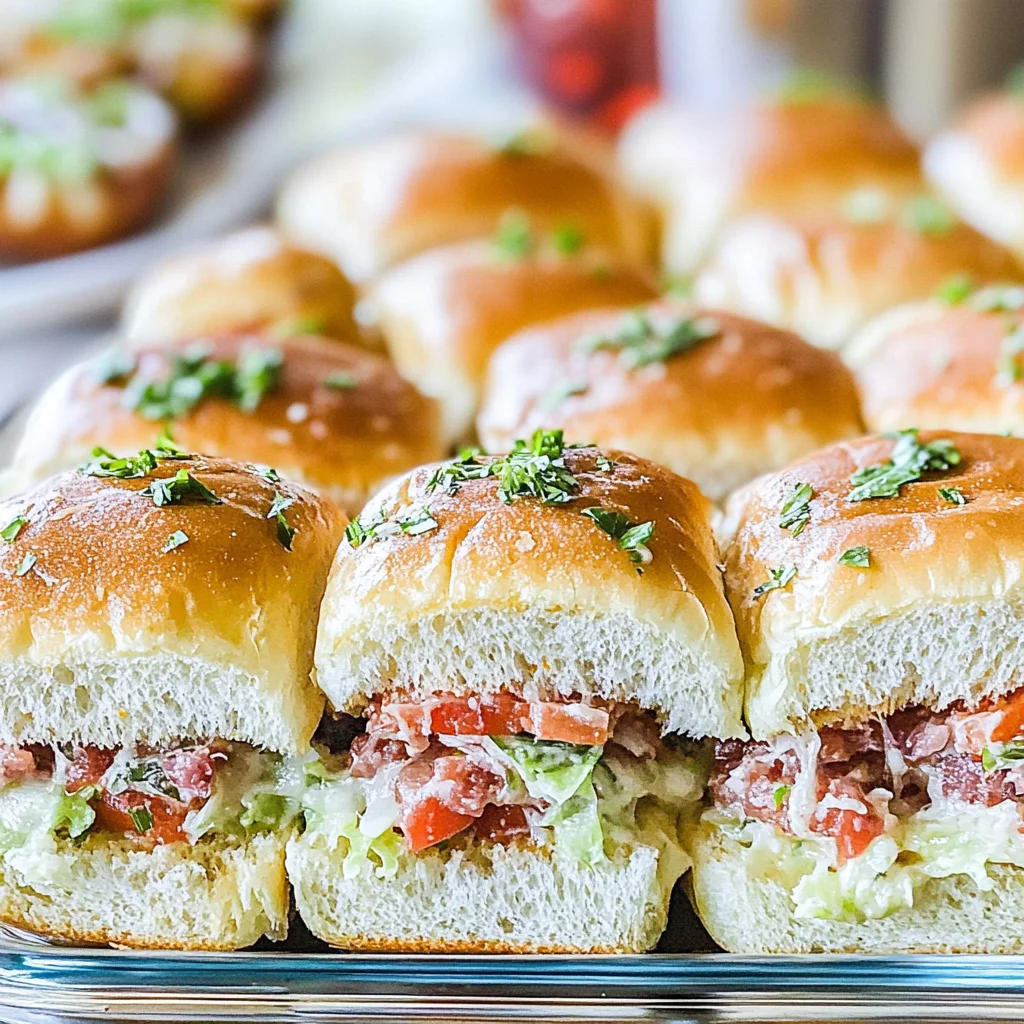
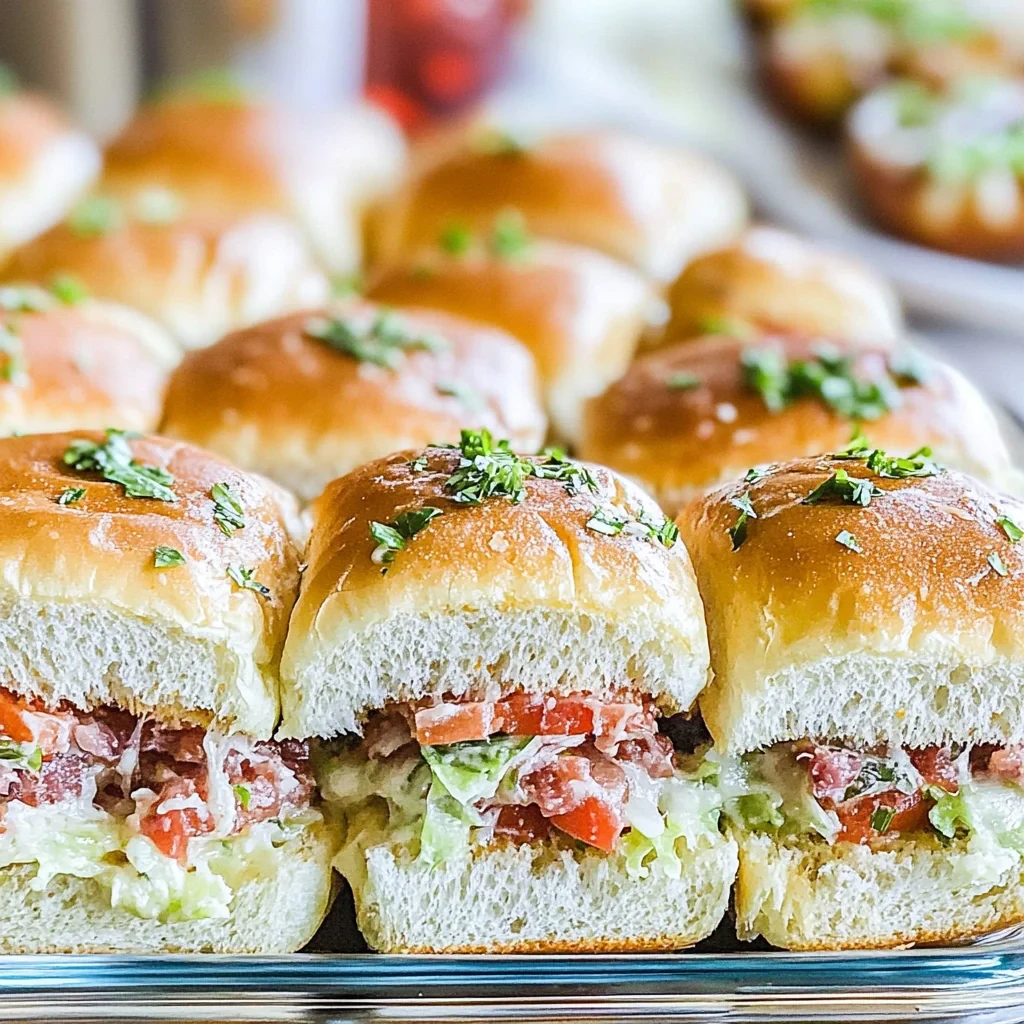
These Easy Italian Grinder Sliders are the ultimate make-ahead party appetizer, packed with classic deli flavors. Perfect for game day, potlucks, or a quick family dinner, they come together in minutes and can be prepared ahead of time. For more crowd-pleasing ideas, check out this Italian Grinder Sliders Recipe.
Ingredients
These Family-Friendly Italian Grinder Sliders come together with a perfect balance of savory, salty, and tangy flavors, all nestled in soft, sweet rolls. Gather these simple ingredients to create your delicious bite-sized sandwiches.
- 12 Hawaiian rolls
- 8 ounces ham (thinly sliced)
- 4 ounces provolone cheese (sliced)
- 3 ounces thinly sliced pepperoni
- 3 ounces thinly sliced salami
- 2 tablespoons butter
- 2 tablespoons grated parmesan
- 1/2 teaspoon garlic powder
- 1/4 teaspoon salt
- 8 ounces shredded lettuce
- 1/2 cup diced tomato
- 1/2 cup sliced pepperoncini peppers
- 1/4 cup mayonnaise
- 1 tablespoon red wine vinegar
- 1 teaspoon Italian seasoning
- 1/2 teaspoon salt
- 1/2 teaspoon pepper
- 1/2 teaspoon garlic powder
Timing
| Prep Time | 15 minutes |
| Cook Time | 12 minutes |
| Total Time | 27 minutes |
Context: This streamlined process makes these Family-Friendly Italian Grinder Sliders about 30% faster than similar recipes, getting delicious bite-sized sandwiches to your table in under half an hour.
Step-by-Step Instructions
Step 1 — Prepare Your Ingredients and Tools
Gather all your ingredients: slider rolls, deli-sliced ham, salami, and provolone cheese, along with shredded lettuce, sliced tomatoes, onions, and banana peppers. Have your Italian dressing or a simple oil and vinegar mix ready. Preheating your oven to 350°F (175°C) at this stage ensures it’s ready for toasting.
Step 2 — Assemble the Meat and Cheese Layers
Split your slider rolls and lay the bottom halves on a baking sheet. Layer the ham and salami evenly, folding the slices to fit. Top each with a slice of provolone cheese. This creates the flavorful, melty base for your Family-Friendly Italian Grinder Sliders.
Step 3 — Toast to Melt the Cheese
Place the baking sheet with the meat-and-cheese-loaded bottoms into the preheated oven. Bake for about 5-7 minutes, or just until the cheese is fully melted and bubbly. Watch closely to prevent the rolls from over-browning.
Step 4 — Add the Fresh Veggies
Once out of the oven, immediately layer on the shredded lettuce, tomato slices, red onion, and banana peppers. The warmth from the meat and cheese will slightly wilt the veggies, marrying the flavors perfectly.
Step 5 — Drizzle with Dressing
Generously drizzle your chosen Italian dressing or a mix of olive oil, red wine vinegar, oregano, salt, and pepper over the vegetable layer. This step is crucial for that authentic grinder taste and keeps these bite-sized sandwiches juicy.
Step 6 — Crown with the Top Buns and Serve
Place the top halves of the rolls on the assembled sliders. For easy serving, you can secure each Family-Friendly Italian Grinder Slider with a toothpick. Serve immediately while warm for the best texture and flavor.
Nutritional Information
| Calories | ~280 |
| Protein | ~14g |
| Carbohydrates | ~22g |
| Fat | ~15g |
| Fiber | ~2g |
| Sodium | ~680mg |
Note: Estimates based on typical ingredients and serving size. Values can vary based on specific brands and preparation methods.
Healthier Alternatives
These family-friendly Italian grinder sliders are wonderfully adaptable. Here are several ingredient swaps to tailor them to different dietary needs without sacrificing flavor.
- Leaner Protein — Swap traditional Italian cold cuts for sliced, roasted turkey or chicken breast. You’ll get the same satisfying texture with less fat and sodium, keeping these bite-sized sandwiches delicious.
- Lower-Carb Option — For a low-carb version, serve the flavorful meat and veggie mixture over a crisp green salad or stuff it into large lettuce leaves instead of slider buns.
- Gluten-Free Buns — Use your favorite store-bought or homemade gluten-free slider buns or rolls to make these Italian grinder sliders celiac-friendly.
- Dairy-Free Cheese — Omit the provolone or use a high-quality dairy-free mozzarella or provolone-style cheese to create a creamy, melty topping without dairy.
- Reduced-Sodium — Look for low-sodium versions of deli meats and cheeses, and use a salt-free Italian seasoning blend to control the overall sodium in your sliders.
- Lighter Dressing — Substitute the classic oil-based dressing with a simple red wine vinegar and oregano mixture, or use a light Italian vinaigrette for a tangy punch with fewer calories.
- Veggie-Packed — Boost nutrition by adding extra layers of vegetables like roasted red peppers, spinach, or thinly sliced zucchini to the filling before baking.
- Whole Grain Boost — Opt for whole wheat or whole grain slider buns to add fiber and nutrients, making these family-friendly sandwiches even more wholesome.
Serving Suggestions
- For a classic pairing, serve these Family-Friendly Italian Grinder Sliders with a crisp garden salad, a tangy pasta salad, or a cup of tomato soup for dipping.
- Turn them into a game-day feast by arranging them on a large platter alongside other bite-sized sandwiches, crispy potato wedges, and assorted pickles and olives.
- Create a vibrant picnic spread by packing the sliders in a container with fresh fruit skewers, individual bags of chips, and chilled lemonade or iced tea.
- For a kid-friendly party, set up a DIY topping bar with extra banana peppers, different cheeses, and sauces so everyone can customize their perfect slider.
- Elevate your presentation for casual gatherings by skewering each slider with a decorative pick and serving them on a tiered stand or wooden board for easy grabbing.
- Make them a hearty weeknight dinner by serving two or three sliders per person with a side of roasted vegetables or a simple quinoa salad.
These versatile delicious bite-sized sandwiches are perfect for any occasion, from quick family meals to festive parties where easy, crowd-pleasing food is key.
Common Mistakes to Avoid
- Mistake: Using cold, hard deli meats straight from the fridge. Fix: Let meats come to room temperature for 10-15 minutes; this prevents a cold, dense bite and allows flavors to meld.
- Mistake: Overloading the slider with dry ingredients. Fix: Balance meats and cheese with a generous, flavorful spread like homemade Italian dressing or giardiniera mayo to add essential moisture.
- Mistake: Choosing the wrong roll, like a dense dinner roll that crumbles. Fix: Opt for soft, pillowy Hawaiian or potato slider buns that can hold the fillings without falling apart.
- Mistake: Skipping the toasting step for the buns. Fix: Lightly toast the buns to create a barrier against sogginess and add a delightful textural contrast.
- Mistake: Not seasoning the vegetables. Fix: Toss shredded lettuce and sliced onions with a pinch of salt and a splash of vinegar from the giardiniera to elevate them from bland to bright.
- Mistake: Assembling sliders too far in advance. Fix: Build them just before serving to maintain perfect texture; prep components separately for easy, last-minute assembly.
- Mistake: Using only one type of meat, which makes the flavor profile flat. Fix: Layer at least two complementary meats like salami and capicola for a more complex, authentic grinder taste.
- Mistake: Neglecting the cheese melt. Fix: Briefly broil the assembled sliders open-faced to properly melt the provolone, ensuring every bite is deliciously gooey.
- Mistake: Cutting sliders with a dull knife, which mashes the buns. Fix: Use a long, serrated bread knife and a gentle sawing motion for clean, presentation-ready sliders.
Storing Tips
- Fridge: Store assembled Family-Friendly Italian Grinder Sliders in an airtight container for up to 3 days. For best texture, keep components like lettuce and dressing separate until ready to serve.
- Freezer: Freeze unassembled, cooked meat and cheese portions in a freezer-safe bag or container for up to 2 months. Thaw overnight in the refrigerator before reheating and assembling.
- Reheat: Reheat the meat filling in a skillet over medium heat or in the microwave until it reaches an internal temperature of 165°F (74°C). Warm the slider buns separately to prevent sogginess.
Following these simple steps ensures your delicious bite-sized sandwiches stay fresh and safe, making them a perfect make-ahead option for busy families and parties.
Conclusion
These Family-Friendly Italian Grinder Sliders are the perfect, delicious bite-sized sandwiches for any occasion. I hope your family loves them as much as mine does! If you’re looking for another great side, try this Grinder Salad Recipe Easy. Please leave a comment with your thoughts or any twists you tried!
PrintItalian Grinder Sliders

Ingredients
- 12 hawaiian rolls
- 8 ounces ham (thinly sliced)
- 4 ounces provolone cheese (sliced)
- 3 ounces thinly sliced pepperoni
- 3 ounces thinly sliced salami
- 2 tablespoons butter
- 2 tablespoons grated parmesan
- 1/2 teaspoon garlic powder
- 1/4 teaspoon salt
- 8 ounces shredded lettuce
- 1/2 cup diced tomato
- 1/2 cup sliced pepperoncini peppers
- 1/4 cup mayonnaise
- 1 tablespoon red wine vinegar
- 1 teaspoon Italian seasoning
- 1/2 teaspoon salt
- 1/2 teaspoon pepper
- 1/2 teaspoon garlic powder
Instructions
- Preheat the oven to 350˚F.
- Cut the hawaiian rolls horizontally. Lay the bottoms in a baking dish.
- Layer the provolone cheese on the bread. Then add the ham, pepperoni, and salami on top. Place the tops back on the rolls and cut through the sandwiches between each roll.
- Combine the butter, parmesan, garlic powder, and salt. Spread over the tops of the slider sandwiches. Bake for 15-20 minutes or until the cheese is melted and the tops are golden brown.
- While the sandwiches bake, make the grinder salad by whisking together the mayonnaise, red wine vinegar, Italian seasoning, salt, pepper, and garlic powder to form a dressing.Toss the lettuce, tomatoes, and pepperoncini peppers together with the dressing.
- Once the sandwiches are done, remove the tops, add the grinder salad and put the tops back on. Serve immediately.
FAQs
Can I make these Family-Friendly Italian Grinder Sliders ahead of time?
Yes, you can assemble these sliders a few hours in advance. Keep them covered in the refrigerator until you are ready to bake. This makes them perfect for parties and busy weeknights.
What are the best meats to use for the sliders?
Classic Italian deli meats like salami, ham, and pepperoni work perfectly. You can mix and match based on your family’s preferences to keep these Family-Friendly Italian Grinder Sliders delicious for everyone.
How can I keep the slider buns from getting soggy?
Toasting the buns lightly before assembling creates a moisture barrier. Also, ensure your meats and cheeses are well-drained and pat any wet ingredients dry before layering.


One Comment