Spicy Salmon Sushi Bake Recipe
Introduction
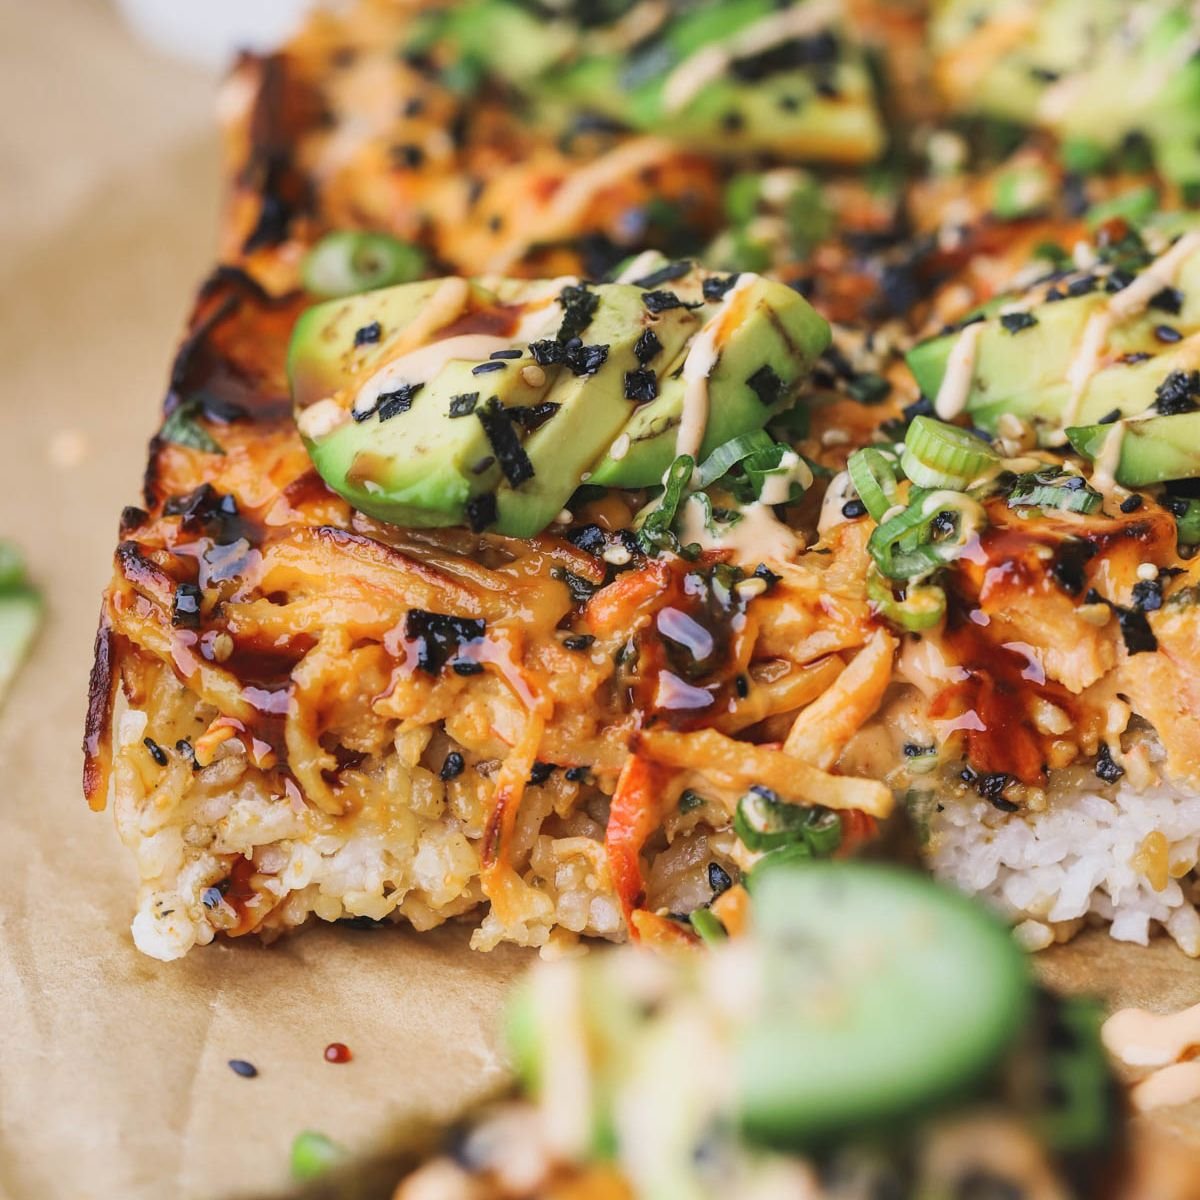
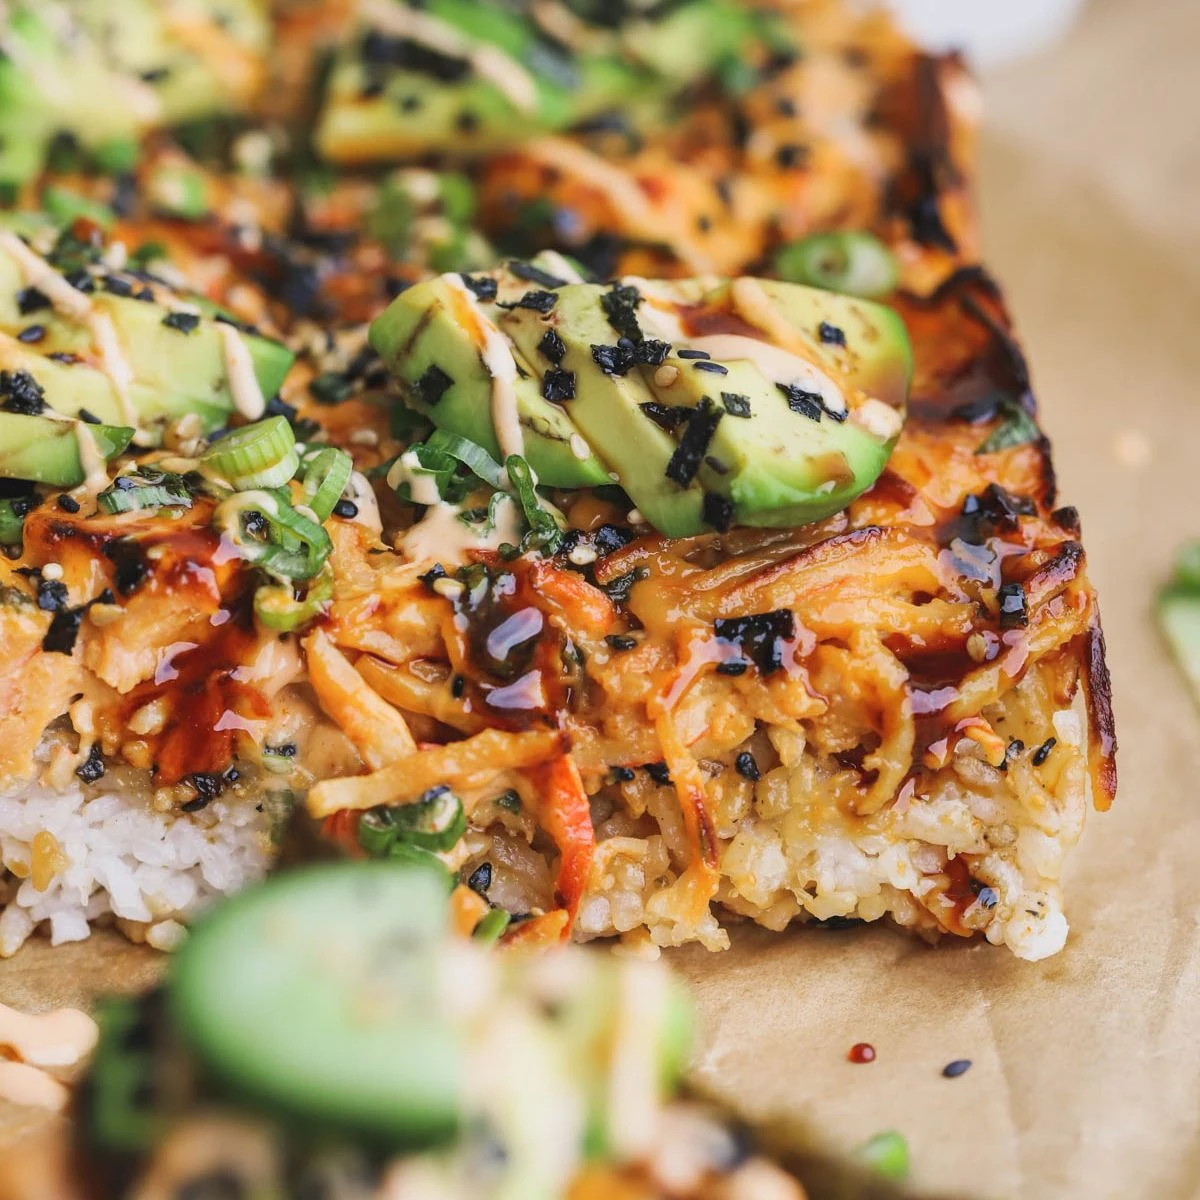
This Easy Salmon Sushi Bake is the viral TikTok recipe that brings all the flavors of sushi into a simple, shareable casserole. It layers seasoned rice, creamy spicy salmon, and savory toppings for a fun, no-roll meal. For another delicious salmon dish, try this Orange Teriyaki Salmon Recipe. It’s a perfect way to enjoy a popular fish with minimal fuss and maximum flavor.
Ingredients
This deconstructed sushi casserole combines the creamy, savory richness of seasoned salmon with the perfect bite of slightly sweet sushi rice, all finished with a spicy kick and cool, fresh toppings.
- 1 1/2 cups Sushi rice (rinsed)
- 2 cups Water
- 1/4 cup Lite seasoned rice vinegar
- 2 tbsp Furikake
- 8 oz Salmon filet (skin removed and cut into 1/2″ pieces)
- 8 oz Imitation crab meat (shredded)
- 1/3 cup Kewpie mayo
- 3 oz Cream cheese (softened)
- 2 tbsp Sriracha
- 2 tbsp Soy sauce or Tamari
- 1/4 cup Green onions (sliced thin)
- 1/4 cup Soy sauce
- 1/4 cup Mirin
- 2 tbsp Sake
- 1 1/2 tbsp White granulated sugar
- 1/2 cup Kewpie mayo
- 2 tbsp Sriracha
- 1 tsp Fresh lime juice
- 1/4 tsp Salt
- Avocado (sliced thin)
- Sesame seeds (black and white, toasted)
- Green onion (sliced thin)
- English cucumber (sliced thin)
- Nori sheets (cut into small squares)
Timing
| Prep Time | 15 minutes |
| Cook Time | 25 minutes |
| Total Time | 40 minutes |
Context: This streamlined Salmon Sushi Bake recipe is about 20% faster than many layered casserole versions, getting you from prep to a delicious, shareable meal in well under an hour.
Step-by-Step Instructions
Step 1 — Prepare the Rice
Cook your sushi rice according to package directions. Once cooked, gently fold in seasoned rice vinegar while the rice is still warm. Spread the seasoned rice evenly into the bottom of a greased 9×13 inch baking dish, pressing it down firmly to create a solid base for your Salmon Sushi Bake.
Step 2 — Prepare the Salmon
Place skinless salmon fillets on a parchment-lined baking sheet. Bake at 400°F (200°C) for 12-15 minutes, or until the salmon flakes easily with a fork. Let it cool slightly, then use a fork to flake the salmon into small pieces in a large mixing bowl.
Step 3 — Make the Creamy Filling
To the bowl of flaked salmon, add mayonnaise, sriracha (for the spicy version), and a splash of soy sauce. For The Epicurean Mouse version, you might use a touch of sesame oil and finely chopped chives. Mix everything thoroughly until the salmon is well-coated and creamy.
Step 4 — Assemble the Bake
Spoon the creamy salmon mixture over the pressed rice base in your baking dish. Use a spatula to spread it into a smooth, even layer that covers the rice completely.
Step 5 — Add the Toppings
Sprinkle a generous amount of shredded mozzarella or a Japanese cheese blend evenly over the salmon layer. This will create the deliciously melted, golden top. For extra flavor, you can also add a sprinkle of furikake or toasted sesame seeds.
Step 6 — Bake to Perfection
Place the assembled dish in a preheated 450°F (230°C) oven. Bake for 8-12 minutes, or until the cheese is fully melted, bubbly, and just beginning to brown in spots. Keep a close eye to prevent burning.
Step 7 — Garnish and Serve
Once out of the oven, immediately garnish your Spicy Salmon Sushi Bake with sliced green onions, avocado, and more sriracha drizzle if desired. Serve it warm with sheets of nori (seaweed) or soy sauce for dipping, allowing everyone to scoop the bake onto their nori to eat.
Nutritional Information
| Calories | ~420 kcal |
| Protein | ~28 g |
| Carbohydrates | ~35 g |
| Fat | ~18 g |
| Fiber | ~2 g |
| Sodium | ~650 mg |
Note: Estimates based on typical ingredients and serving size. This Salmon Sushi Bake is also a good source of Vitamin D and Omega-3 fatty acids.
Healthier Alternatives
This salmon sushi bake is wonderfully adaptable. Here are some simple swaps to tailor it to your dietary needs or flavor preferences.
- Protein Swap: Canned Tuna or Crab — Use well-drained canned tuna or imitation crab for a more budget-friendly or classic seafood flavor.
- Lower-Carb Base: Cauliflower Rice — Replace sushi rice with riced cauliflower for a keto-friendly version that still soaks up the creamy sauce.
- Dairy-Free Creaminess: Vegan Mayo & Coconut Cream — Combine vegan mayonnaise with a splash of coconut cream to mimic the rich, tangy texture without dairy.
- Gluten-Free Assurance: Tamari or Coconut Aminos — Use tamari (gluten-free soy sauce) or coconut aminos for a soy-free, low-sodium alternative to season the salmon mixture.
- Low-Sodium Option: Reduced-Sodium Soy Sauce & Fresh Veggies — Cut salt by using low-sodium soy sauce and boosting flavor with extra fresh ginger, cucumber, or avocado as toppings.
- Spice Control: Sriracha or Chili Flakes — For a milder bake, reduce or omit the sriracha; for more heat, add a drizzle on top before serving or a pinch of chili flakes to the mix.
- Extra Veggie Boost: Spinach or Edamame — Stir a handful of chopped fresh spinach or thawed edamame into the rice layer for added fiber, color, and nutrients.
Serving Suggestions
- Pair your Salmon Sushi Bake with a simple side of miso soup and a crisp seaweed salad for a complete, restaurant-style meal at home.
- For a fun party platter, serve the bake alongside bowls of edamame, pickled ginger, and wasabi for guests to customize their bites.
- This dish is perfect for casual gatherings, potlucks, or a unique game-day spread, as it can be made ahead and served warm or at room temperature.
- Elevate the presentation by topping individual servings with a drizzle of spicy mayo and eel sauce, a sprinkle of furikake, and a few sesame seeds.
- For the Spicy Salmon Sushi Bake variation, balance the heat with a cool, creamy topping like avocado slices or a dollop of Japanese Kewpie mayonnaise.
- Serve it in the baking dish for a rustic, family-style feel, or use a ring mold to create elegant, individual portions for a more refined dinner party.
- Leftovers make an excellent filling for hand rolls (temaki) the next day—just scoop the bake into sheets of nori with some fresh cucumber.
Common Mistakes to Avoid
- Mistake: Using warm, freshly cooked rice. Fix: Cool rice completely before mixing with vinegar to prevent a gummy, mushy bake.
- Mistake: Over-saucing the salmon layer. Fix: Use a light hand with mayo and sriracha; too much fat can make the dish greasy and heavy.
- Mistake: Skipping the rice seasoning. Fix: Always fold in seasoned rice vinegar (sushi vinegar) while the rice is warm for authentic flavor.
- Mistake: Underseasoning the salmon mixture. Fix: Taste the filling before assembling; it should be boldly flavored to stand up to the rice.
- Mistake: Overbaking until dry. Fix: Bake just until heated through and the top is lightly golden, about 12-15 minutes.
- Mistake: Using low-quality nori sheets. Fix: Choose toasted sushi nori for the best flavor and crisp texture when serving.
- Mistake: Not pressing the rice layer firmly. Fix: Pack the rice into an even, compact layer to create a stable base that holds together.
- Mistake: Adding wet toppings before baking. Fix: Garnish with items like avocado, cucumber, or extra sauce only after baking to maintain texture.
- Mistake: Using canned salmon without draining. Fix: Thoroughly drain and flake canned salmon to avoid excess moisture in your bake.
- Mistake: Serving immediately from the oven. Fix: Let the Spicy Salmon Sushi Bake rest for 5 minutes to set for cleaner slices.
Storing Tips
- Fridge: Cool the bake completely, then transfer to an airtight container. Refrigerate for up to 2 days. For food safety, ensure it cools to room temperature within 2 hours before refrigerating.
- Freezer: Portion the cooled bake into freezer-safe containers or wrap tightly. Freeze for up to 1 month. Thaw overnight in the refrigerator before reheating.
- Reheat: For best results, reheat refrigerated portions in a 350°F oven until the internal temperature reaches 165°F, about 10-15 minutes. You can also use a microwave, though the texture may soften.
Always store your Salmon Sushi Bake promptly and reheat it thoroughly to ensure it’s both delicious and safe to enjoy.
Conclusion
This Spicy Salmon Sushi Bake is the ultimate easy, shareable meal for sushi lovers. It’s packed with flavor and perfect for a fun dinner. If you’re looking for another vibrant side dish, try this Chili Crisp Snap Pea Salad Recipe. Give this recipe a try and let us know what you think in the comments!
PrintSpicy Salmon Sushi Bake
Ingredients
- 1 1/2 cups Sushi rice (rinsed )
- 2 cups Water
- 1/4 cup Lite seasoned rice vinegar
- 2 tbsp Furikake
- 8 oz Salmon filet (skin removed and cut into 1/2" pieces )
- 8 oz Imitation crab meat (shredded)
- 1/3 cup Kewpie mayo
- 3 oz Cream cheese (softened )
- 2 tbsp Sriracha
- 2 tbsp Soy sauce or Tamari
- 1/4 cup Green onions (sliced thin)
- 1/4 cup Soy sauce
- 1/4 cup Mirin
- 2 tbsp Sake
- 1 1/2 tbsp White granulated sugar
- 1/2 cup Kewpie mayo
- 2 tbsp Sriracha
- 1 tsp Fresh lime juice
- 1/4 tsp Salt
- Avocado (sliced thin)
- Sesame seeds (black and white, toasted)
- Green onion (sliced thin)
- English cucumber (sliced thin)
- Nori sheets (cut into small squares )
Instructions
- Sushi Rice
- Salmon Mixture
- Unagi Sauce
- Spicy Mayo
- Assembly
FAQs
What is the best type of salmon to use for this Salmon Sushi Bake?
For the best results, use fresh, sushi-grade salmon for your Salmon Sushi Bake. This ensures the fish is safe to eat after baking and provides the highest quality flavor and texture. You can find it at a reputable fish market or the seafood counter of a well-stocked grocery store.
Can I make this Spicy Salmon Sushi Bake ahead of time?
Yes, you can assemble the bake a few hours ahead and refrigerate it until ready to cook. For the best texture, bake it just before serving. This Salmon Sushi Bake is best enjoyed fresh from the oven while the rice is warm and the top is perfectly golden.
How can I adjust the spice level in this recipe?
Control the heat in your Spicy Salmon Sushi Bake by adjusting the amount of sriracha or spicy mayo you mix into the salmon. Start with less, taste the mixture, and add more to suit your preference. You can also serve extra sriracha on the side for those who want an extra kick.

2 Comments