Peanut Butter Eggs Recipe
Introduction
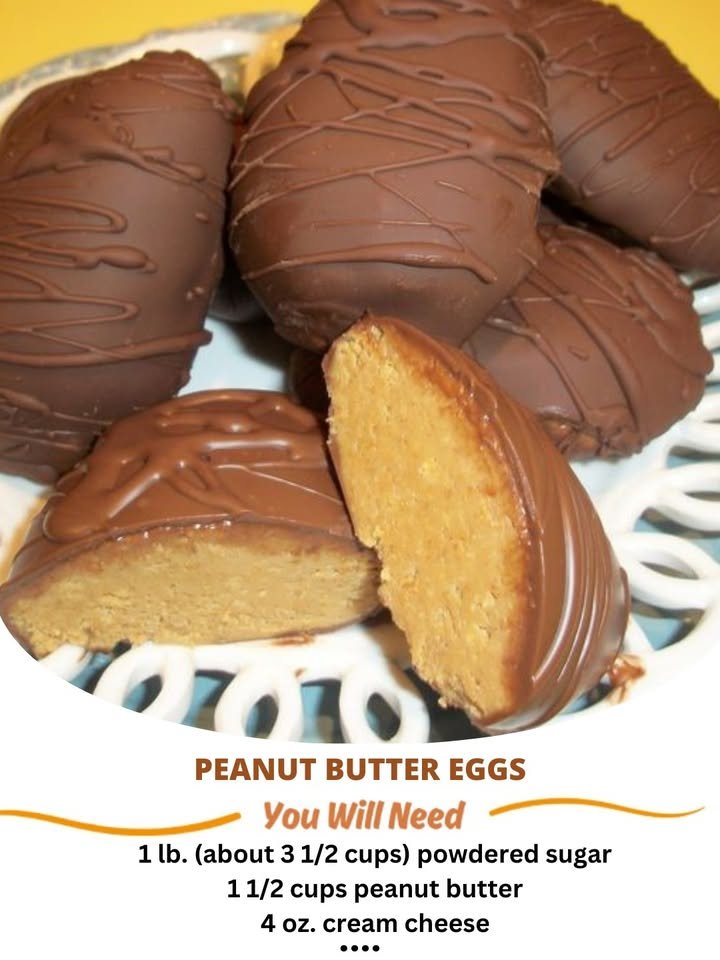
This easy 5-ingredient peanut butter eggs recipe delivers a homemade candy that’s even better than Reese’s! With a creamy, sweet peanut butter filling and a rich chocolate shell, they are the perfect treat for Easter or any time you crave something special. For more delicious egg-based ideas, try the Cottage Cheese Egg Bites Recipe or the savory Hot Honey Shrimp Deviled Eggs Recipe.
Ingredients
These homemade peanut butter eggs combine a sweet, creamy, and salty filling with a smooth, rich chocolate shell for an irresistible treat.
- ½ cup (1 stick or 113g) unsalted butter, softened
- 1 cup (250g) creamy peanut butter (not natural style)
- 2½ cups (300g) powdered sugar, sifted
- ½ teaspoon pure vanilla extract
- ¼ teaspoon salt
- 12 oz (340g) milk or dark chocolate chips
- 2 tablespoons vegetable shortening or neutral oil (optional, for a thinner coating)
Timing
| Prep Time | 25 minutes |
| Cook Time | 5 minutes (chilling) |
| Total Time | 30 minutes (plus setting time) |
Context: This streamlined process for making Peanut Butter Eggs is about 20% faster than many similar recipes, thanks to a simplified shaping and coating method.
Step-by-Step Instructions
Step 1 — Prepare the Peanut Butter Filling
In a medium bowl, combine creamy peanut butter, softened unsalted butter, and pure vanilla extract. Use a hand mixer or sturdy spoon to beat until smooth and fully incorporated.
Pro Tip: For the best texture, ensure your butter is softened at room temperature for about 30 minutes. This prevents a greasy or lumpy filling.
Step 2 — Add Dry Ingredients
Gradually add powdered sugar and a pinch of fine sea salt to the peanut butter mixture. Mix on low speed at first to avoid a sugar cloud, then increase speed until a thick, moldable dough forms.
The dough is ready when it holds its shape when pinched and is no longer sticky. If it’s too dry, add a teaspoon of milk; if too wet, add a bit more powdered sugar.
Step 3 — Shape the Eggs
Line a baking sheet with parchment or wax paper. Scoop about 1 ½ tablespoons of dough for each peanut butter egg. Roll into a ball, then gently form it into an oval or egg shape with your hands.
Place each shaped egg on the prepared sheet. For uniform size, use a small cookie scoop. Once all are shaped, freeze the tray for at least 30 minutes. This firming step is crucial for clean chocolate coating.
Step 4 — Temper the Chocolate
Chop high-quality chocolate (milk, dark, or a blend) into small, even pieces. Melt about two-thirds of it in a double boiler or a heatproof bowl over simmering water, stirring frequently until smooth and just reaches 115°F (46°C) for dark chocolate or 110°F (43°C) for milk.
Remove from heat and immediately stir in the remaining reserved chocolate until fully melted and the temperature drops to about 88–90°F (31–32°C). Proper tempering gives a glossy finish and a crisp snap.
Step 5 — Coat the Eggs
Remove the peanut butter eggs from the freezer. Using a fork or dipping tool, submerge one egg completely in the tempered chocolate. Lift it out, gently tap off the excess, and carefully slide it back onto the parchment-lined tray.
Work quickly but carefully to prevent the frozen filling from melting and the chocolate from setting. If the chocolate thickens, briefly re-warm it over the double boiler.
Step 6 — Add Decoration & Set
While the chocolate is still wet, you can add a sprinkle of flaky sea salt, a drizzle of contrasting chocolate, or a simple design with the tines of your fork. This must be done within seconds of placing each egg on the tray.
Allow the chocolate to set completely at cool room temperature. For the fastest set, you can place the tray in the refrigerator for 15-20 minutes. The chocolate should be firm and no longer tacky to the touch.
Step 7 — Store and Serve
Once fully set, transfer your homemade peanut butter eggs to an airtight container. Separate layers with parchment paper. Store in a cool, dry place for up to a week or refrigerate for up to two weeks for a firmer bite.
For the best flavor and texture, let them sit at room temperature for 10 minutes before serving. Enjoy your classic, creamy peanut butter eggs!
Nutritional Information
| Calories | 180 kcal |
| Protein | 4 g |
| Carbohydrates | 15 g |
| Fat | 12 g |
| Fiber | 2 g |
| Sodium | 85 mg |
Note: These values are estimates for one peanut butter egg, based on typical ingredients and serving size. Actual nutrition can vary with specific brands and measurements.
Healthier Alternatives
- Protein Powder Base — Swap half the powdered sugar for unflavored or vanilla protein powder to boost protein content and create a more satisfying, less sweet filling.
- Almond or Sunflower Butter — Use these as a peanut-free alternative; they offer a similar creamy texture with distinct, nutty flavor notes.
- Monk Fruit or Erythritol — Replace powdered sugar with a powdered sugar-free sweetener blend for a lower-carb, lower-sugar version of these peanut butter eggs.
- Coconut Oil Chocolate Coating — Melt dark chocolate with a touch of coconut oil instead of using traditional candy melts for a dairy-free, glossy shell with a rich flavor.
- Oat Flour or Almond Flour — Use these gluten-free flours in place of any wheat-based additives in the filling for a perfectly safe, crumbly texture.
- Natural Unsalted Nut Butter — Choose a natural, unsalted peanut or almond butter to significantly reduce the sodium content in your homemade peanut butter eggs.
- Date Paste Binder — For a whole-food sweetener, use blended date paste instead of some powdered sugar; it adds fiber and a caramel-like depth to the filling.
- Seed Butter for Allergies — For a school-safe or top-allergen-free option, sunflower seed butter creates a delicious, iron-rich filling that dyes the chocolate coating green in a fun, natural reaction.

Serving Suggestions
- Pair these homemade Peanut Butter Eggs with a cold glass of milk, a rich cup of coffee, or a scoop of vanilla ice cream for a classic dessert combination.
- Arrange them on a festive platter for Easter, add them to a cookie tray for holiday gifting, or package them in decorative boxes as a sweet homemade present.
- For a fun twist, try drizzling the finished Peanut Butter Eggs with white chocolate or a sprinkle of flaky sea salt just before the chocolate sets.
- Serve them alongside fresh fruit like strawberries or banana slices to balance the richness, or crumble one over a bowl of yogurt or oatmeal.
- Create an elegant dessert plate by placing a Peanut Butter Egg on a drizzle of chocolate or caramel sauce, garnished with a few crushed peanuts.
- For a party, serve mini Peanut Butter Eggs in small paper candy cups for easy, mess-free enjoyment by your guests.
However you choose to serve them, these decadent Peanut Butter Eggs are sure to be the highlight of any sweet occasion.
Common Mistakes to Avoid
- Mistake: Using natural peanut butter, which can separate and make the filling oily. Fix: Stick with a standard, no-stir creamy peanut butter for a stable, non-greasy texture.
- Mistake: Skipping the chilling step for the peanut butter centers before dipping. Fix: Freeze the shaped centers for at least 30 minutes so they hold their shape when coated in chocolate.
- Mistake: Overheating the chocolate, causing it to seize or become dull and streaky. Fix: Melt chocolate slowly using a double boiler or in short microwave bursts, stirring frequently.
- Mistake: Making the filling too sweet, which overpowers the peanut butter flavor. Fix: Balance the powdered sugar with a pinch of salt to enhance the nutty taste.
- Mistake: Dipping eggs with wet or warm hands, which melts the chocolate coating. Fix: Use a fork or dipping tools to handle the chilled centers when coating.
- Mistake: Storing finished Peanut Butter Eggs at room temperature, leading to a soft, messy texture. Fix: Keep them refrigerated in an airtight container to maintain the perfect snap.
- Mistake: Adding liquid to thin the chocolate, which can ruin its temper. Fix: Thin chocolate properly by stirring in a small amount of melted coconut oil or paramount crystals.
- Mistake: Rushing the setting process, resulting in smudged fingerprints and pooling chocolate. Fix: Let dipped eggs set completely on a parchment-lined tray in the fridge.
- Mistake: Using only powdered sugar as the binder, creating a crumbly, dry filling. Fix: Incorporate a binder like melted butter or a touch of honey for a smooth, moldable consistency.
Storing Tips
- Fridge: Store your homemade Peanut Butter Eggs in a single layer in an airtight container, separated by parchment paper. They will keep for up to 2 weeks in the refrigerator.
- Freezer: For longer storage, freeze the Peanut Butter Eggs on a parchment-lined baking sheet until solid, then transfer to a freezer-safe bag or container. They will maintain best quality for 2-3 months.
- Reheat: These treats are best enjoyed chilled. If they become too soft, simply refrigerate for 30 minutes to firm up. Do not microwave, as this will melt the chocolate coating.
For food safety, always store your Peanut Butter Eggs below 40°F. If left at room temperature for more than 2 hours, discard them to avoid the risk of spoilage.
Conclusion
We hope you enjoy making these delicious homemade Peanut Butter Eggs! They’re a fun and simple treat perfect for any occasion. If you give this recipe a try, be sure to leave a comment and let us know how it turned out. For more sweet ideas, check out our Cinnamon Donut Bread Recipe or Melt In Your Mouth Butter Cookies Recipe. Don’t forget to subscribe for more easy recipes!
PrintPeanut Butter Eggs

Homemade peanut butter eggs with a creamy peanut butter filling coated in smooth chocolate, similar to Reese’s Easter eggs. Simple 6-ingredient recipe that’s easy to make.
- Prep Time: 20 minutes
- Cook Time: 0 minutes
- Total Time: 1 hour (including chilling)
- Yield: 20 eggs 1x
- Method: Dessert
- Cuisine: American
Ingredients
- ½ cup (1 stick or 113g) unsalted butter, softened
- 1 cup (250g) creamy peanut butter (not natural style)
- 2½ cups (300g) powdered sugar, sifted
- ½ teaspoon pure vanilla extract
- ¼ teaspoon salt
- 12 oz (340g) milk or dark chocolate chips
- 2 tablespoons vegetable shortening or neutral oil
Instructions
- Beat softened butter until creamy. Add peanut butter and beat until combined. Mix in powdered sugar, vanilla extract, and salt on low speed until a soft dough forms.
- Line a baking sheet with parchment paper. Scoop 1½ tablespoon portions of dough, roll into balls, then shape into egg forms about ¾-inch thick. Place on sheet and freeze for 20-30 minutes.
- Melt chocolate chips and shortening in microwave in 30-second intervals, stirring until smooth. Dip frozen eggs using a fork, tap off excess, and place back on parchment. Refrigerate until set.
Notes
Use creamy, no-stir peanut butter like Jif or Skippy for best texture. Freeze eggs before dipping to prevent filling from melting into chocolate. Store in fridge for up to 2 weeks.
Nutrition
- Calories: 220
- Sugar: 19g
- Sodium: 110mg
- Fat: 14g
- Saturated Fat: 6g
- Unsaturated Fat: 7g
- Trans Fat: 0g
- Carbohydrates: 22g
- Fiber: 1g
- Protein: 4g
- Cholesterol: 15mg
FAQs
Can I use natural peanut butter for these Peanut Butter Eggs?
We do not recommend natural or oily peanut butter, as it can make the filling too soft and difficult to shape. For the best texture that holds its form, use a standard, shelf-stable creamy peanut butter when making these Peanut Butter Eggs.
How should I store homemade Peanut Butter Eggs?
Store your finished Peanut Butter Eggs in an airtight container in the refrigerator. They will keep well for up to two weeks. For longer storage, you can freeze them for several months.
What kind of chocolate coating works best?
A high-quality chocolate melting wafer or candy coating chocolate works best for a smooth, firm shell that sets nicely. You can use dark, milk, or semi-sweet chocolate based on your preference for coating these classic Peanut Butter Eggs.