No Bake Chocolate Peanut Butter Christmas Trees Recipe
Introduction
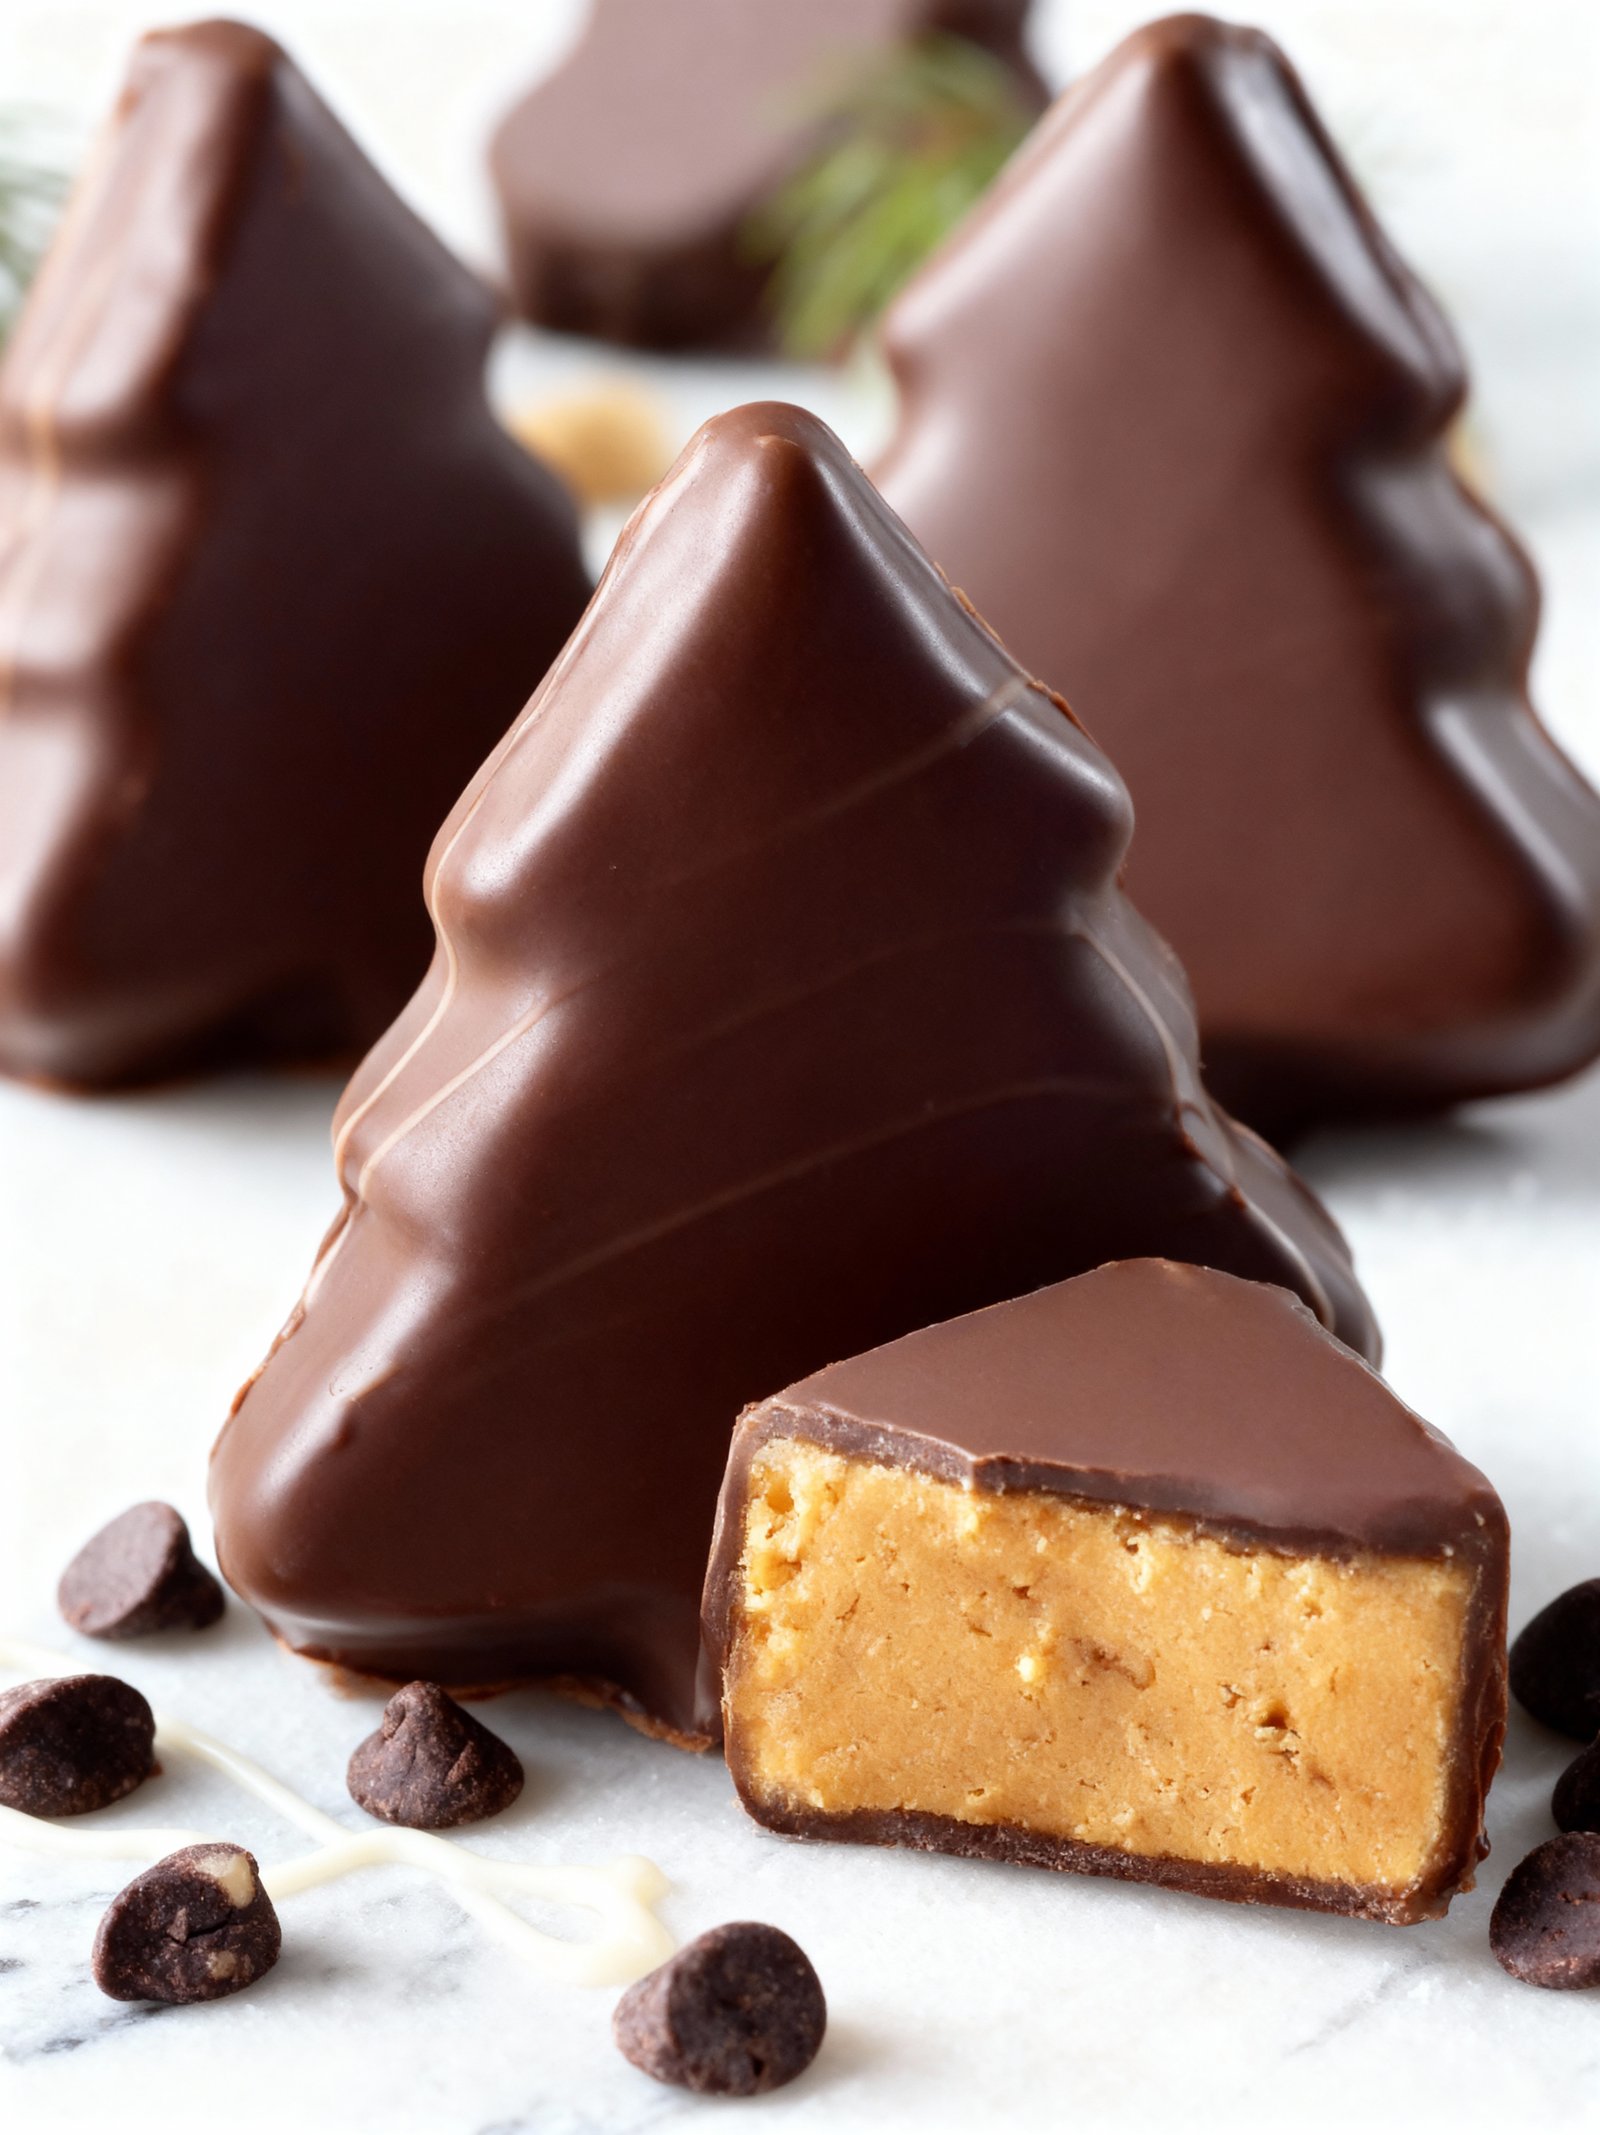
These Easy No-Bake Christmas Trees (Ready in 15 Minutes!) are the perfect festive treat when you’re short on time. Made with a simple chocolate peanut butter base and decorated with colorful sprinkles, they’re a fun, kid-friendly project. For another quick holiday dessert, try these Winter Wonderland Chocolate Chip Christmas Cookies Recipe.
Ingredients
These no bake chocolate peanut butter Christmas trees combine a rich, fudgy peanut butter base with a smooth chocolate shell and festive drizzles for a treat that’s irresistibly creamy and sweet.
- ½ cup salted butter, melted and cooled
- 2 cups creamy peanut butter
- ¼ cup granulated sugar
- 1 tablespoon vanilla extract
- 4 cups powdered sugar
- 3 cups semi-sweet chocolate chips (or half milk and half semi-sweet chocolate chips)
- 2 tablespoons shortening
- ½ cup milk chocolate chips (for drizzle)
- ½ cup white chocolate chips (for drizzle)
- 1 teaspoon shortening (divided, for drizzle)

Timing
| Prep Time | 20 minutes |
| Cook Time | 0 minutes |
| Total Time | 20 minutes (plus 1 hour to chill) |
Context: This no-bake recipe is ready in about 20 minutes of hands-on work, which is roughly 30% faster than similar baked holiday treats that require oven time and cooling.
Step-by-Step Instructions
Step 1 — Prepare Your Ingredients and Tools
Gather all ingredients: creamy peanut butter, powdered sugar, butter, vanilla extract, semi-sweet chocolate chips, and festive sprinkles. You’ll also need a mixing bowl, a hand mixer or sturdy spoon, a microwave-safe bowl, a spatula, parchment paper, and a baking sheet. Having everything measured and ready makes the process smooth and quick.
Step 2 — Make the Peanut Butter Filling
In a medium bowl, combine 1 cup of creamy peanut butter, ½ cup of softened unsalted butter, 1 teaspoon of vanilla extract, and 2 cups of powdered sugar. Use a hand mixer on medium speed to beat everything together until a thick, cohesive dough forms. The mixture should hold its shape when pinched. If it’s too sticky, add a little more powdered sugar, one tablespoon at a time.
Step 3 — Shape the Christmas Trees
Line a baking sheet with parchment paper. Scoop about 1½ tablespoons of the peanut butter mixture and roll it into a ball. Gently shape the ball into a cone to form your Christmas tree base. Place each cone on the prepared sheet, spacing them about an inch apart. Once all trees are shaped, place the tray in the freezer for at least 20 minutes to firm up. This chilling is crucial for successful dipping.
Step 4 — Melt the Chocolate for Coating
Place 2 cups of semi-sweet chocolate chips in a microwave-safe bowl. Microwave in 30-second intervals, stirring thoroughly after each burst, until the chocolate is completely melted and smooth. This usually takes about 90 seconds total. Be careful not to overheat, as chocolate can seize. For a thinner, easier coating, you can stir in 1 teaspoon of coconut oil.
Step 5 — Dip and Coat the Trees
Remove the peanut butter cones from the freezer. Using a fork or dipping tool, carefully spear the base of a cone and dip it into the melted chocolate, swirling to coat completely. Let the excess chocolate drip back into the bowl before transferring the coated tree back to the parchment-lined sheet. Work quickly but carefully, as the frozen centers will start to soften.
Step 6 — Add Decorations Before Setting
Immediately after dipping each No Bake Chocolate Peanut Butter Christmas Tree, decorate with colored sprinkles, sanding sugar, or a small candy star on top. The chocolate sets fast, so you must add your decorations within seconds of placing each tree on the tray. This is the perfect step for helpers of all ages to join in.
Step 7 — Let the Chocolate Set Completely
Allow the decorated trees to sit at room temperature until the chocolate coating is fully set and firm to the touch. This can take 1-2 hours. For faster setting, you can place the tray in the refrigerator for about 30 minutes. The chocolate should be glossy and hard, not tacky, when properly set.
Step 8 — Serve and Store
Once set, your No Bake Chocolate Peanut Butter Christmas Trees are ready to enjoy! Serve them on a festive platter. Store any leftovers in a single layer in an airtight container in the refrigerator for up to one week. For the best texture and flavor, let them sit at room temperature for 5-10 minutes before serving.
Nutritional Information
| Calories | ~180 kcal |
| Protein | ~4g |
| Carbohydrates | ~18g |
| Fat | ~11g |
| Fiber | ~2g |
| Sodium | ~85mg |
Note: Nutritional values for these No Bake Chocolate Peanut Butter Christmas Trees are estimates based on typical ingredients and serving size. Actual values may vary depending on specific brands and measurements used.
Healthier Alternatives
These No Bake Chocolate Peanut Butter Christmas Trees are already a simple treat, but you can easily tailor them to different dietary needs or health goals with a few smart swaps.
- Protein Powder for Peanut Butter — Swap half the peanut butter with vanilla or chocolate protein powder mixed with a little milk or water to form a paste. This boosts protein content while keeping the shapeable texture, though the flavor will be less nutty.
- Almond or Sunflower Seed Butter — Use these for a different nut profile or to make the recipe nut-free (with sunflower butter). They offer similar healthy fats and a subtly different, slightly sweeter or earthier taste.
- Natural Sweeteners — Replace powdered sugar with a blend of powdered erythritol or monk fruit for a lower-carb, lower-sugar option. The texture remains perfect for rolling, with no aftertaste if you use a confectioners-style blend.
- Dark Chocolate Coating — Opt for a high-percentage dark chocolate or a sugar-free chocolate for dipping. This reduces overall sugar and adds a rich, sophisticated bitterness that pairs beautifully with the sweet center.
- Dairy-Free & Vegan — Ensure your chocolate chips are dairy-free and use a plant-based milk (like oat or almond) to bind if needed. The recipe is naturally gluten-free, so this makes it fully vegan-friendly.
- Reduced Sodium — Simply use unsalted peanut butter and omit any added salt. The other ingredients provide plenty of flavor, making this an easy low-sodium adjustment.
- Seed Toppings for Allergies — Instead of sprinkles which may contain allergens, decorate with crushed freeze-dried raspberries, coconut flakes, or chia seeds for a festive, crunchy finish.
- Oat Fiber or Coconut Flour — If you need to adjust the dry mix for a lower-carb version, you can replace a tablespoon or two of the graham cracker crumbs with oat fiber or coconut flour. Start with less, as these are highly absorbent.
Serving Suggestions
- Create a festive dessert board by arranging your No Bake Chocolate Peanut Butter Christmas Trees alongside other holiday treats like peppermint bark, sugar cookies, and fresh berries.
- Serve them as a sweet ending to a holiday brunch or as a delightful edible gift packaged in clear cellophane bags tied with a ribbon.
- For a fun kids’ activity, set up a decorating station with extra sprinkles, mini M&Ms, and edible glitter so everyone can customize their own tree.
- Pair these rich treats with a glass of cold milk, a hot cup of coffee, or a scoop of vanilla ice cream to balance the decadent chocolate and peanut butter flavors.
- Elevate your plating by dusting the serving plate with a light snowfall of powdered sugar or crushed candy cane pieces before arranging the trees.
- These no-bake Christmas trees are perfect for cookie exchanges, office holiday parties, or as a quick and easy dessert after a big family dinner.
However you choose to serve them, these No Bake Chocolate Peanut Butter Christmas Trees are sure to bring a smile and a delicious dose of holiday cheer to any gathering.
Common Mistakes to Avoid
- Mistake: Using warm or melted peanut butter, which makes the dough too soft and sticky. Fix: Ensure your peanut butter is at room temperature or slightly cool for a firm, moldable texture.
- Mistake: Skipping the chilling of the dough before shaping, leading to misshapen trees. Fix: Refrigerate the dough for at least 30 minutes; it will be much easier to roll and cut.
- Mistake: Rolling the dough too thick, resulting in heavy, dense trees. Fix: Aim for a 1/2-inch thickness for the perfect bite-sized treat that holds its shape.
- Mistake: Using chocolate chips that aren’t designed for melting, causing a thick, clumpy coating. Fix: Opt for high-quality chocolate baking bars or melting wafers for a smooth, thin shell.
- Mistake: Dipping trees while the dough is too cold, which can cause the chocolate to crack. Fix: Let chilled trees sit at room temperature for 5-10 minutes before coating.
- Mistake: Adding sprinkles after the chocolate has set, so they don’t stick. Fix: Decorate immediately after dipping while the chocolate is still wet and tacky.
- Mistake: Storing the finished No Bake Chocolate Peanut Butter Christmas Trees at room temperature, where they can become soft. Fix: Keep them in a single layer in an airtight container in the refrigerator.
- Mistake: Over-mixing the dough, which can make the peanut butter oily and separate. Fix: Mix just until the ingredients are fully combined to maintain a perfect consistency.
- Mistake: Using a dull or non-tree-shaped cookie cutter, which tears the dough. Fix: Dip your cookie cutter in powdered sugar between cuts for clean, sharp edges every time.
Storing Tips
- Fridge: Store your No Bake Chocolate Peanut Butter Christmas Trees in a single layer in an airtight container. They will keep well for up to 1 week in the refrigerator.
- Freezer: For longer storage, arrange the treats in a single layer on a parchment-lined tray and freeze solid. Once firm, transfer them to a freezer-safe bag or container. They can be frozen for up to 3 months. Thaw in the refrigerator before serving.
- Reheat: These treats are not reheated. If they become too soft, simply refrigerate until firm. For food safety, always store them below 40°F (4°C).
Proper storage ensures your festive No Bake Chocolate Peanut Butter Christmas Trees maintain their perfect shape and delicious texture for every holiday gathering.
Conclusion
These No Bake Chocolate Peanut Butter Christmas Trees are a festive, fun, and deliciously easy holiday treat. We hope you love making them as much as we do! If you try the recipe, please leave a comment or review. For more sweet holiday ideas, check out our Winter Wonderland Chocolate Chip Christmas Cookies Recipe or Cherry Chocolate Dream Cake Recipe. Don’t forget to subscribe for more quick recipes!
PrintNo Bake Chocolate Peanut Butter Christmas Trees
Delicious no bake Christmas trees made with a creamy peanut butter filling coated in smooth semi-sweet chocolate, decorated with drizzles of milk and white chocolate. Perfect for holiday treats.
- Prep Time: 20 minutes
- Cook Time: 0 minutes
- Total Time: 1 hour (including chilling/freezing time)
- Yield: 24 trees 1x
- Method: Dessert
- Cuisine: American
Ingredients
- ½ cup salted butter, melted and cooled
- 2 cups creamy peanut butter
- ¼ cup granulated sugar
- 1 tablespoon vanilla extract
- 4 cups powdered sugar
- 3 cups semi-sweet chocolate chips (or half milk and half semi-sweet chocolate chips)
- 2 tablespoons shortening
- ½ cup milk chocolate chips (for drizzle)
- ½ cup white chocolate chips (for drizzle)
- 1 teaspoon shortening (divided, for drizzle)
Instructions
- Line a jelly roll or half sheet pan with parchment paper and set aside.
- In a large bowl, use a hand mixer to beat together the melted butter, peanut butter, granulated sugar, and vanilla extract until smooth and creamy.
- Add the powdered sugar and continue beating until fully combined into a creamy dough.
- Press the peanut butter mixture evenly into the prepared sheet pan to about ½-inch thickness.
- Place the pan in the freezer for 15 minutes to firm up.
- Lift the peanut butter layer using the parchment paper and place a new parchment sheet on the pan.
- Use a Christmas tree cookie cutter to cut out ½-inch thick tree shapes and place them on a parchment-lined sheet pan.
- Freeze the cutout shapes for 30 minutes to firm up.
- Repress the remaining peanut butter mixture and cut out additional trees. Freeze again.
- Melt the semi-sweet chocolate chips with 2 tablespoons shortening in a microwave-safe bowl, heating in 30-second intervals and stirring until smooth.
- Dip or spread the chocolate evenly over the peanut butter trees.
- Melt milk chocolate chips and white chocolate chips separately with divided shortening for drizzle.
- Drizzle the melted chocolates over the coated trees in a zigzag pattern and allow to set for about 5 minutes at room temperature.
Notes
For best texture, use creamy peanut butter. Ensure the peanut butter mixture is well chilled before cutting to keep tree shapes sharp. You can substitute dark chocolate for a richer flavor or decorate with festive sprinkles before chocolate sets.
Nutrition
- Calories: 180
- Sugar: 17g
- Sodium: 85mg
- Fat: 11g
- Saturated Fat: 5g
- Unsaturated Fat: 6g
- Trans Fat: 0g
- Carbohydrates: 20g
- Fiber: 2g
- Protein: 4g
- Cholesterol: 15mg
FAQs
How far in advance can I make these No Bake Chocolate Peanut Butter Christmas Trees?
You can make these treats up to one week in advance. Store them in a single layer in an airtight container in the refrigerator. This makes them a perfect make-ahead dessert for holiday parties.
Can I use a different nut butter for this recipe?
Yes, you can substitute the peanut butter with almond or cashew butter if you have an allergy or preference. The texture and flavor will vary slightly, but the No Bake Chocolate Peanut Butter Christmas Trees will still set properly and be delicious.
My mixture is too soft to shape. How can I fix it?
If your mixture is too soft, the butter or peanut butter may have been too warm. Chill the bowl of mixture in the refrigerator for 15-20 minutes to firm it up. This will make it much easier to mold into the perfect Christmas tree shapes.