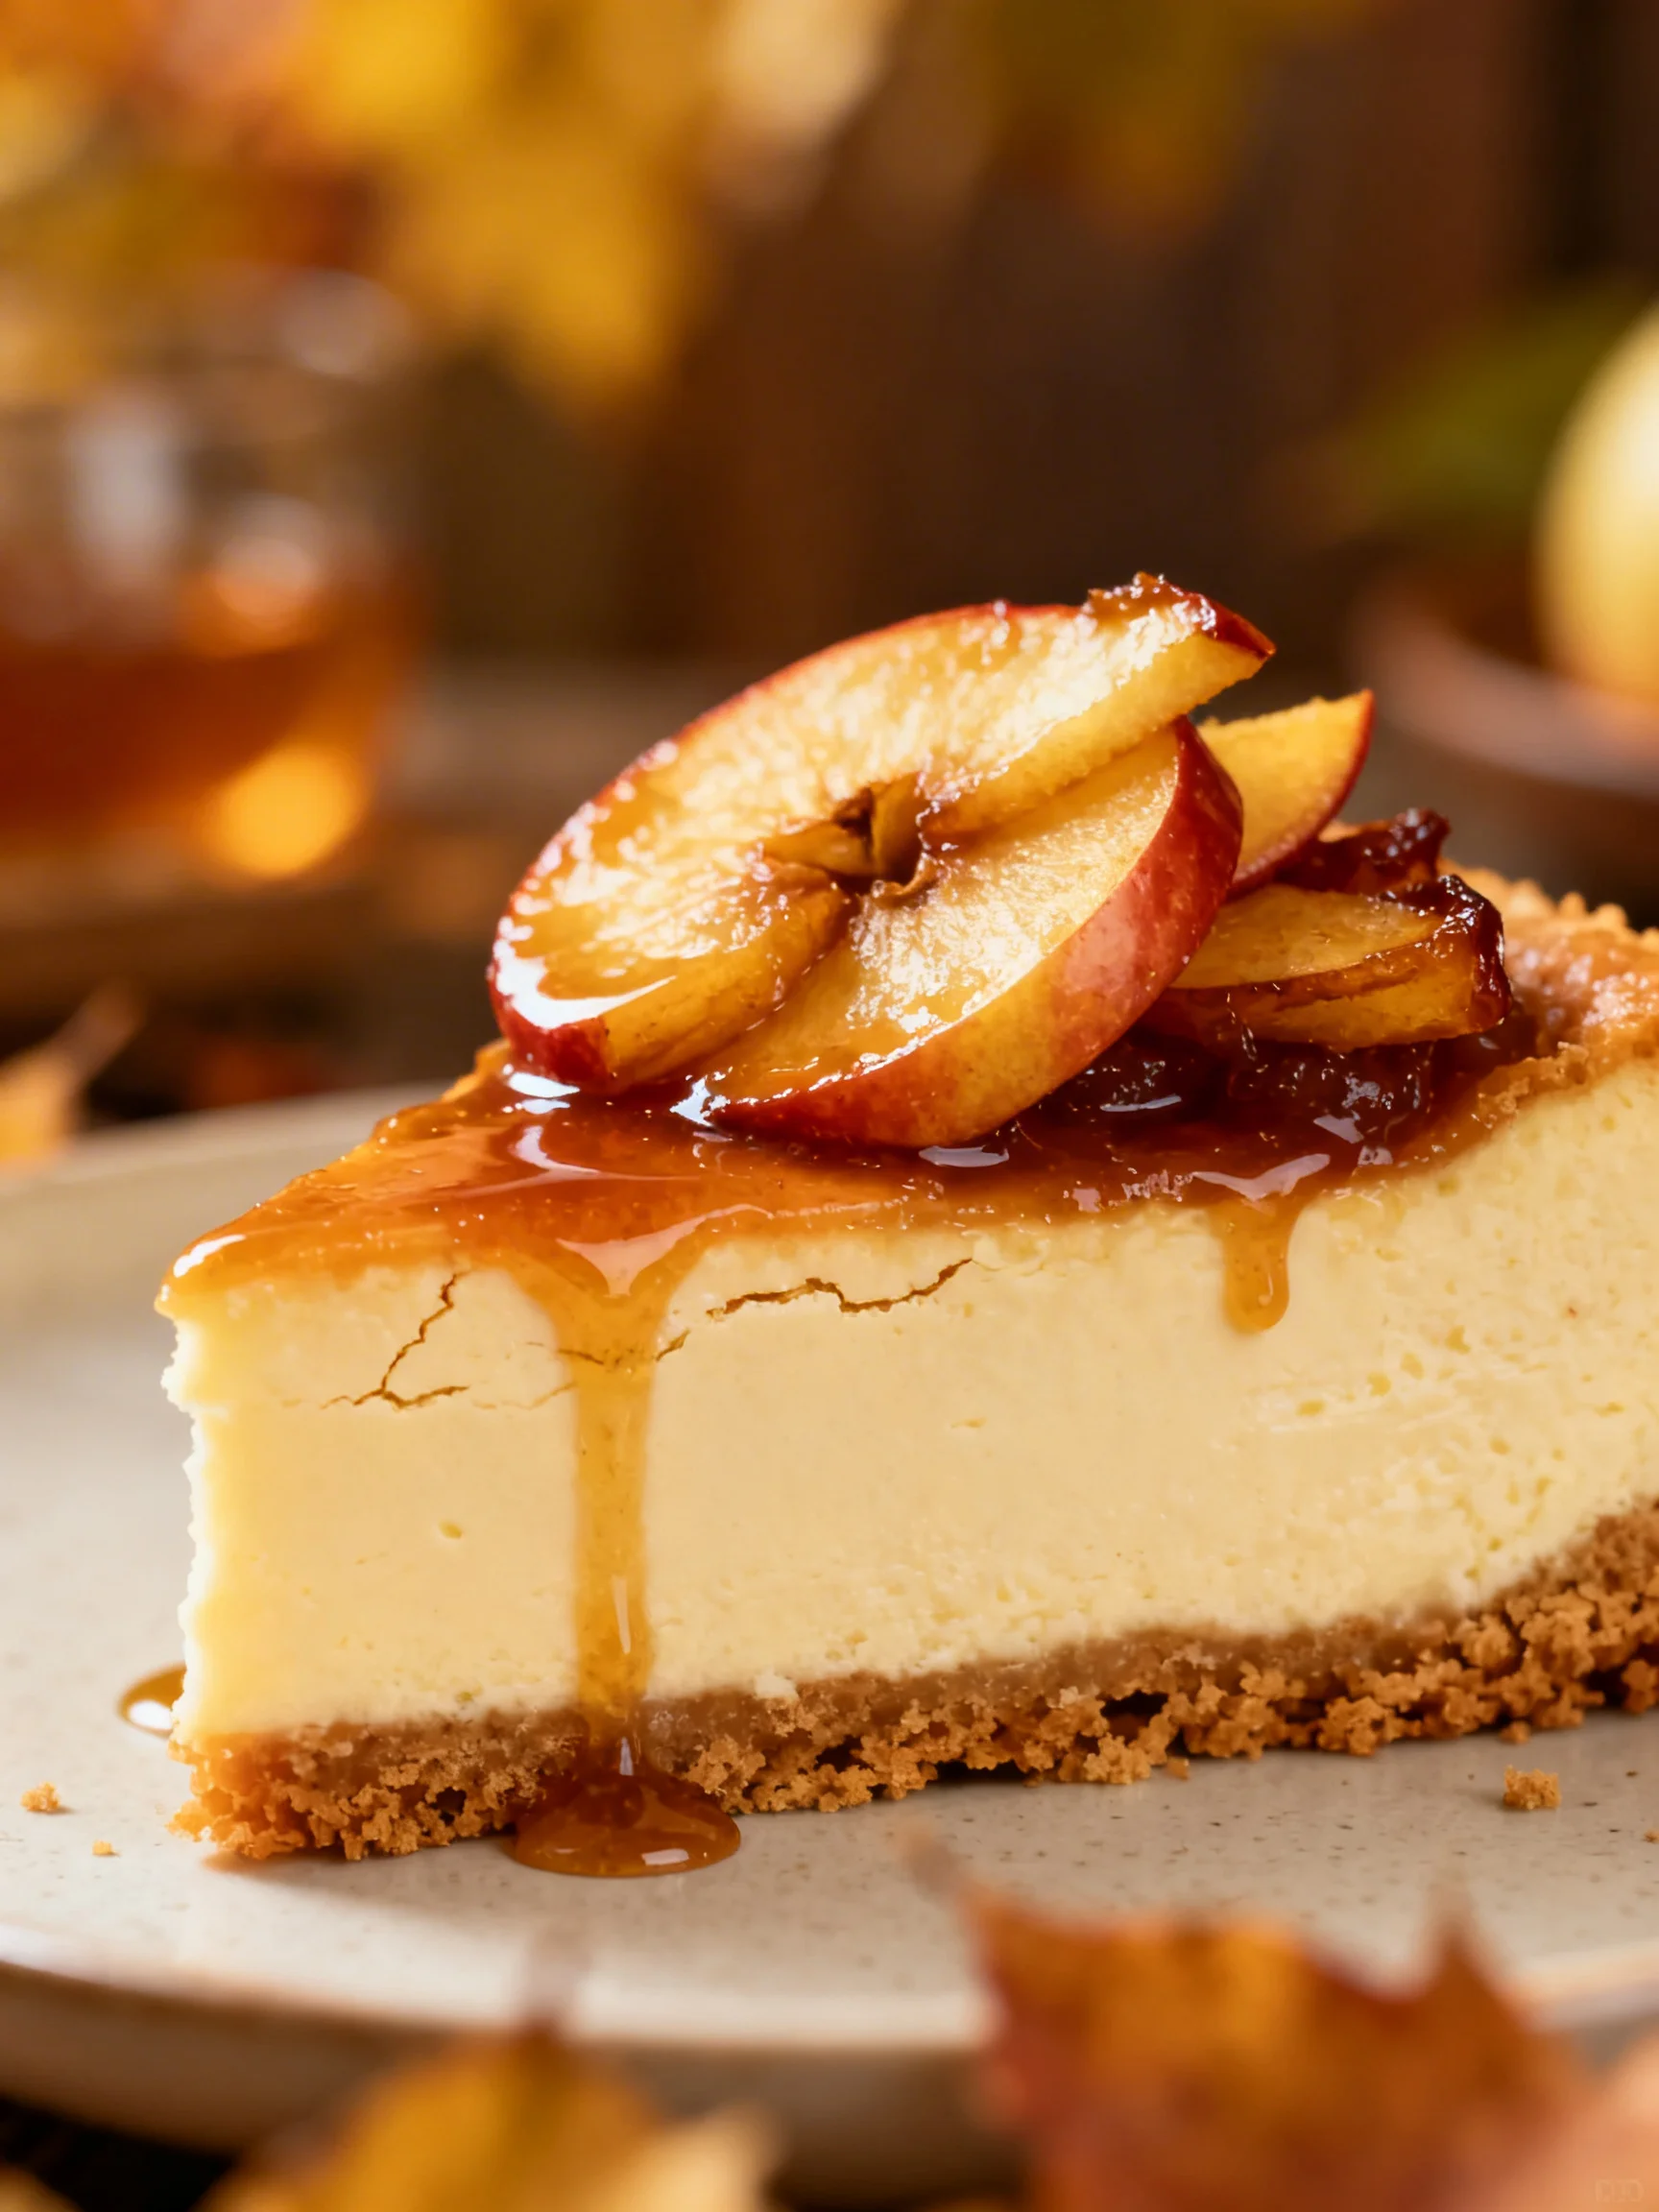
Apple Cider Cheesecake Recipe
Tested & Approved
by Sophie Lane
Introduction
This wonderfully creamy Apple Cider Cheesecake is the perfect fall dessert that isn"t pumpkin. Through extensive testing, I"ve found that reducing fresh apple cider concentrates its tangy, tart flavor, creating a uniquely autumnal taste in every velvety bite. It"s a showstopper that feels special yet is surprisingly straightforward to make.
Published: April 14, 2026 Updated: July 9, 2026
Ingredients
The magic of this fall cheesecake lies in its simple, high-quality components. Using a tart, fresh-pressed cider like Honeycrisp and full-fat dairy ensures a rich, balanced flavor and the signature creamy texture we all love.
- For the Crust:
- 270g or 2 packed cups digestive cookies or graham crackers
- 85g or 6 tablespoons butter (melted)
- ¼ teaspoon salt
- 2 tablespoons powdered sugar
- For the Filling:
- 720g or 3 cups fresh apple cider (honeycrisp cider is more tart, tastes great here)
- Optional: a sachet of mulling spices (like cinnamon stick, cloves, allspice)
- 3 full fat cream cheese bricks (227g each, softened and at room temperature)
- 200g or 1 cup brown sugar
- ½ teaspoon salt
- 2 teaspoons pure vanilla extract
- 240g or 1 cup sour cream
- ⅓ cup reduced apple cider (from above)
- 1 teaspoon cinnamon
- 3 large eggs
- 2 tablespoons all purpose flour
Timing
| Prep Time | 45 minutes |
| Cook Time | 1 hour 15 minutes (plus cooling) |
| Total Time | About 2 hours active time |
Context: While the total time includes cooling, the active prep is efficient. This is a fantastic make-ahead dessert; the flavor deepens beautifully overnight, making it perfect for holiday gatherings where you want to prep a day in advance.
Step-by-Step Instructions
Step 1 — Reduce the Apple Cider
Pour the 3 cups of fresh apple cider into a medium saucepan. For extra depth, you can add a sachet of mulling spices. Bring to a simmer over medium heat, then reduce to maintain a gentle bubble. Cook, stirring occasionally, until the cider has reduced to about ⅓ cup. This process, which takes 25-35 minutes, concentrates the tart apple flavor and natural sugars. Let it cool completely before using.
Step 2 — Prepare the Crust
Preheat your oven to 325°F (163°C). In a food processor, pulse the digestive cookies or graham crackers into fine crumbs. Combine the crumbs with the melted butter, powdered sugar, and salt until the mixture resembles wet sand. Press firmly and evenly into the bottom of a 9-inch springform pan. Bake for 10 minutes, then set aside to cool. (Pro tip: Use the bottom of a measuring cup to press the crust firmly for a solid base).
Step 3 — Mix the Cream Cheese Base
In the bowl of a stand mixer fitted with the paddle attachment, beat the softened cream cheese on medium speed until completely smooth and lump-free, about 3 minutes. Scrape down the bowl and beater. Add the brown sugar and salt, beating again until fully incorporated and creamy. This initial creaming is crucial for a silky texture.
Step 4 — Incorporate Wet Ingredients & Flavor
With the mixer on low, add the vanilla extract, sour cream, the ⅓ cup of cooled reduced cider, and cinnamon. Mix just until combined, scraping the bowl as needed. In my tests, adding the flour at this stage helps stabilize the filling. Sprinkle the 2 tablespoons of all-purpose flour over the mixture and beat on low until no dry streaks remain.
Step 5 — Add the Eggs
Add the eggs one at a time, mixing on low speed after each addition until just barely combined. Over-beating the eggs can incorporate too much air, leading to cracks. The final batter should be smooth, thick, and homogeneous. Pour the filling over the cooled crust and gently smooth the top.
Step 6 — Bake and Cool Slowly
Place the springform pan on a baking sheet and bake at 325°F for 55-70 minutes. The edges should be set, but the center should still have a slight jiggle—like Jell-O—when you gently shake the pan. Turn off the oven, crack the door open, and let the cheesecake cool inside for 1 hour. This gradual temperature change, unlike shocking it with cold air, is the best defense against cracking. Then, transfer to a wire rack to cool completely before chilling for at least 6 hours, preferably overnight.

Nutritional Information
| Calories | Approx. 480 |
| Protein | 8g |
| Carbohydrates | 42g |
| Fat | 32g |
| Fiber | 1g |
| Sodium | 380mg |
This wonderfully creamy cheesecake is a good source of calcium and vitamin A from the dairy. Estimates are based on typical ingredients and a 1/12th slice; values may vary with specific brands or modifications.
Healthier Alternatives
- Lower-Sugar Crust — Omit the powdered sugar and use cinnamon graham crackers for natural sweetness.
- Reduced-Fat Dairy — Swap full-fat cream cheese and sour cream for Neufchâtel and light sour cream for a lighter texture with good tang.
- Gluten-Free Base — Use certified gluten-free graham crackers or almond flour mixed with butter for a nutty, gluten-free crust.
- Natural Sweetener — Replace brown sugar with coconut sugar or a monk fruit blend for a lower glycemic index; the molasses notes still complement the apple flavor.
- Dairy-Free Version — Use high-fat, firm vegan cream cheese and coconut cream instead of sour cream; the reduced cider’s tartness helps balance the flavors.
- Protein Boost — Add 1-2 scoops of unflavored collagen peptides or vanilla protein powder when mixing the filling for extra protein without altering the creamy texture significantly.
Serving Suggestions
- Top with a simple salted caramel sauce for a sweet-and-salty contrast that enhances the apple notes.
- Serve alongside a small glass of ice-cold apple cider or a dry hard cider to echo the autumnal flavors.
- Garnish with thinly sliced Honeycrisp apples sautéed in butter and a pinch of cinnamon for an elegant, restaurant-style presentation.
- Pair with a sharp cheddar cheese on the side for a classic apple-and-cheese combination that delights guests.
- For a festive touch, sprinkle the plate with crushed gingersnap cookies or a dusting of cinnamon sugar before placing the slice.
- This make-ahead dessert is perfect for Thanksgiving or a fall dinner party, as its flavor deepens overnight, reducing day-of stress.
This fall cheesecake that isn"t pumpkin shines as the centerpiece of any autumn gathering. Its rich, creamy profile pairs beautifully with both warm beverages and after-dinner coffee.
Common Mistakes to Avoid
- Mistake: Using cold cream cheese. Fix: Let all dairy ingredients sit at room temperature for 2 hours to ensure a perfectly smooth, lump-free filling as described in Step 3.
- Mistake: Over-beating the eggs. Fix: Mix on low speed and stop as soon as each egg is incorporated to prevent incorporating excess air, which is a primary cause of cracks.
- Mistake: Not cooling the reduced cider completely. Fix: Ensure the ⅓ cup of reduced apple cider is at room temperature before adding it to prevent it from seizing the cream cheese.
- Mistake: Skipping the slow cool-down in the oven. Fix: Always follow Step 6’s instruction to let the baked cheesecake cool in the turned-off oven with the door ajar for 1 hour to prevent dramatic temperature shock.
- Mistake: Pressing the crust unevenly. Fix: Use the bottom of a flat measuring cup to press the crumb mixture firmly and uniformly across the pan bottom and slightly up the sides for structural integrity.
- Mistake: Opening the oven door frequently during baking. Fix: Resist the urge to check; use the oven light and only perform the “jiggle test” near the end of the bake time to maintain a stable temperature.
- Mistake: Cutting the cheesecake before it"s fully chilled. Fix: Chill for a minimum of 6 hours, but preferably overnight, for the filling to set completely, ensuring clean slices.
Storing Tips
- Fridge: Cover the cooled cheesecake tightly with plastic wrap or store in an airtight container. It will keep for up to 5 days at or below 40°F. The flavor often improves over the first 2 days.
- Freezer: For long-term storage, wrap the whole cheesecake or individual slices tightly in plastic wrap, then in foil. Freeze for up to 2 months. Thaw overnight in the refrigerator before serving.
- Reheat: This dessert is best served cold. If you prefer a slightly softer texture, let a slice sit at room temperature for 15-20 minutes before serving. Do not microwave, as it can compromise the creamy texture.
This Apple Cider Cheesecake is an ideal make-ahead dessert. In my tests, freezing preserves about 95% of the flavor and texture, making it a brilliant strategy for busy holiday hosts who want to prep weeks in advance.
Conclusion
This wonderfully creamy Apple Cider Cheesecake offers a uniquely tangy, non-pumpkin fall flavor that truly stands out. Its make-ahead nature makes it a stress-free, impressive dessert for any autumn celebration. For another easy apple dessert, try this Apple Cinnamon Sheet Cake Recipe. I hope you love this recipe—please share your results in the comments!
Frequently Asked Questions
How many servings does this Apple Cider Cheesecake make?
This recipe yields 12 generous slices. For a standard 9-inch springform pan, this is the ideal serving size to ensure each piece is rich and satisfying. If serving as part of a larger dessert spread, you can easily cut it into 16 smaller portions.
Can I use store-bought apple cider reduction or concentrate instead of reducing it myself?
Yes, you can use a high-quality apple cider concentrate or boiled cider in a pinch. Use ⅓ cup of the concentrate directly in the filling, skipping the reduction step. However, the flavor profile may be slightly less complex and more uniformly sweet compared to reducing fresh cider with its nuanced tartness.
Why did my cheesecake filling separate or look grainy?
Graininess usually occurs if the cream cheese was not fully softened and beaten until perfectly smooth before adding other ingredients, or if the reduced cider was still warm when incorporated. To fix it, ensure all ingredients are at room temperature and beat the cream cheese base thoroughly in Step 3 until no lumps remain.
PrintApple Cider Cheesecake
Ingredients
- 270g or 2 packed cups digestive cookies or graham crackers
- 85g or 6 tablespoons butter (melted)
- ¼ teaspoon salt
- 2 tablespoons powdered sugar
- 720g or 3 cups fresh apple cider (honeycrisp cider is more tart, tastes great here)
- mulling spices
- 3 full fat cream cheese bricks (227g each, softened and at room temperature)
- 200g or 1 cup brown sugar
- ½ teaspoon salt
- 2 teaspoons pure vanilla extract
- 240g or 1 cup sour cream
- ⅓ cup reduced apple cider (from above)
- 1 teaspoon cinnamon
- 3 large eggs
- 2 tablespoons all purpose flour
Instructions
- Boil the cider with the mulling spices on high in a large pot for about 1 hour, until it has reduced to a thick syrup and you have about 1/3 cup. Set aside and allow to cool.
- Preheat the oven to 350 F.
- Make the crust in your food processor: pulse the cookies until finely ground, add the butter, salt and sugar and pulse until it all comes together in wet crumbs.
- Press the crumbs into an 8” round springform pan wrapped with foil or into a 8" wide, 3" high cake pan greased and lined with parchment paper. Bake for 10 minutes. Allow to cool then chill.
- Lower oven temperature to 325 F.
- In a stand mixer fitted with the paddle attachment, beat the cream cheese and sugar until the mixture is completely lump free. This can take a few minutes and you will likely need to scrape down a few times.
- Add the sour cream, vanilla, salt, cinnamon and reduced cider and pulse again repeatedly scraping down and beating until you have a very creamy mixture.
- Add the eggs and flour and beat until just combined – no more.
- Place the cheesecake pan in a 13×9” pan filled with hot water.
- Pour your filling into the crust and bake for 90 or more minutes, until you can shake it and the edges look set but the middle is still wobbly.
- Shut off the oven but leave the cheesecake in. Use a wooden spoon to crack open the oven door. Let the cheesecake cool inside for about 30 minutes.
- After the 30 minutes, close the oven door and allow the cheesecake to cool for another 15 minutes.
- Remove from oven and let cool on the counter, once cool place in fridge for 8 hours before serving.
You Might Also Like
- Ultimate Reese's Peanut Butter Cup Roll Cake Ready in 30 Minutes
- Pioneer Woman Apple Crisp: 6-Ingredient Bliss Recipe
- Best Pumpkin Cupcakes with Cinnamon Cream Cheese Frosting
- Best Country Apple Fritter Bread Recipe


4 Comments