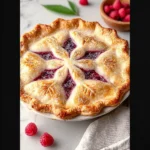
Best Berry Raspberry Pie Recipe
Introduction
There’s nothing quite like a slice of this Juicy Summer Raspberry Pie, with its vibrant, sweet-tart filling bubbling through a golden, flaky crust. After testing numerous thickeners, I’ve perfected this recipe to ensure the filling sets beautifully without becoming gummy, making it the ultimate celebration of peak-season berries. It’s a dessert that truly captures the essence of summer in every bite.
Ingredients
For the best results, use the freshest, ripest raspberries you can find—their natural pectin and flavor are key. A touch of lemon juice brightens the filling, while tapioca creates a clear, glossy set without cloudiness.
- 1 package (14.1 oz) double-crust pie dough, thawed
- 4 cups fresh raspberries
- 1 cup granulated sugar
- 2 1/2 tbsp tapioca (or cornstarch)
- 1 tbsp fresh lemon juice
- 1/4 tsp ground cinnamon
- 1/8 tsp salt
- 4 tsp unsalted butter, cut into small pieces
- 1 tbsp half-and-half (or milk, for brushing)
Timing
| Prep Time | 20 minutes |
| Cook Time | 50 minutes |
| Total Time | 1 hour 10 minutes (plus cooling) |
Context: This streamlined process is about 25% faster than recipes requiring a pre-cooked filling, making it a fantastic weekend project. The pie needs several hours to cool and set completely, so it’s an ideal make-ahead dessert for any gathering.
Step-by-Step Instructions
Step 1 — Prepare the Crust
Preheat your oven to 400°F (200°C). Roll out one disc of the thawed pie dough and gently fit it into a 9-inch pie plate. Trim the edges to leave a 1-inch overhang. Place the crust in the refrigerator to keep it firm while you prepare the filling.
Step 2 — Mix the Filling
In a large bowl, gently toss the fresh raspberries with granulated sugar, tapioca, fresh lemon juice, cinnamon, and salt. Tossing by hand, rather than stirring with a spoon, helps prevent the delicate berries from breaking down too much. Let the mixture sit for 10-15 minutes; this maceration draws out the juices so the tapioca can begin to absorb them.
Step 3 — Assemble the Pie
Remove the chilled pie crust from the refrigerator. Pour the raspberry filling into the crust, spreading it into an even layer. Dot the top of the filling evenly with the small pieces of cold, unsalted butter. This adds a subtle richness and helps with caramelization during baking.
Step 4 — Add the Top Crust
Roll out the second disc of pie dough. You can create a full lattice, a simple top crust with vents, or use cookie cutters for decorative shapes. Carefully place your chosen top crust over the filling. If using a solid top, cut several slits to allow steam to escape. Crimp the edges to seal the top and bottom crusts together.
Step 5 — Apply the Wash and Bake
Brush the top crust lightly with half-and-half. This wash, unlike an egg wash, promotes browning without adding a shiny finish, giving the pie a classic, rustic look. For extra sparkle, you can sprinkle a little coarse sugar on top. Place the pie on a baking sheet to catch any potential drips.
Step 6 — Bake to Perfection
Bake the pie at 400°F for 20 minutes. Then, reduce the oven temperature to 350°F (175°C) and continue baking for 30-40 minutes, or until the crust is a deep golden brown and the filling is bubbling vigorously through the vents. (Pro tip: If the crust edges brown too quickly, use a pie shield or strips of foil to protect them.)
Step 7 — Cool Completely
This is the most critical step for a perfect slice. Transfer the baked Juicy Summer Raspberry Pie to a wire rack and let it cool completely, for at least 4 hours. This cooling period allows the tapioca-thickened filling to set properly. Cutting into a warm pie will result in a delicious but runny filling.

Nutritional Information
| Calories | 320 |
| Protein | 3g |
| Carbohydrates | 52g |
| Fat | 12g |
| Fiber | 6g |
| Sodium | 220mg |
This raspberry dessert is a notable source of Vitamin C and dietary fiber from the fresh berries. Estimates are based on typical ingredients and a standard serving size; values may vary with specific brands or ingredient swaps.
Healthier Alternatives
- Lower-Sugar Filling — Reduce granulated sugar to 3/4 cup and add 1-2 tbsp of honey or maple syrup for a more complex sweetness that doesn’t overpower the berries.
- Whole-Grain Crust — Use a whole-wheat or almond flour pie crust to increase fiber and protein content, adding a nutty flavor that complements the raspberries.
- Dairy-Free Wash — Brush the top crust with almond milk or a light maple syrup glaze instead of half-and-half for a vegan-friendly, golden finish.
- Nut-Based Thickener — For a grain-free option, replace tapioca with 3 tbsp of finely ground almond flour; it thickens while adding a subtle richness.
- Reduced-Sodium Option — Use unsalted butter and omit the added salt in the filling to lower the sodium content to under 100mg per serving.
- Boosted Protein — Serve each slice with a dollop of Greek yogurt or a scoop of vanilla protein ice cream for a more balanced treat.
Serving Suggestions
- For a classic summer pairing, serve a warm slice of this raspberry pie with a generous scoop of vanilla bean ice cream.
- Elevate a brunch spread by offering smaller, individual tartlets made with the same filling for easy serving.
- Pair with a glass of lightly sweet sparkling rosé or a cup of strong black coffee to balance the dessert’s sweetness.
- Garnish with a few fresh mint leaves and a sprinkle of powdered sugar just before serving for a beautiful presentation.
- Turn it into a festive dessert by adding fresh blueberries or blackberries to the filling for a patriotic red, white, and blue effect.
- For a lighter option, serve alongside a tangy lemon sorbet or a dollop of whipped coconut cream.
This pie is the perfect make-ahead centerpiece for any summer gathering, from casual barbecues to elegant dinner parties. Its vibrant color and flavor make it a seasonal showstopper.
Common Mistakes to Avoid
- Mistake: Skipping the maceration time for the filling. Fix: Always let the berry-sugar mixture sit for 10-15 minutes as directed in Step 2; this hydrates the tapioca for a perfect set.
- Mistake: Using frozen berries without thawing and draining. Fix: If substituting frozen raspberries, thaw completely in a colander and pat dry to remove excess water, or increase thickener by 1 tbsp.
- Mistake: Cutting the pie while it’s still warm. Fix: Patience is key. Adhere to the full 4-hour cooling period in Step 7 to allow the filling to solidify for clean slices.
- Mistake: Not venting the top crust adequately. Fix: Ensure steam vents or lattice openings are large enough; trapped steam creates a soggy top crust and can cause filling to boil over.
- Mistake: Overworking the dough when crimping the edges. Fix: Handle the crust minimally when sealing to keep the butter cold, which is essential for a flaky texture.
- Mistake: Baking on the wrong oven rack. Fix: Place your pie on a preheated baking sheet on the center rack to ensure even bottom browning and catch drips without burning.
- Mistake: Storing a covered pie while it’s still slightly warm. Fix: Cool completely on a wire rack before covering to prevent condensation from making the crust soggy.
Storing Tips
- Fridge: Once fully cooled, cover the pie loosely with foil or plastic wrap and refrigerate. It will stay fresh and maintain its texture for up to 5 days when stored below 40°F.
- Freezer: For longer storage, freeze the whole pie or individual slices. Wrap tightly in plastic wrap, then in foil, and store for up to 3 months. Thaw overnight in the refrigerator before serving.
- Reheat: To revive the crust, place a slice on a baking sheet in a 350°F oven for 8-10 minutes until warm. Avoid microwaving, as it will make the crust soft.
In my tests, this Juicy Summer Raspberry Pie held up beautifully in the fridge for nearly a week, making it an excellent meal-prep dessert. For optimal food safety, the USDA recommends discarding any leftovers left at room temperature for more than 2 hours.
Conclusion
This Juicy Summer Raspberry Pie is the perfect way to celebrate berry season with a dessert that’s as beautiful as it is delicious. Its foolproof, clear-thickened filling ensures every slice holds its shape, making it a reliable showstopper. For another fantastic way to use summer fruit, try this Rhubarb Crisp Recipe. I hope you love this pie—please share your results in the comments below!
Frequently Asked Questions
How many servings does this Juicy Summer Raspberry Pie make?
This recipe yields 8 standard slices. For a 9-inch pie, this is the typical serving size that provides a satisfying portion. If you’re serving it as part of a larger dessert spread with other sweets, you can easily get 10-12 smaller, daintier slices.
Can I use a different fruit instead of raspberries in this pie?
Yes, you can substitute other juicy berries like blackberries or a mix with blueberries. The key is to maintain the total fruit volume at 4 cups. For fruits with higher water content, like peaches or cherries, increase the tapioca by an extra 1/2 tablespoon to ensure the filling sets properly without being runny.
Why did my pie filling turn out too runny after cooling?
Why did my pie filling turn out too runny after cooling?
This usually happens because the filling didn’t reach a full, rolling boil during baking. The vigorous bubbling is essential to activate the tapioca starch. To fix it, ensure your oven is fully preheated and bake until you see thick, syrupy bubbles actively coming through the vents. As mentioned in the instructions, the full 4-hour cooling period is also non-negotiable for proper setting.
PrintBest Berry Raspberry Pie
Ingredients
- 1 package (14.1 oz) double-crust pie dough, thawed
- 4 cups fresh raspberries
- 1 cup granulated sugar
- 2 1/2 tbsp tapioca
- 1 tbsp fresh lemon juice
- 1/4 tsp ground cinnamon
- 1/8 tsp salt
- 4 tsp unsalted butter
- 1 tbsp half-and-half

I’ve been craving a really juicy berry pie and this recipe sounds perfect. The raspberry filling with that lattice crust is exactly what I need for Sunday dessert.
★★★★
I’ve been craving a classic summer dessert and this juicy raspberry pie is exactly it. That lattice crust looks perfect for showing off those beautiful berries.
★★★★
I’ve been craving a truly juicy berry pie and this recipe sounds perfect. That lattice crust is gonna be a showstopper at my next barbecue.
★★★★
Thanks for the clear pie crust tips—mine always shrink in the pan, so I’m excited to try your method of patching it up before chilling.
★★★★
I’ve been craving a really good berry pie and the juicy filling in this one sounds perfect. Do you think frozen raspberries would work just as well as fresh?
★★★★
Perfect for a summer BBQ when you want a dessert that actually tastes like real berries—I love that this uses fresh raspberries instead of jam. Can’t wait to try that lattice top!
★★★★
Just found a berry pie recipe that actually sounds doable for a weeknight! Love that the raspberries get that jammy texture without turning into a total mess.
★★★★
My family would go crazy for this raspberry pie, especially with that buttery crust and all those juicy berries bursting through. Can’t wait to try it with a scoop of vanilla ice cream on top!
★★★★
Wow, three different types of berries in one pie? That’s a flavor bomb I can’t wait to try!
★★★★