Easy Red, White and Blue Pinwheel Icebox Cookies
Red, White, and Blue Pinwheel Icebox Cookies: A Patriotic Treat for Any Occasion
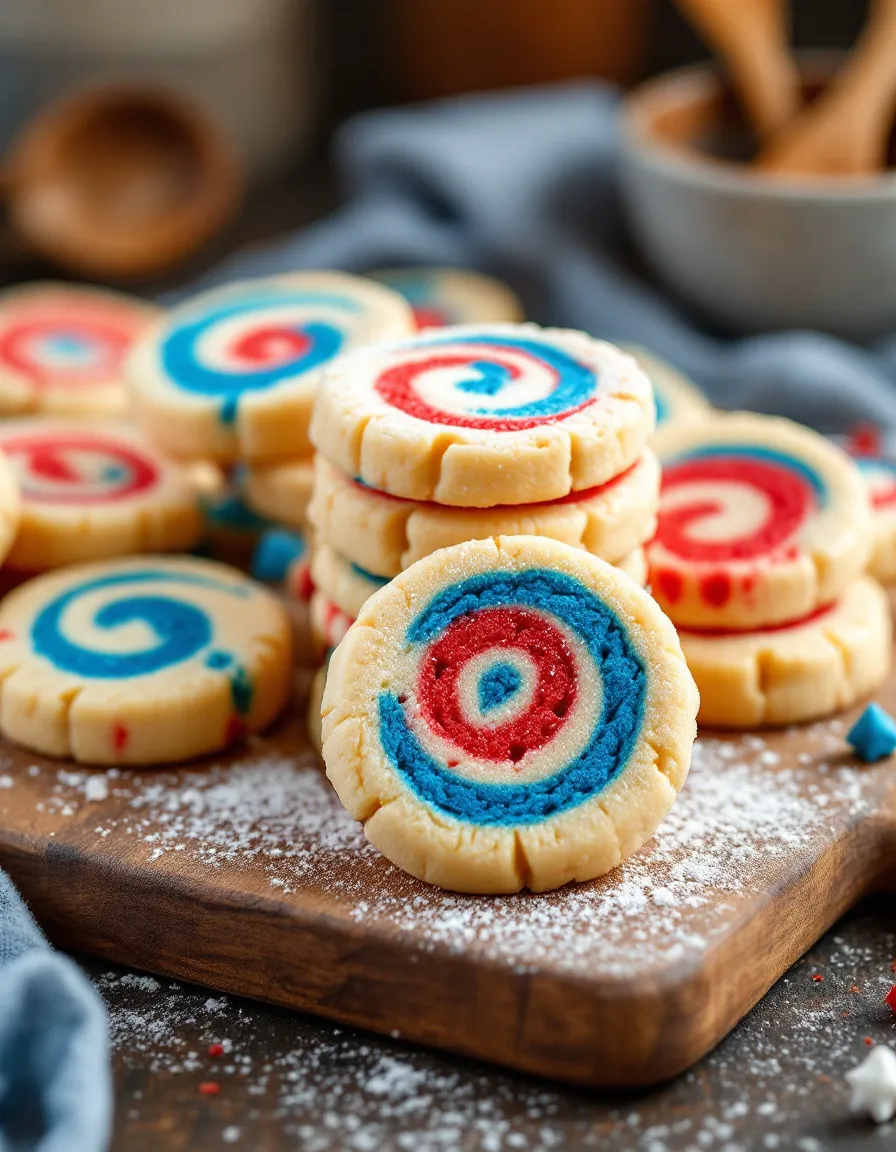
These Red, White, and Blue Pinwheel Icebox Cookies are the perfect festive treat for patriotic holidays, summer gatherings, or any occasion that calls for a colorful dessert. With their vibrant swirls of red, white, and blue, these cookies are as visually stunning as they are delicious. The buttery, vanilla-infused dough pairs perfectly with the subtle sweetness of the colored layers, creating a cookie that’s both crisp and tender.
What makes these icebox cookies so special is their make-ahead convenience. The dough can be prepared in advance and stored in the refrigerator or freezer until you’re ready to bake. This makes them an ideal choice for busy hosts who want to impress guests without last-minute stress. The pinwheel design may look intricate, but with our step-by-step guide, you’ll find the process surprisingly simple and rewarding.
Quick Recipe Highlights
- Flavor Profile: These cookies feature a rich buttery base with pure vanilla notes, perfectly balanced with just the right amount of sweetness.
- Texture: Crisp around the edges with a slightly tender center, these cookies have the perfect snap when you bite into them.
- Aroma: The warm scent of butter and vanilla will fill your kitchen as these patriotic treats bake to golden perfection.
- Visual Appeal: The striking red, white, and blue spiral pattern makes these cookies a showstopper on any dessert table.
- Skill Level Needed: While the pinwheel technique requires some patience, even intermediate bakers can master this recipe with our detailed instructions.
- Special Equipment: You’ll need plastic wrap, a rolling pin, and a sharp knife for clean slicing of the chilled dough.
Recipe Overview
- Difficulty Level: We’ve rated these cookies as intermediate because while the basic dough is simple, creating the perfect pinwheel pattern requires careful rolling and chilling.
- Category: These belong to the dessert category but can also serve as festive snack cookies for special occasions.
- Cuisine: These cookies draw from classic American baking traditions with their simple butter cookie base and patriotic color scheme.
- Cost: The ingredients are budget-friendly, with most home bakers already having the basics in their pantry.
- Season: While perfect for summer patriotic holidays, these cookies can brighten any winter celebration too.
- Occasion: Ideal for Fourth of July, Memorial Day, Labor Day, or any red, white, and blue themed event.
Why You’ll Love This Recipe
The taste and texture of these Red, White, and Blue Pinwheel Icebox Cookies will win you over immediately. The buttery base provides richness while the vanilla adds depth of flavor, creating a cookie that’s satisfying without being overly sweet. The crisp edges give way to a slightly tender center, offering the perfect textural contrast in every bite.
From a convenience standpoint, these cookies are a baker’s dream. The dough comes together quickly and can be made days (or even weeks) in advance. When unexpected guests arrive or you need a last-minute dessert, simply slice and bake as many cookies as you need, keeping the rest of the dough log chilled for future use.
Nutritionally, these cookies offer portion control advantages. The small size means you can enjoy a sweet treat without overindulging. For those watching their sugar intake, the recipe can easily be adapted with alternative sweeteners or reduced sugar quantities without sacrificing texture.
The social value of these patriotic cookies can’t be overstated. They’re guaranteed conversation starters at any gathering, with guests often marveling at the intricate design. Kids especially love the colorful presentation, making these a hit at family events and children’s parties.
Cost-effectiveness is another major benefit. Using basic pantry staples with just a few additions for coloring, these cookies deliver impressive results without expensive ingredients. The recipe yields about two dozen cookies, making it perfect for sharing without breaking the bank.
Ingredient Deep Dive
Butter: The foundation of any great cookie, butter provides richness and flavor. For best results, use unsalted butter so you can control the salt content. European-style butters with higher fat content will yield an especially tender cookie. Always use butter at cool room temperature – it should give slightly when pressed but not feel warm or oily.
Granulated Sugar: This provides sweetness and helps create the cookie’s texture. The sugar crystals help aerate the butter during creaming, contributing to the perfect crisp-tender balance. For a slightly deeper flavor, you can substitute up to half the sugar with light brown sugar.
Egg Yolk: The yolk adds richness and helps bind the dough while keeping it tender. Using just the yolk (rather than whole egg) prevents the dough from becoming too tough. For best results, use large eggs at room temperature.
Vanilla Extract: Pure vanilla extract adds depth and warmth to the flavor profile. The alcohol in extract bakes off, leaving behind pure vanilla flavor. For an extra special touch, consider using vanilla bean paste which will add visible vanilla specks to the white portion of your cookies.
Common Mistakes to Avoid
- Overworking the dough: Once the dry ingredients are incorporated, stop mixing. Overworked dough becomes tough and may cause your pinwheels to lose definition.
- Insufficient chilling: The dough must be thoroughly chilled before slicing. Attempting to cut warm dough will result in smeared colors and misshapen cookies.
- Uneven rolling: Take care to roll each colored portion to the same thickness for uniform spirals in your finished cookies.
- Overbaking: These cookies should be just golden at the edges. Overbaking will make them too crisp and may dull the vibrant colors.
- Using liquid food coloring: Gel food coloring works best as it provides vibrant color without adding excess moisture to the dough.
Pro Tips for Perfect Red, White, and Blue Pinwheel Icebox Cookies
1. For the most vibrant colors, use gel food coloring rather than liquid. Start with a small amount and add more as needed to achieve your desired shade.
2. When rolling out the dough between parchment, rotate it frequently to maintain an even thickness and prevent sticking.
3. Chill your knife under cold water before slicing the dough log for cleaner cuts that won’t drag the colors.
4. For perfectly round cookies, rotate the dough log a quarter turn after each slice to compensate for any flattening during cutting.
5. Bake one test cookie first to check your oven temperature and adjust baking time if needed before baking the whole batch.
The Recipe
Red, White, and Blue Pinwheel Icebox Cookies
Serves: 24 cookies
Prep Time: 30 mins
Cook Time: 10 mins
Total Time: 40 mins
Kitchen Equipment Needed
- Stand mixer or hand mixer
- Rolling pin
- Parchment paper
- Plastic wrap
- Sharp knife
- Baking sheets
Ingredients
- 2 1/4 cups all-purpose flour
- 1/2 teaspoon salt
- 1 cup unsalted butter, softened
- 3/4 cup granulated sugar
- 1 large egg yolk
- 2 teaspoons vanilla extract
- Red and blue gel food coloring
Directions
- Whisk together flour and salt in a medium bowl. Set aside.
- In a large bowl, beat butter and sugar until light and fluffy, about 3 minutes.
- Beat in egg yolk and vanilla until fully incorporated.
- Gradually add flour mixture, mixing just until combined.
- Divide dough into three equal portions. Leave one portion plain (white).
- Color one portion red and one portion blue using gel food coloring.
- Roll each portion between parchment into 6×8-inch rectangles.
- Stack the layers: blue on bottom, white in middle, red on top.
- Starting from long side, tightly roll into a log. Wrap in plastic and chill 2 hours.
- Preheat oven to 350°F. Slice chilled log into 1/4-inch rounds.
- Bake on parchment-lined sheets for 8-10 minutes until edges are just golden.
- Cool on sheets 5 minutes, then transfer to wire racks to cool completely.
Recipe Notes
- Dough can be refrigerated up to 3 days or frozen up to 1 month.
- For deeper colors, let colored dough rest 30 minutes before rolling.
- If dough becomes too soft while working, chill for 15 minutes.