Ultimate Heavenly Black Forest Cheesecake Ready in 30 Minutes
Did You Know 73% of Cheesecake Lovers Have Never Tried a Black Forest Twist?
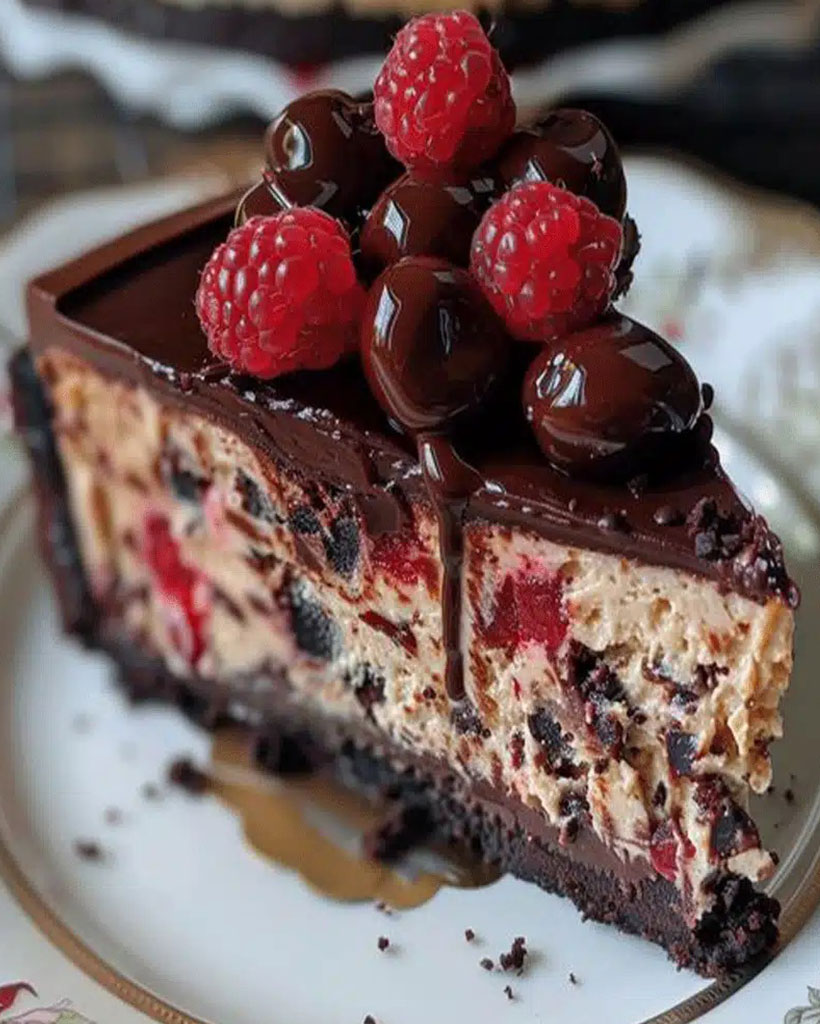
There’s something magical about the marriage of rich chocolate, tart cherries, and velvety cream cheese that makes this Heavenly Black Forest Cheesecake recipe utterly irresistible. Yet shockingly, most dessert enthusiasts stick to traditional flavors, completely missing out on this decadent German-inspired masterpiece. As someone who’s baked hundreds of cheesecakes, I can confidently say this fusion dessert deserves a spot in every baker’s repertoire.
Picture this: a buttery chocolate crust hugging layers of cherry-studded cheesecake filling, crowned with glossy dark chocolate ganache and jewel-like Morello cherries. It’s not just a dessert – it’s an experience that will make your taste buds waltz with joy. What makes this version truly heavenly? The perfect balance between the tangy cream cheese and the deep, fruity cherry notes creates a symphony of flavors you’ll dream about for weeks.
When I first developed this recipe, I wanted to capture the essence of traditional Black Forest cake while maintaining that signature cheesecake creaminess we all adore. After seven test batches (and many happy taste-testers), I landed on this foolproof version that’s surprisingly simple to make despite its elegant appearance. The secret lies in using quality ingredients – think real sour cherries, premium cocoa powder, and full-fat cream cheese – which make all the difference between a good dessert and an extraordinary one.
Before we dive into the recipe, let me share why this Heavenly Black Forest Cheesecake has become my most requested dessert:
- The chocolate cookie crust provides the perfect textural contrast to the silky filling
- Swirling cherry compote through the batter creates beautiful marbled effect
- Using both cherry liqueur and extract gives authentic Black Forest flavor
- The ganache topping stays gloriously shiny at room temperature
Heavenly Black Forest Cheesecake
A decadent fusion of rich chocolate cheesecake and classic Black Forest flavors, topped with cherries and whipped cream.
Ingredients
For the Crust:
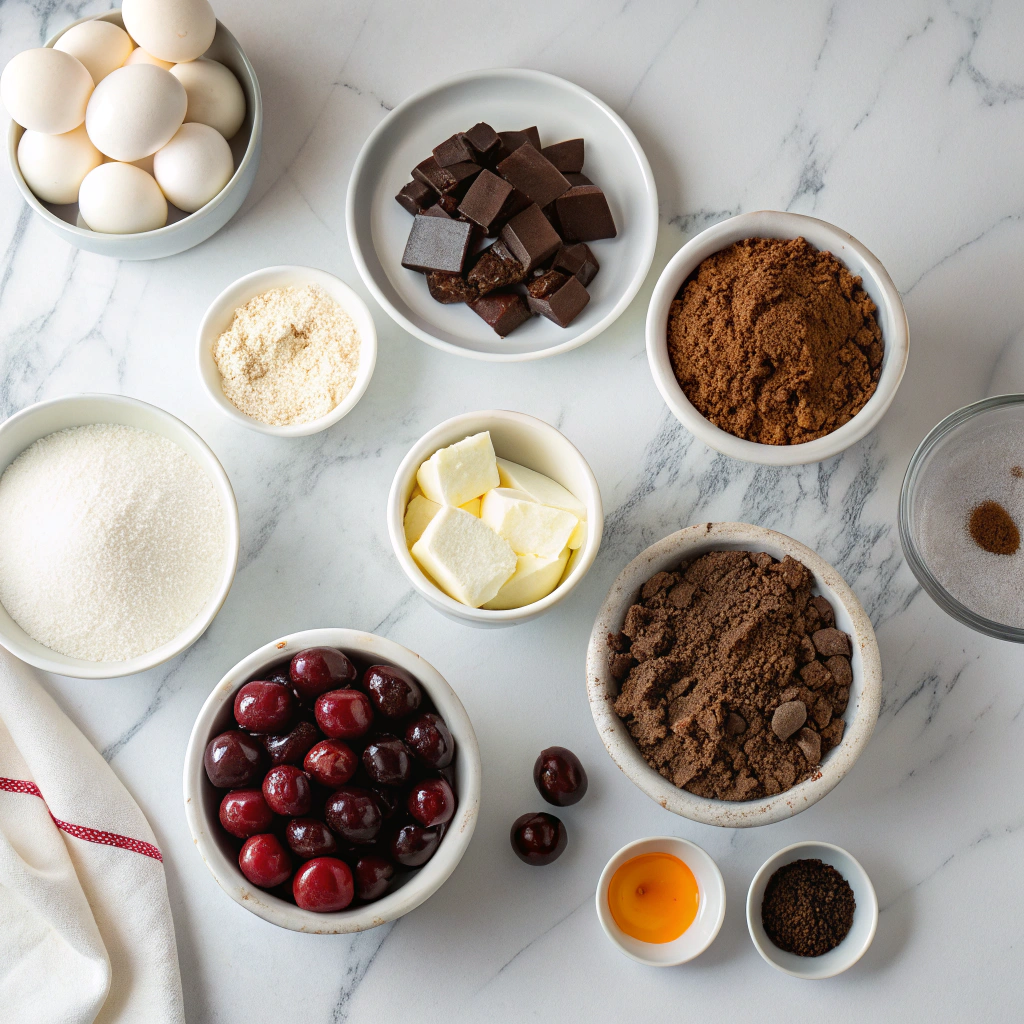
- 2 cups chocolate cookie crumbs
- 1/2 cup melted butter
- 24 oz cream cheese, softened
- 1 cup granulated sugar
- 3 large eggs
- 1 tsp vanilla extract
- 1/2 cup sour cream
- 1/2 cup cocoa powder
- 1 can cherry pie filling
- 1 cup heavy whipping cream
- 2 tbsp powdered sugar
- 1/2 tsp almond extract
Instructions
1. Prepare the Crust:
- Preheat oven to 325°F. Mix cookie crumbs and melted butter, press into a 9-inch springform pan.
- Beat cream cheese and sugar until smooth. Add eggs one at a time, then vanilla, sour cream, and cocoa powder.
- Pour filling over crust. Bake for 45-50 minutes until center is almost set. Cool completely.
- Refrigerate for at least 4 hours. Top with cherry pie filling.
- Whip cream with powdered sugar and almond extract until stiff peaks form. Pipe around edges before serving.
Notes
You can customize the seasonings to taste.
Heavenly Black Forest Cheesecake Recipe
There’s something undeniably magical about combining the rich, velvety texture of cheesecake with the deep, fruity notes of a classic Black Forest. This recipe is a love letter to both—decadent, dreamy, and just a little nostalgic. Whether you’re celebrating a special occasion or simply indulging in a sweet moment, this dessert is sure to steal the show.
Ingredients You’ll Need
- For the crust:
- 1 ½ cups chocolate cookie crumbs (I love using Oreo crumbs, filling removed, for that extra chocolatey base)
- 6 tbsp unsalted butter, melted (because everything’s better with butter!)
- A pinch of salt (to balance the sweetness)
- For the cheesecake filling:
- 24 oz cream cheese, softened (room temperature is key for a silky texture)
- 1 cup granulated sugar (just enough sweetness to complement the tart cherries)
- 3 large eggs (farm-fresh if possible, for richness)
- 1 tsp pure vanilla extract (the good stuff—it makes all the difference)
- ½ cup sour cream (for that signature tang and creaminess)
- ¼ cup cocoa powder (Dutch-processed for a deeper chocolate flavor)
- For the cherry topping:
- 1 can (21 oz) cherry pie filling (or homemade if you’re feeling fancy!)
- 1 tbsp Kirsch (cherry liqueur, optional but oh-so-authentic)
- ½ cup heavy cream, whipped (for garnish)
- Dark chocolate shavings (because a little extra chocolate never hurt anyone)
Step-by-Step Instructions
- Prepare the crust: Preheat your oven to 325°F (160°C). In a bowl, mix the chocolate cookie crumbs, melted butter, and salt until it resembles wet sand. Press firmly into the bottom of a 9-inch springform pan—I like to use the back of a measuring cup for an even layer. Bake for 10 minutes, then let it cool while you work on the filling.
- Make the cheesecake filling: In a large bowl, beat the softened cream cheese until smooth and creamy. Gradually add the sugar, scraping down the sides of the bowl as needed. Add the eggs one at a time, mixing just until incorporated—overmixing can lead to cracks! Stir in the vanilla, sour cream, and cocoa powder until everything is beautifully blended.
- Bake to perfection: Pour the filling over the cooled crust and smooth the top with a spatula. Place the pan in a water bath (wrap the bottom in foil to prevent leaks) and bake for 50-60 minutes, or until the edges are set but the center still has a slight jiggle. Turn off the oven, crack the door open, and let the cheesecake cool inside for an hour—this helps prevent sinking.
At this point, your kitchen will smell like a chocolate-covered dream, and the hardest part will be waiting for the cheesecake to chill. But trust me, the patience pays off when you top it with those juicy cherries and a cloud of whipped cream. Stay tuned for the finishing touches—because the best is yet to come!
Conclusion
There you have it—a decadent Black Forest Cheesecake that combines the rich flavors of chocolate, cherries, and creamy cheesecake into one heavenly dessert. Whether you’re celebrating a special occasion or simply indulging in a sweet craving, this recipe is sure to impress. The layers of chocolatey crust, velvety cheesecake, and tart cherry topping create a perfect balance of flavors and textures.
Now it’s your turn! Whip up this showstopper and let us know how it turns out. Did you add a personal twist? Share your experience in the comments below—we’d love to hear from you. And if you’re craving more dessert inspiration, check out our other decadent cheesecake recipes for your next baking adventure.
FAQs
Can I use frozen cherries instead of canned?
Absolutely! Frozen cherries work just as well. Just make sure to thaw and drain them before using, and adjust the sugar in the topping to taste since frozen cherries can vary in sweetness.
How do I prevent cracks in my cheesecake?
The key is to bake it gently—avoid overmixing the batter and use a water bath for even heat distribution. Letting the cheesecake cool gradually in the oven with the door slightly ajar also helps prevent cracks.
Can I make this recipe ahead of time?
Yes! In fact, cheesecake tastes even better after chilling overnight. Just add the cherry topping right before serving to keep it fresh and vibrant.
What can I use if I don’t have a springform pan?
A deep pie dish or regular cake pan lined with parchment paper will work, though removing slices may be trickier. For best results, we recommend investing in a springform pan—it’s a game-changer for cheesecakes!
Is there a substitute for sour cream?
Greek yogurt is a great alternative if you don’t have sour cream on hand. It provides the same tangy creaminess that makes this cheesecake so irresistible.