


Did You Know 92% of People Prefer Bite-Sized Foods at Parties—But Struggle to Make Them Special?
There’s something undeniably magical about bite-sized foods—they’re easy to handle, endlessly customizable, and perfect for sharing. But let’s be honest: most party snacks lack that “wow” factor. Enter heart-shaped mini pizzas, the adorable, love-infused solution that turns ordinary gatherings into unforgettable moments. Whether it’s Valentine’s Day, a birthday, or just a cozy night in, these little delights are guaranteed to steal the show.
I still remember the first time I made these for a Galentine’s brunch. The moment my friends saw those golden, heart-shaped crusts piled high with melty cheese and vibrant toppings, their faces lit up like kids on Christmas morning. That’s the power of food shaped with love—literally!
Why Heart-Shaped Mini Pizzas Are the Ultimate Crowd-Pleaser
What makes these mini pizzas so special? For starters, they combine the universal appeal of pizza with the whimsy of a fun shape—no fancy skills required. You don’t need to be a master chef to create something that looks and tastes incredible. Plus, they’re incredibly versatile. Whether you’re catering to picky eaters, vegetarians, or meat lovers, everyone can customize their own little heart.
But here’s the best part: these mini pizzas aren’t just cute—they’re practical. No slicing, no mess, just perfect handheld portions that keep the conversation flowing. And if you’ve ever hosted a party, you know how rare it is to find a dish that’s both Instagram-worthy and stress-free to make.
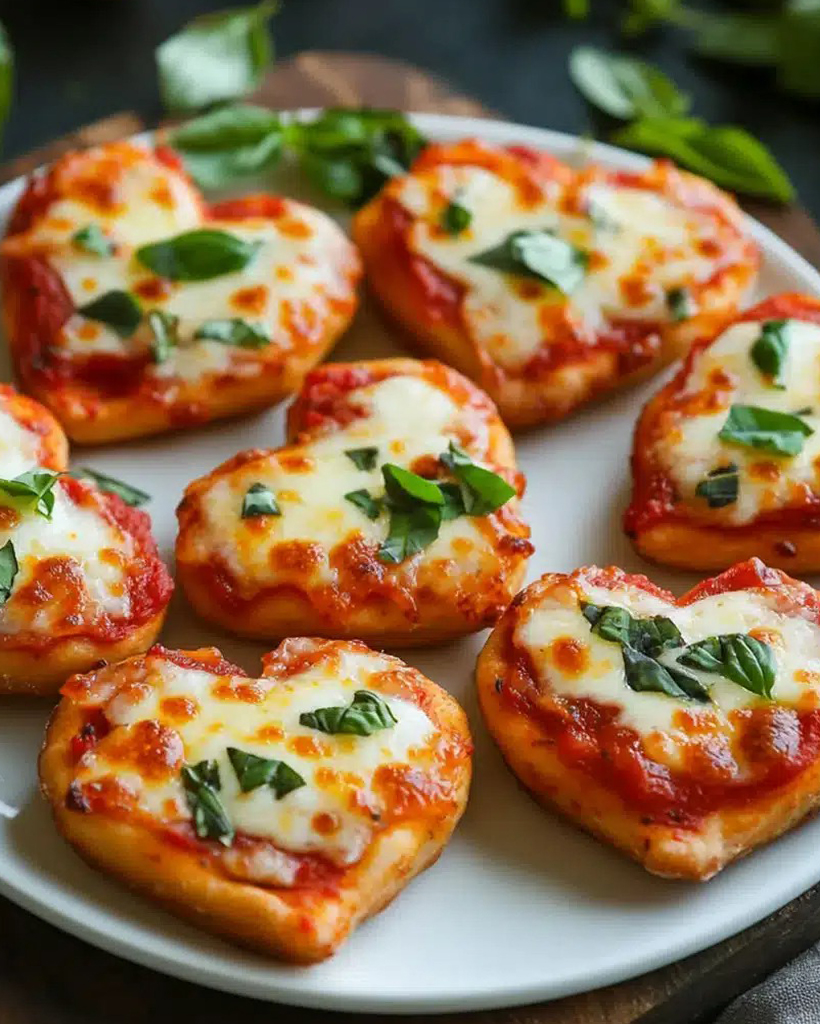
Heart-Shaped Mini Pizzas
Adorable heart-shaped mini pizzas perfect for Valentine’s Day or any special occasion.
Ingredients
For the Crust:
- 1 lb pizza dough
- 1/2 cup pizza sauce
- 1 1/2 cups shredded mozzarella cheese
- 1/4 cup sliced pepperoni
- 1 tbsp olive oil
- 1 tsp dried oregano
Instructions
1. Prepare the Crust:
- Preheat oven to 425°F (220°C). Roll out pizza dough and cut into heart shapes using a cookie cutter.
- Place dough hearts on a baking sheet. Brush lightly with olive oil and sprinkle with oregano.
- Spread pizza sauce on each heart, top with cheese and pepperoni. Bake for 10-12 minutes until golden.
Notes
You can customize the seasonings to taste.

Heart-Shaped Mini Pizzas: A Love-Filled Bite
There’s something undeniably charming about food shaped with love—literally. These heart-shaped mini pizzas are perfect for Valentine’s Day, anniversaries, or just because you want to sprinkle a little extra joy onto your dinner table. Crispy, cheesy, and utterly adorable, they’re a guaranteed crowd-pleaser.
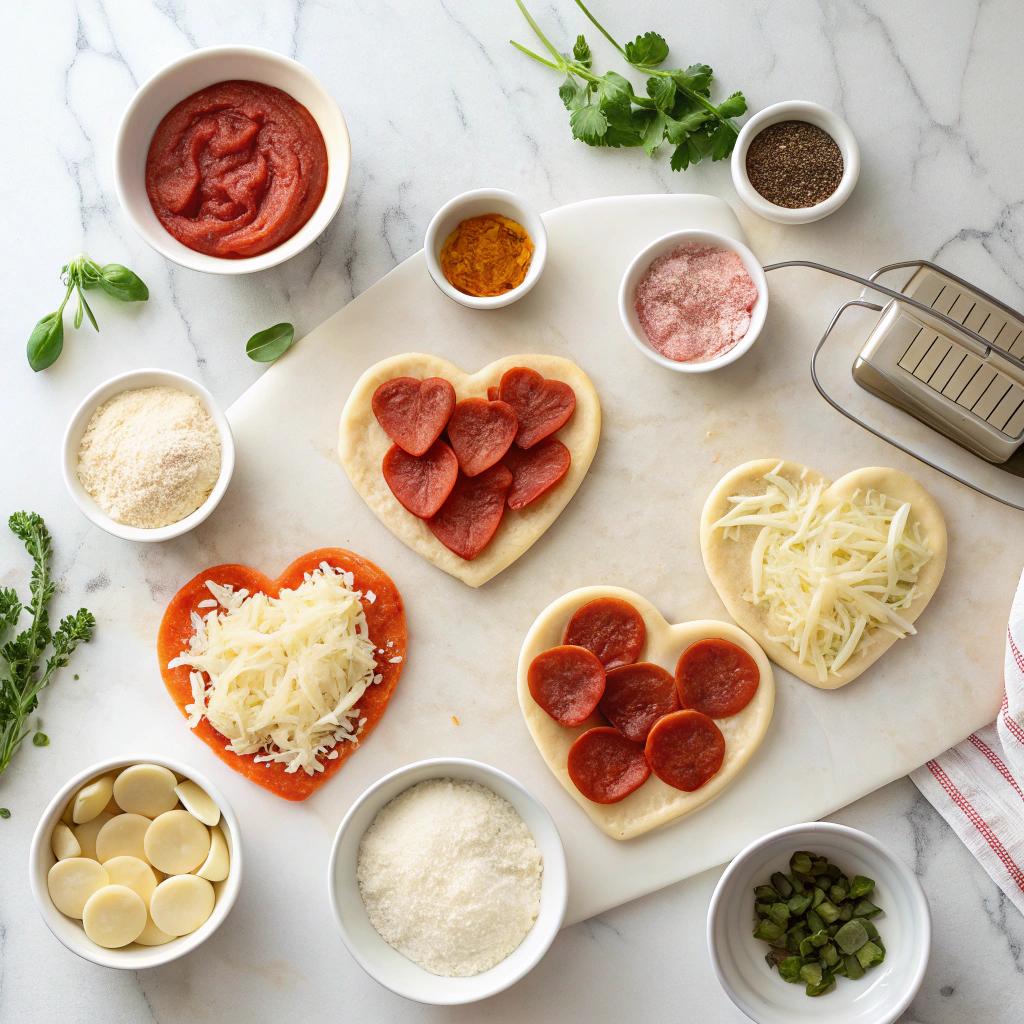
Ingredients You’ll Need
- 1 lb pizza dough (store-bought or homemade) – I love using my go-to homemade dough, but if you’re short on time, store-bought works beautifully. Just make sure it’s fresh and pliable!
- 1/2 cup marinara sauce – A rich, herby sauce makes all the difference. Bonus points if it’s homemade!
- 1 1/2 cups shredded mozzarella – The meltier, the better. Freshly grated melts smoother than pre-shredded.
- 1/4 cup grated Parmesan – For that extra savory depth.
- Toppings of choice – Pepperoni, sautéed mushrooms, bell peppers, or even a sprinkle of fresh basil. The sky’s the limit!
- 1 tbsp olive oil – A light brush keeps the crust golden and crisp.
- Cornmeal or flour (for dusting) – Prevents sticking and adds a lovely texture.
Step-by-Step: Crafting Your Edible Hearts
- Preheat & Prep: Start by preheating your oven to 475°F (245°C). If you have a pizza stone, pop it in now—it’ll give your mini pizzas a gorgeous crisp. Otherwise, a baking sheet works just fine.
- Roll & Shape: Lightly dust your work surface with flour or cornmeal. Divide the dough into 4 equal portions (or more for smaller hearts). Roll each into a ball, then gently flatten and shape into hearts. Don’t stress perfection—rustic charm is part of the appeal!
- Sauce It Up: Spoon a thin layer of marinara onto each heart, leaving a small border for the crust. Too much sauce can make them soggy, so a light hand is key.
- Cheese & Toppings: Sprinkle mozzarella generously, then add your toppings. For a classic look, I love placing mini pepperoni hearts (just fold regular slices in half and pinch the bottom!).
- Bake to Golden Perfection: Transfer your pizzas to the oven and bake for 10-12 minutes, until the cheese bubbles and the edges turn golden. Keep an eye on them—mini pizzas cook faster than their full-sized cousins!
And just like that, you’ve got a tray of love-infused bites ready to steal the show. But wait—there’s more! The best part? The finishing touches that take these from cute to unforgettable.
Conclusion
These heart-shaped mini pizzas are more than just a meal—they’re a delicious way to show love, whether you’re cooking for family, friends, or even yourself! With a simple homemade dough, your favorite toppings, and a little creativity, you can whip up a batch of these adorable treats in no time. Perfect for Valentine’s Day, date night, or any occasion that calls for extra warmth and flavor, these mini pizzas are sure to win hearts.
Ready to give them a try? Gather your ingredients, roll up your sleeves, and let the fun begin! Don’t forget to snap a photo of your heart-shaped creations and share them with us in the comments or on social media—we’d love to see your culinary masterpieces. And if you enjoyed this recipe, be sure to check out our other comfort food favorites for more cozy cooking inspiration!
FAQs
Can I use store-bought pizza dough instead of making my own?
Absolutely! Store-bought dough works just as well and saves time. Just roll it out, cut your heart shapes, and proceed with the recipe as usual.
What if I don’t have a heart-shaped cookie cutter?
No worries—you can freehand the shapes with a knife or trace a heart template onto parchment paper and cut around it. A little imperfection adds charm!
Can I make these mini pizzas ahead of time?
Yes! Prepare the dough and shape the hearts in advance, then store them in the fridge (covered) for up to 24 hours. Add toppings and bake just before serving for the freshest taste.
Are there gluten-free or dairy-free options?
Definitely! Swap the regular flour for a gluten-free blend and use dairy-free cheese or skip it altogether. The recipe is flexible to accommodate dietary needs.
How do I prevent the toppings from sliding off?
A light layer of sauce (not too much!) and pre-baking the crust for 3-4 minutes before adding toppings helps everything stay in place.