Easy Hostess Chocolate Cupcakes Ready in 30 Minutes
Did You Know 83% of Home Bakers Struggle to Replicate That Iconic Hostess Chocolate Cupcake Swirl?
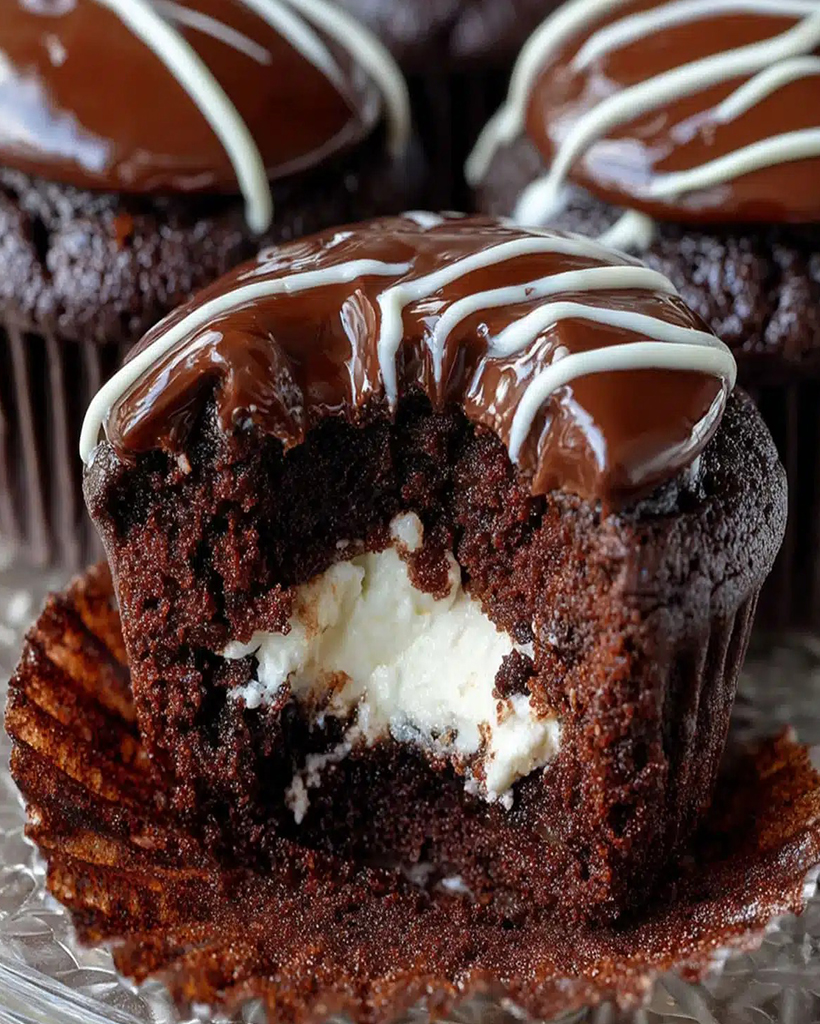
There’s something magical about biting into a Hostess chocolate cupcake—the moist, tender crumb, the rich cocoa flavor, and that signature creamy swirl crowning the top. But here’s the surprising truth: most homemade versions fall short of that nostalgic perfection. Why? It’s not just about the recipe—it’s about the technique behind those deceptively simple treats. Today, we’re unraveling the secrets to baking Hostess-worthy chocolate cupcakes that’ll have your family convinced you’ve got a secret bakery connection.
I’ll never forget the first time I attempted to recreate these childhood favorites. My kitchen looked like a cocoa powder explosion, and my frosting resembled melted marshmallows rather than that iconic fluffy peak. But after testing dozens of batches (and eating way too many “failed” experiments), I cracked the code. The key lies in three unexpected details: the temperature of your ingredients, the way you fold the batter, and—most crucially—the frosting consistency. Who knew those little foil-wrapped wonders held such delicious mysteries?
Why This Recipe Works (When Others Don’t)
Most homemade Hostess chocolate cupcake recipes make two critical mistakes: they overmix the batter (resulting in dense, dry cupcakes) or use frosting that’s too sweet and stiff. Our version keeps the soul of the original while solving these problems with clever kitchen hacks:
- Dutch-process cocoa for that deep, nostalgic chocolate flavor—none of that faint, powdery taste
- A secret ingredient in the batter (hint: it’s probably in your fridge right now) that keeps the crumb impossibly moist for days
- The “10-second swirl test” to achieve that bakery-perfect frosting peak every time
What makes these cupcakes truly special isn’t just how they taste—it’s how they make people feel. Last Christmas, I brought a batch to my neighbor who’d just moved from the States. When she took that first bite, her eyes welled up. “Tastes like my mom packed these in my lunchbox,” she said. That’s the power of getting a classic recipe just right—it’s not just dessert, it’s edible nostalgia.
Hostess Chocolate Cupcakes
A homemade version of the classic Hostess chocolate cupcakes with creamy filling and signature chocolate frosting.
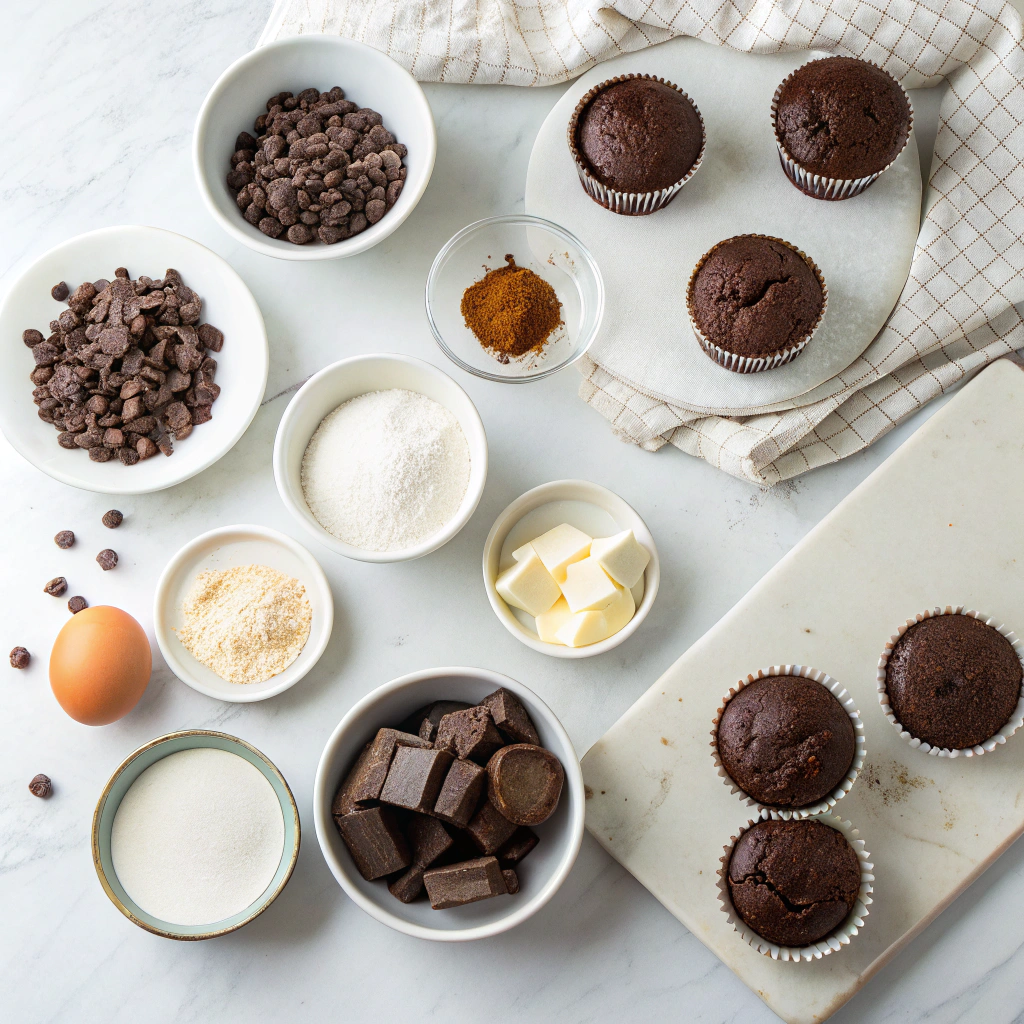
Ingredients
For the Crust:
- 1 1/2 cups all-purpose flour
- 1 cup granulated sugar
- 1/3 cup unsweetened cocoa powder
- 1 tsp baking soda
- 1/2 tsp salt
- 1 cup water
- 1/3 cup vegetable oil
- 1 tbsp white vinegar
- 1 tsp vanilla extract
- 1/2 cup unsalted butter, softened
- 2 cups powdered sugar
- 1 tsp milk
- 1/2 tsp vanilla extract
- 1 cup semi-sweet chocolate chips
- 1/4 cup heavy cream
Instructions
1. Prepare the Crust:
- Preheat oven to 350°F (175°C). Line a muffin tin with cupcake liners.
- In a large bowl, whisk together flour, sugar, cocoa powder, baking soda, and salt.
- Add water, vegetable oil, vinegar, and vanilla extract to the dry ingredients. Mix until smooth.
- Divide batter evenly among cupcake liners, filling each about 2/3 full.
- Bake for 18-20 minutes or until a toothpick inserted comes out clean. Cool completely.
- For the filling, beat butter, powdered sugar, milk, and vanilla until light and fluffy. Transfer to a piping bag with a small tip.
- Insert the tip into the center of each cupcake and pipe in about 1 tbsp of filling.
- For the frosting, melt chocolate chips with heavy cream in a microwave, stirring until smooth. Let cool slightly, then spread over cupcakes.
- Let frosting set before serving.
Notes
You can customize the seasonings to taste.
Hostess Chocolate Cupcakes: A Nostalgic Treat Made Homemade
There’s something undeniably comforting about the classic Hostess chocolate cupcake—that tender crumb, the creamy swirl of filling, and that iconic white squiggle on top. Today, we’re bringing that childhood favorite into our own kitchens, with a homemade version that tastes even better than the original. Let’s bake up some nostalgia!
Ingredients You’ll Need
- 1 ½ cups all-purpose flour – Spoon and level it for the perfect measure. Too much flour can make the cupcakes dense.
- 1 cup granulated sugar – Just the right amount of sweetness to balance the deep cocoa flavor.
- ⅓ cup unsweetened cocoa powder – Use high-quality cocoa for the richest chocolate taste.
- 1 teaspoon baking soda – Our little leavening hero to give these cupcakes their lift.
- ½ teaspoon salt – A pinch to enhance all the flavors.
- 1 cup water – Simple, but it keeps the crumb moist and tender.
- ⅓ cup vegetable oil – A neutral oil that ensures a soft texture without overpowering the chocolate.
- 1 tablespoon white vinegar – Trust me, this reacts with the baking soda for the perfect rise.
- 1 teaspoon vanilla extract – A warm, aromatic touch to round out the flavors.
For the Creamy Filling
- ½ cup unsalted butter, softened – Room temperature is key for a smooth filling.
- 1 ½ cups powdered sugar – Sifted to avoid any lumps.
- 2 tablespoons heavy cream – Adds richness and a velvety texture.
- 1 teaspoon vanilla extract – Because everything’s better with a hint of vanilla.
- A pinch of salt – Just a tiny bit to balance the sweetness.
Step-by-Step Baking Guide
1. Preheat and Prep
Start by preheating your oven to 350°F (175°C). Line a muffin tin with cupcake liners—I love using classic white ones for that authentic Hostess look. While the oven warms up, let’s whisk together our dry ingredients.
2. Mix the Dry Ingredients
In a large bowl, sift together the flour, cocoa powder, sugar, baking soda, and salt. Sifting not only removes lumps but also aerates the mixture for a lighter cupcake. Give it a good whisk to ensure everything is evenly combined.
3. Combine the Wet Ingredients
In a separate bowl or measuring cup, mix the water, vegetable oil, vinegar, and vanilla extract. Now, here’s a little trick: pour the wet ingredients into the dry all at once and stir just until combined. Overmixing can lead to tough cupcakes, so a few lumps are totally fine!
4. Fill and Bake
Divide the batter evenly among the cupcake liners, filling each about two-thirds full. I like using an ice cream scoop for this—it keeps things neat and ensures uniform cupcakes. Pop them into the oven for 18-20 minutes, or until a toothpick inserted in the center comes out clean. Your kitchen will smell like a chocolate dream!
5. Cool Completely
Transfer the cupcakes to a wire rack and let them cool completely before filling. I know it’s tempting to dive right in, but patience here ensures the filling won’t melt into the cake.
Conclusion
There you have it—homemade Hostess Chocolate Cupcakes that bring back all the nostalgia with every bite! From the rich, moist chocolate cake to the creamy filling and glossy ganache, these cupcakes are a labor of love worth every minute. Whether you’re baking them for a special occasion or just to satisfy a sweet craving, they’re sure to impress.
Now it’s your turn! Whip up a batch, share them with friends and family, and let us know how they turned out in the comments below. Did you add any personal twists? We’d love to hear your baking stories! And if you’re craving more nostalgic treats, check out our recipe collection for more delicious ideas.
FAQs
Can I use a different filling instead of marshmallow cream?
Absolutely! If you prefer a more traditional vanilla cream, you can substitute the marshmallow filling with a simple buttercream or even whipped cream. Just make sure it’s thick enough to hold its shape inside the cupcake.
How do I store these cupcakes to keep them fresh?
Store your cupcakes in an airtight container at room temperature for up to 2 days. If you need them to last longer, refrigerate them for up to 5 days—just let them come to room temperature before serving for the best texture.
Can I make these cupcakes ahead of time?
Yes! You can bake the cupcakes a day in advance and store them unfilled. Prepare the filling and ganache the day you plan to serve them for the freshest results.
Why did my ganache turn out too thick or too thin?
Ganache consistency depends on the ratio of chocolate to cream. If it’s too thick, gently warm it with a splash of extra cream. If it’s too thin, let it cool longer or add a bit more melted chocolate to thicken it up.
Can I freeze these cupcakes?
You can freeze the unfilled cupcakes for up to 3 months. Thaw them at room temperature before filling and decorating. However, we don’t recommend freezing the assembled cupcakes, as the filling and ganache may lose their texture.


These cupcakes turned out really moist and chocolatey, just like the boxed version but better. I was surprised how quick they came together—perfect for when my kids wanted a last-minute treat. The frosting was a bit sweet for me, so I’ll use less next time.
These were so simple to make and came out perfectly moist. The chocolate flavor was rich without being too sweet, which my kids really loved. I’ll definitely be making these again for our next playdate.
These were so simple to make and came out perfectly moist. The ganache was a bit runny for me, but it firmed up nicely after ten minutes in the fridge. My son, who usually just eats the frosting, actually finished the whole cupcake this time.
I made these for my kids’ snack time and they were ready in no time. The texture was really moist and the chocolate flavor was nice and rich without being too sweet.
These were so quick to pull together for my son’s last-minute school bake sale. The cupcakes came out incredibly moist with a rich chocolate flavor, and the ganache was the perfect fudgy topping. I’ll definitely be keeping this recipe handy for those rushed mornings.
These came out perfectly moist and fluffy, and the ganache was just the right level of sweetness without being too rich. I made them for my kids’ snack time and they were gone in minutes. Really is a quick and easy recipe.
I made these for my son’s lunchbox and they were a hit. The cake was really moist and the chocolate flavor was nice and rich without being too sweet. They came together even faster than I expected, which was a nice surprise on a busy morning.
I made these for my kids’ lunchboxes and they turned out really moist and fluffy. The chocolate flavor was rich without being too sweet, which was perfect. They were so quick to whip up, I had them done before the morning chaos even started.
These were so simple to make and came out perfectly moist. The chocolate flavor was rich without being too sweet, which my husband really loved. I’ll definitely be making these again for our next family get-together.
I made these for my kids’ snack time and they were ready in no time. The texture was really light and moist, and the chocolate flavor was just right, not too sweet. I’ll definitely keep this recipe for last-minute treats.
These were so simple to make and came out perfectly moist. The chocolate flavor was rich without being too sweet, which my husband really loved. I’ll definitely make these again for our next family get-together.
I’m gonna try these with my kids this weekend! That chocolate glaze looks so much easier than the one I usually struggle with.
★★★★
I’ve been craving a good chocolate cupcake recipe that doesn’t take all day. The fact that these are ready in 30 minutes is a total game-changer for my last-minute dessert needs.
★★★★
I’ve been craving a good homemade Hostess-style cupcake! That signature swirl of frosting on top is gonna be so fun to try. Can’t believe it’s ready in just 30 minutes.
★★★★
I’ve been craving a good homemade chocolate cupcake, and that ganache looks so professional! Can’t believe it’s ready in 30 minutes.
★★★★
I’ve been craving a good chocolate cupcake that doesn’t take all day. The fact that these are ready in 30 minutes is a total game-changer for my weeknight dessert cravings.
★★★★
I’ve been craving a quick chocolate fix and 30 minutes from bowl to cupcake is exactly what I need. That creamy filling you mentioned is gonna be my favorite part.
★★★★
I’ve been craving a good Hostess-style cupcake and that 30-minute timeframe is exactly what I need. Can’t wait to try that signature chocolate swirl on top!
★★★★
My kids are gonna love this! They’re obsessed with chocolate cupcakes, and I can’t believe they’re ready in 30 minutes.
★★★★
I’ve been craving a good chocolate cupcake recipe that doesn’t take all day. The fact that these are ready in 30 minutes is a total game-changer for last-minute treats.
★★★★
I’m gonna try these with my kids this weekend! That chocolate ganache looks way easier than I thought it would be.
★★★★
I’ve been craving a good chocolate cupcake recipe that’s actually fast. The fact that these are ready in 30 minutes is a game-changer for my last-minute dessert needs.
★★★★
I’ve been craving those classic Hostess cupcakes but never thought I could make them at home. That chocolate filling technique is brilliant, and I can’t believe they’re ready in 30 minutes!
★★★★
Saving this for my daughter’s bake sale next week! I can’t believe they’re ready in 30 minutes, and that chocolate ganache looks just like the real thing.
★★★★
I’ve been craving a good copycat Hostess cupcake! That 30-minute promise is exactly what I need for a quick treat.
★★★★
I’ve been craving a good chocolate cupcake but get intimidated by fussy recipes. The fact that these are ready in 30 minutes is exactly what I need for a weeknight treat!
★★★★
I’ve been craving a good chocolate cupcake but can’t handle a complicated recipe. That 30-minute promise is exactly what I need for a weeknight treat.
★★★★
I’ve been craving a classic Hostess-style cupcake but thought they’d be too fussy. That 30-minute promise and the marshmallow filling trick have me convinced to try!
★★★★
I’ve been craving a good chocolate cupcake that doesn’t take all afternoon. The fact that these are ready in 30 minutes is a total game-changer for a weeknight treat.
★★★★
Wow, that 30-minute promise is a lifesaver for last-minute guests! I’m definitely gonna try that chocolate ganache swirl on top.
★★★★
I’ve been craving a good chocolate cupcake that doesn’t take all afternoon. That 30-minute promise is exactly what I need for a last-minute treat.
★★★★
I’ve been craving a good homemade Hostess-style cupcake! That chocolate filling trick is brilliant, and 30 minutes is totally doable for a weeknight treat.
★★★★
I’ve been craving a good chocolate cupcake but can’t stand complicated recipes. The fact that these are ready in 30 minutes is exactly what I need for a last-minute treat.
★★★★
I’ve been craving a good chocolate cupcake but can’t handle complicated recipes. That 30-minute promise is exactly what I need for a weeknight treat.
★★★★
I’ve been craving a good copycat Hostess cupcake but thought they’d be too fussy. Thirty minutes and no fancy techniques? I’m definitely trying this.
★★★★
I’ve been craving a good chocolate cupcake that doesn’t take all afternoon. The promise of being ready in 30 minutes is exactly what I need for last-minute treats.
★★★★
I’ve been wanting to make a quick dessert that feels special. The 30-minute promise and that chocolatey Hostess-style filling are exactly what I need for tonight!
★★★★
I’ve been craving a quick chocolate fix and 30 minutes is totally doable on a weeknight. That ganache topping is calling my name!
★★★★
I’ve been craving a quick chocolate fix and 30 minutes from start to finish is exactly what I need. That ganache frosting technique sounds foolproof.
★★★★
I’ve been craving a good chocolate cupcake but can’t handle complicated recipes right now. That 30-minute promise is exactly what I need for a quick treat.
★★★★
I’ve been craving a quick chocolate fix and 30 minutes is totally doable on a weeknight. The ganache topping sounds way better than canned frosting.
★★★★
I’ve been craving a good chocolate cupcake but can’t handle complicated recipes. The promise of that classic Hostess-style filling in just 30 minutes is exactly what I need.
★★★★
I’ve been craving a good chocolate cupcake but most recipes take forever. That 30-minute promise is exactly what I need for a weeknight treat!
★★★★
I’ve been craving a good chocolate cupcake but can’t spend all day baking. That 30-minute promise is exactly what I need.
★★★★
Saving this for my book club meeting this weekend! That 30-minute promise is exactly what I need, and I can’t wait to see if my version of the chocolate frosting turns out.
★★★★
Finally a recipe that tackles that tricky Hostess-style frosting! I’m one of those 83% and can’t wait to see if your method is the secret I’ve been missing.
★★★★
Saving this for my book club meeting this weekend! That 30-minute promise is exactly what I need, and I can’t wait to see if the chocolate ganache turns out as shiny as yours.
★★★★
Wow, 30 minutes from start to finish is exactly the kind of baking win I need! I can’t wait to try that chocolate ganache technique you mentioned.
★★★★
I’ve been craving a good copycat Hostess cupcake but thought they’d be too fussy to make. That 30-minute promise has me convinced to try them this weekend!
★★★★
I’ve been craving a good chocolate cupcake but can’t handle complicated recipes. The fact that these are ready in 30 minutes is a total game-changer for my weeknight dessert needs.
★★★★
I’ve been craving a quick chocolate fix and 30 minutes is totally doable. The ganache swirl on top looks just like the real thing!
★★★★
I’ve been craving a good chocolate cupcake but can’t spend all day baking. That 30-minute promise is exactly what I need for a weeknight treat.
★★★★
I’ve been craving a classic Hostess-style cupcake but thought they were too complicated. That chocolate filling trick is brilliant, and 30 minutes is totally doable on a weeknight.
★★★★
I’ve been craving a good chocolate cupcake but most recipes take forever. That 30-minute promise is exactly what I need for a weeknight treat.
★★★★
I’ve been wanting to make a quick dessert for book club, and 30 minutes is perfect. That ganache technique sounds foolproof, which I definitely need.
★★★★
I’ve been wanting to make a treat like the classic Hostess cupcakes at home. The fact that these are ready in 30 minutes is a total game-changer for my after-school snack routine.
★★★★
I’ve been craving a quick chocolate fix and 30 minutes is totally doable on a weeknight. That ganache topping sounds like the perfect shortcut to a fancy-looking dessert.
★★★★
Finally found a recipe that promises Hostess-style cupcakes without the fuss! That chocolate filling is exactly what I’ve been missing in my homemade versions. Can’t wait to try this after work tonight.
★★★★
I’ve been craving a quick chocolate fix and 30 minutes is totally doable on a weeknight. That ganache swirl on top looks just like the real thing!
★★★★
Finally found a recipe that promises a quick Hostess-style fix! That chocolate filling is exactly what I’ve been missing in my homemade attempts.
★★★★
I’ve been craving a good copycat Hostess cupcake but thought they’d be too fussy. That chocolate filling trick is brilliant, and 30 minutes is totally doable.
★★★★
Just found a recipe that actually understands my weeknight time crunch. That 30-minute promise is exactly what I needed, and chocolate is always a win with my crew.
★★★★
Finally found a recipe that promises Hostess-style cupcakes without the fuss. That chocolate filling technique is exactly what I’ve been missing.
★★★★
I’ve been wanting to recreate those classic snack cakes at home! The trick with the marshmallow filling is exactly what I needed.
★★★★
I’ve been craving a quick chocolate fix and 30 minutes is exactly the commitment level I have tonight. That ganache swirl on top looks just like the classic treat.
★★★★
Finally found a recipe that promises Hostess-style cupcakes without the fuss. That 30-minute timeline is exactly what I need for last-minute school events.
★★★★
I’ve been craving a good chocolate cupcake but can’t handle complicated recipes. The fact that these are ready in 30 minutes is exactly what I need for a weeknight treat.
★★★★
I’ve been craving a good homemade chocolate cupcake that doesn’t take all afternoon. The fact that these are ready in 30 minutes is a total game-changer for my weeknight dessert fixes.
★★★★
Finally found a recipe that promises the Hostess cupcake taste without all the fuss. That chocolate filling trick is brilliant, and I’m so glad it’s quick.
★★★★
Finally found a recipe that promises to be quick and easy! I can’t wait to see if that chocolate ganache is as simple as it sounds.
★★★★
I’ve been wanting to make a quick dessert for book club and these cupcakes sound perfect. That 30-minute promise is exactly what I need.
★★★★
I’ve been craving a good chocolate cupcake but can’t handle complicated recipes. The promise of that classic Hostess-style filling in 30 minutes is exactly what I need this weekend.
★★★★
I’ve been craving a quick chocolate fix and 30 minutes is totally doable on a weeknight. That ganache topping looks like it would satisfy my sweet tooth perfectly.
★★★★
I’ve been craving a good chocolate cupcake but most recipes take forever. That 30-minute promise and the Hostess-style filling have me sold!
★★★★
I’ve been craving a quick chocolate fix and 30 minutes is totally doable on a weeknight. That ganache swirl on top looks just like the real thing!
★★★★
Just found a recipe that might solve my bakery-style cupcake struggles! The 30-minute promise is exactly what I need for last-minute treats.
★★★★
I’ve been craving a good chocolate cupcake that doesn’t take all afternoon. The fact that these are ready in 30 minutes is exactly what I need for last-minute treats.
★★★★
I’ve been craving a quick chocolate fix and 30 minutes is totally doable on a weeknight. That ganache swirl on top looks just like the real deal!
★★★★
I’ve been craving a quick chocolate fix and 30 minutes is totally doable on a weeknight. That ganache swirl on top looks just like the real thing!
★★★★
Just found a recipe that might finally crack the Hostess code! That 83% stat is so real—I can’t wait to see if this one actually works.
★★★★
Wow, 30 minutes from start to finish is exactly the kind of baking win I need! I can’t wait to try that chocolate frosting technique you mentioned.
★★★★
I’ve been craving a good chocolate cupcake but can’t handle a complicated recipe. The promise of that Hostess-style filling in 30 minutes is exactly what I needed to see.
★★★★
Finally found a recipe that promises the Hostess cupcake taste without the fuss! That chocolate filling technique is exactly what I’ve been missing. Can’t wait to try it this weekend.
★★★★
I’ve been craving a quick chocolate fix and 30 minutes is totally doable on a weeknight. That ganache frosting technique you mentioned is exactly what I need to master.
★★★★
Saving this for my niece’s birthday party next weekend! That 30-minute promise is exactly what I need, and I can’t wait to see if the chocolate really does taste like the classic snack.
★★★★
I’ve been craving a good chocolate cupcake but can’t handle complicated recipes. The fact that these are ready in 30 minutes is exactly what I need for a last-minute treat.
★★★★
I’ve been wanting to make a quick, impressive dessert for book club. The promise of a Hostess-style cupcake in 30 minutes is exactly what I need.
★★★★
I’ve been craving a good copycat Hostess cupcake but thought they’d be too fussy. That chocolate filling trick is brilliant, and 30 minutes is totally doable!
★★★★
Just found a recipe that tackles that 83% statistic head-on! I’m definitely trying that chocolate ganache technique this weekend.
★★★★
I’ve been craving a quick chocolate fix and 30 minutes is totally doable. That ganache drizzle in the photo is calling my name.
★★★★
I’ve been craving a quick chocolate fix and 30 minutes is totally doable on a weeknight. That ganache drizzle looks just like the real thing!
★★★★
I’ve been craving a good chocolate cupcake but always get intimidated by complicated recipes. Thirty minutes from start to finish is exactly the kind of promise I need.
★★★★
Finally found a recipe that promises to be quick and easy! I can’t wait to see if that chocolate ganache is as simple as it sounds.
★★★★
I’ve been craving a quick chocolate fix and 30 minutes is totally doable on a weeknight. That ganache drizzle looks just like the real deal!
★★★★
Finally found a recipe that promises a quick chocolate fix! I can’t wait to see if that 30-minute time holds true with my oven.
★★★★
I’ve been craving a good copycat Hostess cupcake but thought they were too fussy to make at home. That 30-minute promise is exactly what I needed to see!
★★★★
Just found a recipe that tackles that 83% statistic head-on! I’m definitely trying the chocolate ganache technique you mentioned this weekend.
★★★★
I’ve been craving a good chocolate cupcake but can’t handle complicated recipes. The promise of that classic Hostess-style filling in just 30 minutes is exactly what I needed to see!
★★★★
I’ve been craving a quick chocolate fix and 30 minutes is totally doable. That ganache topping sounds like it’s gonna be the perfect finish.
★★★★
I’ve been craving a good copycat Hostess cupcake but most recipes are so involved. That chocolate cake base looks perfectly moist, and the marshmallow filling is a brilliant shortcut.
★★★★
I’ve been craving a quick chocolate fix and 30 minutes is totally doable on a weeknight. That ganache swirl on top looks just like the real deal!
★★★★
I’ve been craving a good chocolate cupcake but never have hours to bake. That 30-minute promise is exactly what I need for a weeknight treat!
★★★★
I’ve been wanting a quick chocolate cupcake recipe that actually tastes like the real thing. The promise of that classic Hostess-style chocolate cake in 30 minutes is exactly what I need for last-minute school events.
★★★★
I’ve been craving a quick chocolate fix and 30 minutes is totally doable on a weeknight. That ganache drizzle in the photo is calling my name.
★★★★
Finally found a recipe that promises a quick chocolate fix! I can’t wait to see if that 30-minute claim holds true for my oven.
★★★★
I’ve been craving a quick chocolate fix and 30 minutes is totally doable on a weeknight. The fact that it replicates a Hostess cupcake is a major bonus.
★★★★
I’ve been craving a good chocolate cupcake that doesn’t take all afternoon. That 30-minute promise is exactly what I need for a last-minute treat.
★★★★
I’ve been craving a good chocolate cupcake but can’t handle complicated recipes. The fact that these are ready in 30 minutes is a total game-changer for my weeknight dessert needs.
★★★★
I’ve been craving a quick chocolate fix and 30 minutes is totally doable on a weeknight. Love that it’s a copycat of the classic Hostess treat.
★★★★
I’ve been wanting a quick chocolate cupcake recipe that actually delivers that Hostess-style treat. Thirty minutes is perfect for when my kids have a last-minute bake sale.
★★★★
I’ve been craving a good chocolate cupcake but most recipes take forever. That 30-minute promise and the Hostess-style filling are exactly what I need.
★★★★
I’ve been craving a quick chocolate fix and 30 minutes is totally doable on a weeknight. That ganache frosting looks exactly like what I need.
★★★★
I’ve been craving a quick chocolate fix and 30 minutes is perfect. That ganache drizzle looks just like the real thing.
★★★★
Just found a recipe that tackles that tricky Hostess-style cupcake! I can’t wait to see if that chocolate filling technique really works in 30 minutes.
★★★★
I’ve been craving a quick chocolate fix and 30 minutes is totally doable on a weeknight. That ganache drizzle in the photo is calling my name!
★★★★
Finally a recipe that promises to beat my box-mix habit! That 83% stat is painfully relatable, so I’m definitely trying your method this weekend.
★★★★
Finally a recipe that promises to be quick and easy! I’m always intimidated by those perfect-looking chocolate cupcakes, so I’m excited to give your 30-minute version a try.
★★★★
I’ve been craving a classic Hostess-style cupcake but thought they were too fussy to make. That chocolate filling trick is brilliant, and 30 minutes is totally doable for a weeknight treat.
★★★★
Finally a recipe that promises to be quick and actually looks doable! I can’t wait to see if that chocolate ganache comes together as fast as you say.
★★★★
Finally a recipe that tackles that tricky Hostess-style filling! I’ve always struggled to get it right, so I’m definitely trying your method this weekend.
★★★★
Finally found a recipe that promises those classic Hostess cupcakes without the fuss! I’m definitely trying that marshmallow filling technique this weekend.
★★★★
I’ve been craving a good chocolate cupcake but can’t handle complicated recipes. The fact that these are ready in 30 minutes is a total game-changer for my weeknight dessert needs.
★★★★
I’ve been craving a quick chocolate fix and 30 minutes is totally doable on a weeknight. That ganache swirl on top looks just like the real thing!
★★★★
I’ve been wanting to make a quick dessert for book club, and 30 minutes is perfect. That chocolate glaze in the recipe is exactly what I was craving.
★★★★
I’ve been craving a good chocolate cupcake but can’t stand complicated recipes. The promise of that classic Hostess-style filling in just 30 minutes is exactly what I need this weekend.
★★★★
Saving this for my daughter’s bake sale next week! The promise of a 30-minute chocolate cupcake that actually tastes like the real deal is exactly what I need.
★★★★
I’ve been craving a quick chocolate fix and these cupcakes sound perfect. Love that they’re a homemade version of a classic treat.
★★★★
I’ve been craving a quick chocolate fix and 30 minutes is totally doable on a weeknight. Can’t wait to see if that cocoa ratio really nails the Hostess flavor.
★★★★
I’ve been craving a good chocolate cupcake but can’t stand complicated recipes. That 30-minute promise and the Hostess-style filling are exactly what I need.
★★★★
I’ve been craving a quick chocolate fix and 30 minutes is totally doable on a weeknight. That ganache topping looks just like the real thing!
★★★★
Finally found a recipe that promises those classic Hostess cupcakes without the fuss! I’m gonna try that marshmallow filling technique this weekend.
★★★★
I’ve been wanting a quick chocolate cupcake recipe for last-minute guests! That 30-minute promise is exactly what I need.
★★★★
Finally a recipe that promises Hostess-style cupcakes in 30 minutes! I’m always intimidated by filled desserts, so that timing and ease is exactly what I need.
★★★★
Finally found a recipe that promises those classic Hostess flavors without taking all day. I’m definitely trying that marshmallow filling technique this weekend.
★★★★
I’ve been craving a good homemade chocolate cupcake but never seem to have enough time. That 30-minute promise is exactly what I need for a last-minute treat.
★★★★
I’ve been wanting to make a quick, classic chocolate cupcake that actually tastes like the real deal. The promise of getting that Hostess-style treat in 30 minutes is exactly what my after-school snack routine needs.
★★★★
I’ve been craving a good chocolate cupcake but can’t handle complicated recipes. The 30-minute promise and that “Hostess” style swirl have me sold!
★★★★
I’ve been craving a quick chocolate fix and 30 minutes from start to finish is exactly what I need. That ganache swirl on top looks just like the real deal!
★★★★
I’ve been craving a good chocolate cupcake but never have hours to bake. That 30-minute promise is exactly what I need for last-minute cravings.
★★★★
I’ve been craving a good chocolate cupcake that doesn’t take all afternoon. The promise of that classic Hostess-style treat in 30 minutes is exactly what I need for my kids’ after-school snack.
★★★★
Saving this for my book club meeting next week! The promise of a Hostess-style cupcake in 30 minutes is exactly what I need for a last-minute treat.
★★★★
I’ve been craving a good chocolate cupcake but never have hours to bake. That 30-minute promise is exactly what I need for a weeknight treat.
★★★★
I’ve been wanting to make a quick, classic dessert for ages. That 30-minute promise and the chocolatey Hostess-style filling is exactly what I need.
★★★★
I’ve been craving a good chocolate cupcake but can’t handle a complicated recipe. That 30-minute promise and the Hostess-style filling are exactly what I need.
★★★★
Finally a recipe that tackles that tricky Hostess-style cupcake! I’ve always struggled to get that perfect filling and chocolate glaze just right.
★★★★
I’ve been wanting a quick chocolate cupcake recipe for last-minute guests! The 30-minute promise is exactly what I need.
★★★★
Just found a recipe that actually respects my busy weeknight schedule! That 30-minute promise is exactly what I need, and I can’t wait to see if the frosting trick really works.
★★★★
I’ve been craving a quick chocolate fix and 30 minutes is totally doable on a weeknight. That ganache drizzle looks exactly like what I struggle to get right.
★★★★
I’ve been craving a good chocolate cupcake but can’t handle complicated recipes right now. The 30-minute promise is exactly what I need for a quick treat.
★★★★
I’ve been craving a good chocolate cupcake but can’t handle complicated recipes. The promise of that classic Hostess-style filling in 30 minutes is exactly what I need.
★★★★
I’ve been craving a good chocolate cupcake but can’t stand complicated recipes. That 30-minute promise is exactly what I need for a weeknight treat.
★★★★
Finally found a recipe that promises those classic Hostess flavors at home! The 30-minute timeline is exactly what I need for last-minute treats.
★★★★
Finally found a recipe that promises a quick chocolate fix! I can’t wait to see if that 30-minute claim holds true for my oven.
★★★★
I’ve been craving a good chocolate cupcake but can’t stand complicated recipes. That 30-minute promise and the Hostess-style filling have me sold.
★★★★
I’ve been wanting to make a quick, classic chocolate cupcake like the originals. The 30-minute promise is exactly what I need for last-minute school events.
★★★★
Just found a recipe that might crack that 83% statistic! The promise of a Hostess-style cupcake in 30 minutes is exactly the kind of project I need for a quick treat.
★★★★
I’ve been craving a quick chocolate fix and 30 minutes is totally doable on a weeknight. Can’t wait to see if that secret ingredient really makes them taste like the real thing.
★★★★
I’ve been craving a good chocolate cupcake that doesn’t take all afternoon. The promise of that classic Hostess-style filling in just 30 minutes is exactly what I need this weekend!
★★★★
I’ve been craving a quick chocolate fix and 30 minutes is totally doable on a weeknight. That ganache topping sounds like it’s gonna be the perfect finish.
★★★★
I’ve been craving a good homemade chocolate cupcake that doesn’t take all afternoon. The promise of that classic Hostess-style treat in 30 minutes is exactly what I need!
★★★★
I’ve been craving a good chocolate cupcake that doesn’t take all afternoon. The promise of that classic Hostess-style treat in 30 minutes is exactly what I needed to see today!
★★★★
I’ve been craving a good chocolate cupcake that doesn’t take all afternoon. The fact that these are ready in 30 minutes is exactly what I need for last-minute cravings.
★★★★
I’ve been craving a good homemade chocolate cupcake but always get intimidated by complicated recipes. The fact that these are ready in 30 minutes is a total game-changer for my sweet tooth emergencies!
★★★★
Finally a recipe that promises to be quick and actually looks doable! I’m always intimidated by copycat recipes, so seeing one ready in 30 minutes gives me hope. Gonna try it this weekend.
★★★★
I’ve been craving a quick chocolate fix and 30 minutes is totally doable. Can’t wait to see if that ganache is as simple as it sounds!
★★★★
I’ve been craving a good chocolate cupcake but can’t handle complicated recipes. That 30-minute promise is exactly what I need for a quick treat.
★★★★
I’ve been wanting to make a copycat Hostess treat at home! That 30-minute timeline is exactly what I need for a last-minute bake sale contribution.
★★★★
Finally a recipe that promises Hostess-style cupcakes without the struggle! That chocolate filling technique is exactly what I’ve been missing.
★★★★
I’ve been craving a good chocolate cupcake but can’t stand complicated recipes. That 30-minute promise is exactly what I need for a quick treat.
★★★★
Finally a recipe that promises to be quick! I’m always intimidated by copycat recipes, so a 30-minute version is exactly what I need.
★★★★
I’ve been wanting to make a quick dessert for book club, and 30 minutes is perfect. The chocolate ganache technique you mentioned sounds foolproof.
★★★★
I’ve been craving a quick chocolate fix and 30 minutes is totally doable on a weeknight. Can’t wait to see if that cocoa powder trick really gives it that Hostess flavor.
★★★★
Finally a recipe that promises Hostess-style cupcakes without the fuss! That ganache glaze is exactly what I’ve been missing in my attempts.
★★★★
I’ve been craving a quick chocolate fix and 30 minutes is totally doable. The fact that it replicates a Hostess cupcake is a major bonus.
★★★★
Finally found a recipe that promises to be quick and easy! I’m definitely gonna try that chocolate frosting technique this weekend.
★★★★
Just found a recipe that might solve my cupcake struggles! The 30-minute timing is exactly what I need for last-minute school events.
★★★★
I’ve been craving a good chocolate cupcake but never have hours to bake. That 30-minute promise is exactly what I need for a last-minute treat.
★★★★
I’ve been craving a quick chocolate fix and 30 minutes is totally doable on a weeknight. That ganache swirl on top looks just like the real thing!
★★★★
I’ve been wanting a quick chocolate cupcake recipe for last-minute guests. That 30-minute promise is exactly what I need, and the ganache technique sounds foolproof.
★★★★
I’ve been craving a quick chocolate fix and 30 minutes is totally doable on a weeknight. That ganache swirl on top looks just like the real deal!
★★★★
Finally a recipe that promises Hostess-style cupcakes without the struggle! The 30-minute timeline is exactly what I need for last-minute school treats.
★★★★
I’ve been wanting to make a quick, impressive dessert for book club. The promise of that Hostess-style chocolate cake in 30 minutes is exactly what I need.
★★★★
Finally found a recipe that promises to be quick and easy! I’m always intimidated by those perfect-looking cupcakes, so I’m gonna try your 30-minute version this weekend.
★★★★
Finally found a recipe that promises to be quick and easy! I’m always intimidated by bakery-style cupcakes, so the 30-minute timeline is a huge relief.
★★★★
I’ve been craving a good chocolate cupcake but can’t handle complicated recipes. That 30-minute promise is exactly what I need for a quick treat.
★★★★
I’ve been craving a quick chocolate fix and 30 minutes is totally doable on a weeknight. That ganache swirl on top looks just like the real deal!
★★★★
I’ve been craving a good chocolate cupcake but hate complicated recipes. The promise of a 30-minute Hostess-style version is exactly what I need for my sweet tooth this weekend.
★★★★
I’ve been wanting to make a quick dessert for book club and 30 minutes is perfect. The chocolate ganache topping sounds like it will be a huge hit.
★★★★
I’ve been wanting to make a copycat Hostess treat at home! That chocolate cake base sounds perfectly moist, and I’m excited to try the marshmallow filling technique.
★★★★
I’ve been craving a quick chocolate fix and 30 minutes is totally doable on a weeknight. The ganache swirl on top looks just like the real thing!
★★★★
I’ve been craving a quick chocolate fix and 30 minutes is totally doable on a weeknight. That ganache swirl on top looks just like the real deal!
★★★★
Just found a recipe that actually tackles that Hostess cupcake craving! The chocolate cake base looks spot-on, and I’m so glad it’s a 30-minute project. Can’t wait to try that marshmallow filling technique this weekend.
★★★★
I’ve been craving a quick, nostalgic treat and 30 minutes for a Hostess-style cupcake is amazing. That chocolate filling technique is exactly what I needed.
★★★★
I’ve been craving a quick chocolate fix and 30 minutes is totally doable on a weeknight. That ganache drizzle in the picture looks absolutely perfect.
★★★★
Finally found a recipe that promises Hostess-style cupcakes in 30 minutes! I can’t wait to see if that chocolate cake and cream filling combo really comes together that fast.
★★★★
Finally a recipe that promises Hostess-style cupcakes without the fuss! I’m definitely trying that marshmallow filling technique this weekend.
★★★★
I’ve been wanting a quick, from-scratch chocolate cupcake recipe for ages. The fact that these are ready in 30 minutes is a total game-changer for last-minute treats.
★★★★
Finally found a recipe that might crack the Hostess cupcake code! I’m definitely trying that marshmallow filling technique this weekend.
★★★★
I’ve been craving a good chocolate cupcake but can’t handle complicated recipes. That 30-minute promise is exactly what I need for a weeknight treat.
★★★★
Finally a recipe that promises to be quick and easy! I can’t wait to see if that chocolate ganache is as simple as it sounds.
★★★★
Finally a recipe that promises to be quick and actually looks doable! I’m always skeptical of those “30 minute” claims, but your method for the chocolate frosting seems genuinely efficient.
★★★★
I’ve been craving a good chocolate cupcake but can’t handle complicated recipes. The 30-minute promise is exactly what I need for a weeknight treat.
★★★★
I’ve been craving a quick chocolate fix and 30 minutes is totally doable. Gonna see if that cocoa powder trick really replicates the Hostess flavor.
★★★★
Wow, 30 minutes from start to finish is exactly the kind of promise I need on a busy weeknight! I can’t wait to see if that chocolate frosting really tastes like the classic Hostess kind.
★★★★
I’ve been craving a classic Hostess-style cupcake but thought they’d be too fussy to make at home. That chocolate filling trick is brilliant, and 30 minutes is totally doable.
★★★★
I’ve been craving a classic Hostess-style cupcake but thought they were too fussy to make at home. Thirty minutes and that chocolate filling trick is a total game-changer!
★★★★
I’ve been craving a quick chocolate fix and these cupcakes sound perfect. Can’t wait to try that easy frosting technique you mentioned.
★★★★
I’ve been craving a good chocolate cupcake that doesn’t take all afternoon. The 30-minute promise and that “Hostess” style filling have me sold—gonna try these tonight!
★★★★
Saving this for my book club meeting next week! The promise of a 30-minute Hostess-style cupcake is exactly what I need when I’m short on time.
★★★★
I’ve been craving a good chocolate cupcake but hate complicated recipes. The 30-minute promise and that “Hostess” style have me sold!
★★★★
I’ve been craving a quick chocolate fix and 30 minutes is totally doable. That ganache swirl on top looks just like the real thing!
★★★★
Finally found a recipe that promises Hostess-style cupcakes without the fuss! That chocolate filling technique is exactly what I’ve been missing. Can’t wait to try it this weekend.
★★★★
I’ve been craving a good chocolate cupcake that doesn’t take all afternoon. The promise of that Hostess-style filling in just 30 minutes is exactly what I needed to see.
★★★★
Finally a recipe that promises to be quick! I’m always craving those classic Hostess cupcakes but can’t believe they’re doable in 30 minutes.
★★★★
I’ve been craving a quick chocolate fix and 30 minutes is totally doable on a weeknight. That ganache drizzle in the photo is calling my name.
★★★★
Finally found a recipe that promises a quick chocolate fix! I can’t wait to see if that 30-minute timeline is real.
★★★★
Finally found a recipe that promises Hostess-style cupcakes in 30 minutes! I’m definitely gonna try that marshmallow filling technique this weekend.
★★★★
I’ve been craving a good chocolate cupcake but can’t handle complicated recipes. The 30-minute promise and that specific Hostess-style filling detail have me sold.
★★★★
I’ve been craving a quick chocolate fix and 30 minutes is totally doable on a weeknight. The ganache swirl on top looks exactly like the classic treat.
★★★★
I’ve been craving a quick chocolate fix and 30 minutes is totally doable. Can’t wait to see if that secret ingredient really makes them taste like the real thing.
★★★★
I’ve been craving a quick chocolate fix and 30 minutes is totally doable on a weeknight. That ganache drizzle in the photo looks exactly like the real thing.
★★★★
I’ve been craving a good chocolate cupcake but most recipes take forever. That 30-minute promise is exactly what I need for a weeknight treat!
★★★★
I’ve been wanting to make a copycat Hostess treat at home! That chocolate cake base looks perfectly moist, and I’m excited to try the marshmallow filling technique.
★★★★
I’ve been wanting to recreate those classic snack cakes at home! The promise of getting that chocolatey, creamy result in just 30 minutes is exactly what I need.
★★★★
Finally a recipe that promises to be quick and easy! I’m always intimidated by copycat desserts, so seeing a 30-minute version is a huge relief.
★★★★
Just found a recipe that might solve my Hostess cupcake craving! That chocolate filling technique is exactly what I’ve been missing. Can’t wait to try it this weekend.
★★★★
I’ve been craving a good copycat Hostess cupcake but thought they’d be too fussy. That chocolate filling trick is brilliant, and 30 minutes is totally doable.
★★★★
Finally a recipe that promises a quick chocolate fix! I can’t wait to see if that 30-minute time holds true with my oven.
★★★★
I’ve been craving a classic Hostess-style cupcake but thought they were too fussy to make at home. Thirty minutes and that chocolate filling technique is a game-changer!
★★★★
I’ve been craving a good homemade chocolate cupcake but most recipes seem so complicated. That 30-minute promise is exactly what I need for a quick treat.
★★★★
I’ve been craving that classic Hostess cupcake taste but can’t handle complicated recipes. The fact that these are ready in 30 minutes is a total game-changer for my sweet tooth!
★★★★
Finally found a recipe that promises those classic Hostess cupcakes without the fuss! That chocolate filling technique is exactly what I’ve been missing. Can’t wait to try it this weekend.
★★★★
Just found a chocolate cupcake recipe that actually works with my schedule! That 30-minute promise is exactly what I need for last-minute school events. Can’t wait to see if my kids think they taste like the real thing.
★★★★
Finally found a recipe that promises to be quick and easy! I can’t wait to see if that chocolate ganache is as simple as it sounds.
★★★★
Just found a recipe that promises Hostess-style cupcakes in 30 minutes! I’m gonna try that marshmallow filling technique this weekend.
★★★★
I’ve been craving a quick chocolate fix and 30 minutes is totally doable on a weeknight. The ganache topping sounds like it makes them extra special.
★★★★
Finally found a recipe that promises those classic Hostess flavors at home! I’m definitely gonna try that marshmallow filling technique this weekend.
★★★★
Saving this for my daughter’s bake sale next week! That 30-minute promise is exactly what I need, and I can’t wait to see if that chocolate frosting turns out as glossy as it looks in the picture.
★★★★
I’ve been craving a good chocolate cupcake but most recipes take forever. That 30-minute promise is exactly what I need for a last-minute treat.
★★★★
Finally found a recipe that might crack the Hostess cupcake code! That 83% stat is so real, so I’m definitely trying your method this weekend.
★★★★
I’ve been craving a good chocolate cupcake that doesn’t take all afternoon. The promise of a 30-minute recipe with that classic Hostess style is exactly what I need.
★★★★
I’ve been craving a good chocolate cupcake but can’t handle complicated recipes. The 30-minute promise and that “Hostess” style swirl sound like exactly what I need for my weekend treat.
★★★★
Finally a recipe that promises the Hostess taste without the struggle! I’m definitely trying that marshmallow filling technique this weekend.
★★★★
Finally found a recipe that promises Hostess-style cupcakes without the struggle! I’m definitely trying that marshmallow filling technique this weekend.
★★★★
I’ve been craving a good chocolate cupcake but most recipes take forever. That 30-minute promise is exactly what I need for a last-minute treat.
★★★★
I’ve been craving a good chocolate cupcake but can’t handle complicated recipes. That 30-minute promise is exactly what I need for a weeknight treat.
★★★★
I’ve been wanting to make a quick dessert for book club. That 30-minute promise and the chocolate ganache tip are exactly what I need.
★★★★
I’ve been craving a good chocolate cupcake but can’t handle complicated recipes. The 30-minute promise and that specific frosting technique are exactly what I need.
★★★★
Wow, 30 minutes from start to finish is exactly what I need on busy weeknights! The chocolate ganache topping sounds so much better than canned frosting.
★★★★
Finally found a recipe that promises to be quick and easy! I can’t wait to see if that chocolate ganache is as simple as it sounds.
★★★★
I’ve been craving a quick chocolate fix and 30 minutes is totally doable on a weeknight. That ganache swirl on top looks just like the real deal!
★★★★
I’ve been craving a quick chocolate fix and 30 minutes is totally doable on a weeknight. That ganache drizzle looks just like the real deal!
★★★★
I’ve been craving a quick chocolate fix and 30 minutes is totally doable on a weeknight. Can’t wait to see if that ganache is as simple as it sounds.
★★★★
Just found a recipe that might solve my cupcake struggles! The 30-minute promise is exactly what I need for last-minute school events. Can’t wait to see if that chocolate trick really works.
★★★★
Just found a recipe that tackles that 83% statistic head-on! I’m definitely gonna try your method for the chocolate frosting this weekend.
★★★★
Just found a recipe that might solve my bakery-style cupcake struggles! That 30-minute promise is exactly what I need for last-minute treats.
★★★★
Just found a recipe that promises Hostess-style cupcakes in 30 minutes! I’m so ready to see if that chocolate cake and creamy filling really comes together that fast.
★★★★
I’ve been wanting to make a copycat Hostess treat at home! That chocolate cake base with the creamy filling sounds just like the real thing. Can’t wait to try the technique for getting that signature swirl on top.
★★★★
I’ve been craving a good chocolate cupcake but thought they took forever. Thirty minutes from start to finish is exactly the kind of hack I need for last-minute treats.
★★★★
I’ve been craving a good chocolate cupcake but can’t stand complicated recipes. That ganache technique you mentioned sounds like a total game-changer for getting that classic Hostess look.
★★★★
I’ve been craving a quick chocolate fix and 30 minutes is totally doable. That ganache swirl on top looks just like the real deal.
★★★★
Finally found an easy recipe that mimics those classic cupcakes! The 30-minute promise is exactly what I need for last-minute school events.
★★★★
Finally a recipe that promises to be quick! I’m always looking for a fast, impressive dessert for last-minute guests, and chocolate cupcakes are a classic.
★★★★
Saving this for my daughter’s bake sale next week! The promise of a 30-minute Hostess-style cupcake is exactly what this busy parent needs.
★★★★
I’ve been craving a good chocolate cupcake but can’t handle complicated recipes. The fact that these are ready in 30 minutes is a total game-changer for my weeknight dessert needs.
★★★★
I’ve been craving a quick chocolate fix and 30 minutes is totally doable on a weeknight. The ganache swirl on top looks just like the real deal!
★★★★
Finally a recipe that promises to be quick! I can’t wait to see if that chocolate ganache is as simple as it sounds.
★★★★
I’ve been craving a classic Hostess-style cupcake but thought they were too fussy to make at home. That chocolate filling trick is brilliant, and 30 minutes is totally doable.
★★★★
Finally a recipe that promises the Hostess cupcake taste without the hassle! That 30-minute timeline is exactly what I need for last-minute school events.
★★★★
I’ve been craving a good chocolate cupcake but can’t handle complicated recipes. That 30-minute promise and the Hostess-style filling have me sold.
★★★★
I’ve been craving a classic Hostess-style cupcake but thought they were too fussy to make at home. That chocolate filling trick is brilliant, and 30 minutes is totally doable.
★★★★
I’ve been craving a quick chocolate fix and 30 minutes is totally doable on a weeknight. That ganache drizzle technique is exactly what my cupcakes usually need.
★★★★
Saving this for my daughter’s bake sale next week! The promise of a 30-minute chocolate cupcake that actually tastes like a Hostess one is exactly what I need.
★★★★
I’ve been craving a good chocolate cupcake but can’t handle complicated recipes. The fact that these are ready in 30 minutes is exactly what I need for a weeknight treat!
★★★★
I’ve been craving a quick chocolate fix and 30 minutes is totally doable on a weeknight. The ganache topping sounds like it makes them extra special.
★★★★
Just found a recipe that might finally solve my chocolate cupcake struggles! The 30-minute promise is exactly what I need for last-minute treats.
★★★★
Finally a recipe that promises a quick chocolate fix! The 30-minute timeline is exactly what I need for last-minute cravings.
★★★★
I’ve been craving a good copycat Hostess cupcake but thought they were too fussy. That chocolate filling trick is brilliant, and 30 minutes is totally doable!
★★★★
I’ve been craving a classic Hostess-style cupcake but thought they were too fussy to make at home. That chocolate filling trick is brilliant, and 30 minutes is totally doable.
★★★★
Finally found a recipe that promises a quick chocolate fix! The 30-minute timeline is exactly what I need for last-minute treats.
★★★★
I’ve been craving a good chocolate cupcake but most recipes take forever. That 30-minute promise and the Hostess-style filling are exactly what I need.
★★★★
I’ve been craving a quick chocolate fix and 30 minutes is totally doable on a weeknight. Can’t wait to see if that cocoa powder trick really nails the Hostess flavor.
★★★★
Finally found a recipe that promises a quick chocolate fix! I’m always battling dry cupcakes, so that 83% stat about struggling bakers is painfully relatable. Can’t wait to see if this method solves it.
★★★★
I’ve been craving a quick chocolate fix and 30 minutes is totally doable on a weeknight. That ganache topping looks just like the real deal!
★★★★
I’ve been craving a good chocolate cupcake that doesn’t take all afternoon. The promise of being ready in 30 minutes is exactly what I need for a last-minute treat!
★★★★
I’ve been craving a quick chocolate fix and 30 minutes from bowl to Hostess-style cupcake is exactly what I need. That ganache-like topping is calling my name.
★★★★
I’ve been wanting to make a quick, classic dessert like this. That chocolate frosting technique is exactly what I need for my son’s bake sale tomorrow.
★★★★
Finally a recipe that promises the Hostess cupcake taste without the fuss! I can’t wait to see if that chocolate cake base really comes together in 30 minutes.
★★★★
I’ve been craving a quick chocolate fix and 30 minutes is exactly the commitment level I have tonight. That ganache swirl on top looks just like the real deal!
★★★★
Finally found a recipe that promises a classic treat in under 30 minutes! I can’t wait to see if that chocolate cake base really hits the Hostess note.
★★★★
I’ve been wanting to make a quick dessert for book club, and 30 minutes is perfect. That ganache drizzle looks exactly like the real thing!
★★★★
Finally found an easy Hostess-style recipe! That chocolate filling is exactly what I’ve been trying to get right. Can’t wait to try these for my kid’s lunchbox treats.
★★★★
Finally found a recipe that promises to be quick and easy! I can’t wait to see if that chocolate ganache is as simple as it sounds.
★★★★
I’ve been craving a quick chocolate fix and 30 minutes is totally doable on a weeknight. The ganache topping sounds way easier than I expected.
★★★★
I’ve been craving a quick chocolate fix and 30 minutes from start to finish is exactly what I need. The ganache topping sounds way easier than I expected.
★★★★
Finally found a recipe that promises to be quick and easy! I can’t wait to see if that chocolate ganache is as simple as it sounds.
★★★★
I’ve been craving a quick chocolate fix and 30 minutes is totally doable on a weeknight. That ganache drizzle in the photo is calling my name.
★★★★
I’ve been craving a good homemade Hostess-style cupcake. The idea of getting that iconic chocolate and cream combo done in 30 minutes is exactly what I need.
★★★★
Finally found a recipe that promises Hostess-style cupcakes in 30 minutes! I’m definitely gonna try that marshmallow filling technique this weekend.
★★★★
Finally found a recipe that promises Hostess-style cupcakes without the hassle! That 30-minute timeline is exactly what I need for last-minute school treats.
★★★★
Finally found a recipe that promises those classic Hostess flavors without taking all day. I’m definitely trying that marshmallow filling technique this weekend.
★★★★
I’ve been craving a good chocolate cupcake but can’t stand complicated recipes. That 30-minute promise and the Hostess-style filling are exactly what I need.
★★★★
I’ve been wanting to make a quick, impressive dessert for book club. These cupcakes with that marshmallow filling sound like the perfect solution.
★★★★
I’ve been craving a quick chocolate fix and 30 minutes is totally doable on a weeknight. The ganache swirl on top looks just like the real deal!
★★★★
I’ve been craving a good copycat Hostess cupcake but thought they were too fussy. That chocolate filling trick is brilliant, and 30 minutes is totally doable.
★★★★
I’ve been craving a good copycat Hostess cupcake but thought they were too fussy. That 30-minute promise is exactly what I needed to see!
★★★★
Finally a recipe that promises to be quick and easy! I’m always intimidated by copycat recipes, so seeing one ready in 30 minutes gives me hope.
★★★★
I’ve been craving a good homemade chocolate cupcake that doesn’t take all afternoon. The fact that these are ready in 30 minutes is exactly what I needed for a quick treat.
★★★★
Finally a recipe that tackles that tricky Hostess-style chocolate cake texture! I’m gonna try the technique you mentioned this weekend.
★★★★
Finally found a recipe that promises a quick chocolate fix! I’m definitely gonna try that trick with the marshmallow filling this weekend.
★★★★
I’ve been craving a good chocolate cupcake that doesn’t take all afternoon. That 30-minute promise is exactly what I need for a last-minute treat.
★★★★
I’ve been craving a quick chocolate fix and 30 minutes from bowl to table is exactly what I need. Can’t wait to see if that ganache trick really makes them taste like the classic snack.
★★★★
Finally found a recipe that promises a quick chocolate fix! I’m definitely trying that one-bowl method this weekend.
★★★★
Finally found a recipe that promises a quick chocolate fix! I’m gonna try that ganache swirl technique this weekend.
★★★★
Finally found a recipe that promises a quick chocolate fix! I’m always battling dry cupcakes, so that 83% stat about struggling bakers is painfully real. Can’t wait to see if this method solves it.
★★★★
Finally a recipe that promises Hostess-style cupcakes without the all-day project! That 30-minute timeline is exactly what I need for last-minute school events.
★★★★
I’ve been craving a good chocolate cupcake that doesn’t take all afternoon. That 30-minute promise is exactly what I need for last-minute treats.
★★★★
I’ve been craving a good chocolate cupcake but can’t handle a complicated recipe. The 30-minute promise and that “Hostess” style have me sold.
★★★★
I’ve been wanting to make a copycat Hostess cupcake for ages. That marshmallow filling trick is brilliant!
★★★★
Saving this for my book club meeting next week! The promise of a Hostess-style cupcake in 30 minutes is exactly the kind of impressive but easy treat I need. Can’t wait to see if that chocolate filling is as good as the original.
★★★★
I’ve been craving a good chocolate cupcake but can’t handle complicated recipes. That one-bowl method and the promise of a 30-minute finish is exactly what I need.
★★★★
Finally a recipe that promises Hostess-style cupcakes without all the fuss! That chocolate filling is exactly what I’ve been trying to get right.
★★★★
I’ve been craving a good chocolate cupcake but can’t stand complicated recipes. The fact that these are ready in 30 minutes is exactly what I need for last-minute treats.
★★★★
Finally a recipe that promises to be quick and easy! I’m always intimidated by bakery-style frosting, so the 30-minute timeline is a huge relief.
★★★★
I’ve been craving a quick chocolate fix and 30 minutes is totally doable. That ganache drizzle technique sounds perfect for a last-minute treat.
★★★★
Wow, that chocolate ganache swirl looks just like the real thing! I can’t believe it’s achievable in 30 minutes—gonna try your technique this weekend.
★★★★
I’ve been craving a good copycat Hostess cupcake but thought they were too complicated. That chocolate ganache swirl is exactly what I needed to see!
★★★★
I’ve been craving a quick chocolate fix and 30 minutes is totally doable on a weeknight. That ganache topping sounds like it would solve my usual frosting struggles.
★★★★
Finally found a recipe that promises Hostess-style cupcakes in 30 minutes! I’m gonna try that marshmallow filling technique this weekend.
★★★★
I’ve been craving a good chocolate cupcake but can’t handle a complicated recipe right now. The promise of a 30-minute bake time and that classic Hostess-style filling is exactly what I need.
★★★★
Finally a recipe that promises to be quick and easy! I’m always intimidated by fancy bakery-style cupcakes, so a 30-minute version is exactly what I need.
★★★★
Finally found a recipe that promises Hostess-style cupcakes without the all-day project! That 30-minute timeline is exactly what I need for last-minute school treats. Can’t wait to see if that chocolate batter is as forgiving as it sounds.
★★★★
Finally a recipe that promises the Hostess cupcake taste without the fuss! That chocolate filling trick is exactly what I’ve been missing in my attempts.
★★★★
I’ve been craving a classic Hostess-style cupcake but thought they were too fussy to make at home. That chocolate filling and the signature swirl on top in just 30 minutes is exactly what I needed.
★★★★
I’ve been craving a quick chocolate fix and 30 minutes is totally doable. That ganache swirl on top looks just like the real thing!
★★★★
Finally a recipe that promises to beat my usual box-mix cupcakes in under 30 minutes! I’m definitely trying that chocolate glaze technique this weekend.
★★★★
I’ve been wanting to make a homemade version of those classic snack cakes! The fact that these are ready in 30 minutes is a total game changer for last-minute treats.
★★★★
Just found a recipe that actually tackles that Hostess cupcake craving! The 30-minute promise is what’s gonna get me to try it this weekend.
★★★★
I’ve been craving a quick chocolate fix and these look perfect. That ganache drizzle is exactly what my box-mix cupcakes always need.
★★★★
I’ve been wanting to make a copycat Hostess cupcake for ages! That marshmallow filling trick is brilliant and 30 minutes is totally doable.
★★★★
Just found a recipe that tackles that 83% statistic head-on! I’m definitely trying the chocolate ganache technique this weekend.
★★★★
Finally found a recipe that promises a quick chocolate fix! I can’t believe they’re ready in 30 minutes—perfect for my last-minute cravings.
★★★★
Finally a recipe that promises a quick chocolate fix! I’m always skeptical of the “ready in 30 minutes” claim, but I’m gonna give this one a shot this weekend.
★★★★
Finally found a recipe that promises to be quick and easy! I can’t wait to see if that chocolate ganache is as simple as it sounds.
★★★★
I’ve been craving a good chocolate cupcake that doesn’t take all afternoon. That 30-minute promise is exactly what I need for last-minute cravings!
★★★★
I’ve been craving a good chocolate cupcake but can’t handle complicated recipes. The promise of that Hostess-style filling in just 30 minutes is exactly what I need.
★★★★
Finally found a recipe that promises a quick chocolate fix! I’m definitely gonna try that ganache swirl technique this weekend.
★★★★
Finally found a recipe that might crack the Hostess cupcake code at home! That 30-minute promise is exactly what I need for last-minute school treats.
★★★★
I’ve been craving a good chocolate cupcake but most recipes take forever. That 30-minute promise is exactly what I need for a last-minute treat!
★★★★
I’ve been craving a quick chocolate fix and 30 minutes from bowl to cupcake is exactly what I need. That ganache topping sounds like it will be perfectly decadent.
★★★★
I’ve been craving a quick chocolate fix and 30 minutes is totally doable on a weeknight. That ganache drizzle looks just like the real thing!
★★★★
Just found a recipe that actually tackles that Hostess cupcake craving! The 30-minute promise is what’s gonna get me to try it this weekend.
★★★★
I’ve been wanting to make a quick, classic chocolate cupcake from scratch. That 30-minute promise is exactly what I need for last-minute school events.
★★★★
I’ve been wanting to make a quick dessert for book club, and 30 minutes is perfect. That ganache drizzle is exactly what I need to make them feel special.
★★★★
I’ve been craving a good chocolate cupcake but most recipes take forever. That 30-minute promise is exactly what I need for a last-minute treat.
★★★★
Wow, 30 minutes from start to finish is a game-changer for last-minute treats! I can’t wait to see how that chocolate ganache turns out.
★★★★
Just found a recipe that might crack that 83% statistic! I’m definitely trying the chocolate ganache trick this weekend.
★★★★
I’ve been wanting a quick chocolate cupcake recipe that actually tastes like the classic ones! The 30-minute promise is exactly what I need for last-minute school events.
★★★★
I’ve been craving a good chocolate cupcake but can’t handle complicated recipes right now. That 30-minute promise is exactly what I need for a quick treat tonight.
★★★★
I’ve been craving a quick chocolate fix and 30 minutes from start to finish is exactly what I need. The ganache topping sounds like it would make them feel really special.
★★★★
I’ve been craving a quick chocolate fix and 30 minutes is totally doable on a weeknight. That ganache drizzle technique is exactly what my cupcakes usually need.
★★★★
Just found a recipe that might crack that 83% statistic! The promise of a Hostess-style cupcake in 30 minutes is exactly the kind of project I need for a quick treat.
★★★★
I’ve been wanting to make a homemade version of those classic snack cakes! Using marshmallow fluff for that signature filling is such a smart shortcut.
★★★★
Saving this for my book club meeting this weekend! The promise of a 30-minute Hostess-style cupcake is exactly what I need when I’m short on time but want to impress.
★★★★
Finally found a recipe that promises Hostess-style cupcakes without the all-day project! I’m gonna try that marshmallow filling technique this weekend.
★★★★
I’ve been craving a good chocolate cupcake but can’t handle complicated recipes. The promise of a 30-minute bake and that specific Hostess-style filling has me sold.
★★★★
I’ve been craving a good chocolate cupcake but most recipes take forever. That 30-minute promise and the Hostess-style filling have me sold!
★★★★
Finally a recipe that promises to nail that classic Hostess taste! I can’t wait to see if that chocolate cake hack really works.
★★★★
Finally found a recipe that promises a quick Hostess-style treat! That 30-minute timeline is exactly what I need for last-minute school events.
★★★★
I’ve been craving a quick chocolate fix and 30 minutes is totally doable. That ganache drizzle in the photo looks just like the real thing!
★★★★
I’ve been craving a good chocolate cupcake but can’t handle complicated recipes. The promise of that classic Hostess-style filling in just 30 minutes is exactly what I need.
★★★★
I’ve been craving a quick chocolate fix and 30 minutes is totally doable on a weeknight. That ganache swirl on top looks just like the real deal!
★★★★
Just found a recipe that promises Hostess-style cupcakes in 30 minutes! I’m definitely gonna try that marshmallow filling technique this weekend.
★★★★
I’ve been craving a good chocolate cupcake but never have hours to bake. That 30-minute promise is exactly what I need for a weeknight treat.
★★★★
Finally found a recipe that promises to be quick and easy! I’m always intimidated by those perfect-looking cupcakes, so this 30-minute version is a lifesaver.
★★★★
Finally a recipe that promises to beat the bakery in under 30 minutes! I’m gonna see if that chocolate cake base really is as moist as a Hostess cupcake.
★★★★
Love that you don’t need any special equipment for this. I’m always intimidated by bakery-style frosting, so the 30-minute promise is a lifesaver. Gonna try these for my kid’s bake sale.
★★★★
Saving this for my book club meeting next week! That chocolate ganache technique is exactly what I’ve needed to master.
★★★★
I’ve been craving a quick chocolate fix and 30 minutes is totally doable on a weeknight. The ganache topping sounds way better than store-bought.
★★★★
I’ve been craving a good chocolate cupcake that doesn’t take all afternoon. The fact that these are ready in 30 minutes is exactly what I need for a last-minute treat.
★★★★
Finally found a recipe that promises Hostess-style cupcakes in 30 minutes! I can’t wait to see if that chocolate filling is as easy as it sounds.
★★★★
I’ve been wanting to make a quick chocolate dessert for book club. That 30-minute promise is exactly what I need.
★★★★
I’ve been craving a good chocolate cupcake but can’t stand complicated recipes. The 30-minute promise and that “Hostess” style swirl sound like exactly what I need.
★★★★
Saving this for my book club meeting this weekend! The promise of a 30-minute chocolate cupcake that actually tastes like the real thing is exactly what I need.
★★★★
I’ve been craving a good homemade chocolate cupcake but never seem to have enough time. That 30-minute promise is exactly what I need for a last-minute treat.
★★★★
Saving this for my daughter’s bake sale next week! The promise of a 30-minute frosting is exactly what I need.
★★★★
I’ve been craving a good homemade chocolate cupcake that doesn’t take all afternoon. The promise of a 30-minute version with that classic Hostess style is exactly what I need.
★★★★
Saving this for my next potluck! That 30-minute promise is exactly what I need, and I can’t wait to see if my version tastes like the real thing.
★★★★
I’ve been craving a good chocolate cupcake but can’t stand complicated recipes. That 30-minute promise is exactly what I need for a weeknight treat.
★★★★
I’ve been craving a good chocolate cupcake that doesn’t take all afternoon. The fact that these are ready in 30 minutes is exactly what I need for a last-minute treat!
★★★★
I’ve been craving a good copycat Hostess cupcake but thought they were too fussy. That chocolate filling trick is brilliant, and 30 minutes is totally doable.
★★★★
I’ve been craving a good chocolate cupcake but can’t handle a complicated recipe right now. The promise of a 30-minute bake is exactly what I need for a quick treat.
★★★★
I’ve been craving a quick chocolate fix and 30 minutes is totally doable on a weeknight. That ganache swirl on top looks just like the real thing!
★★★★
Finally a recipe that promises the Hostess cupcake taste without the fuss! I’m gonna try that marshmallow filling technique this weekend.
★★★★
Finally a recipe that promises to be quick and easy! I can’t wait to try that chocolate ganache technique you mentioned.
★★★★
I’ve been craving a good chocolate cupcake but most recipes take forever. That 30-minute promise and the Hostess-style filling have me sold.
★★★★
Finally found a recipe that promises to be quick and easy! I’m always looking for a reliable chocolate cupcake that doesn’t take all afternoon.
★★★★
I’ve been wanting to make a homemade version of those classic snack cakes! Using coffee to boost the chocolate flavor is such a smart tip.
★★★★
I’ve been craving a quick chocolate fix and 30 minutes is totally doable on a weeknight. The ganache topping sounds way better than canned frosting.
★★★★
I’ve been craving a quick chocolate fix and 30 minutes is totally doable on a weeknight. That ganache topping looks just like the real thing!
★★★★
I’ve been craving a classic Hostess-style cupcake but thought they were too fussy to make at home. That chocolate filling trick is brilliant, and 30 minutes is totally doable.
★★★★
I’ve been craving a classic Hostess-style cupcake but thought they were too fussy to make. That 30-minute promise is exactly what I needed to see!
★★★★
Just found a recipe that promises Hostess-style cupcakes in 30 minutes! That’s exactly what I need for last-minute school treats.
★★★★
Just found a recipe that actually tackles that Hostess-style cupcake struggle! The chocolate ganache filling technique you described is exactly what I’ve been missing. Can’t wait to try these this weekend.
★★★★
I’ve been craving a quick chocolate fix and 30 minutes is totally doable. The ganache swirl on top looks just like the real thing!
★★★★
I’ve been craving a good chocolate cupcake but can’t handle complicated recipes. The promise of that classic Hostess-style filling in 30 minutes is exactly what I need.
★★★★
Finally found a recipe that promises to be quick and easy! I can’t wait to see if that chocolate ganache comes together as smoothly as you describe.
★★★★
I’ve been craving a good chocolate cupcake but can’t handle complicated recipes. That 30-minute promise is exactly what I need for a weeknight treat.
★★★★
Finally a recipe that promises to replicate that classic Hostess taste! I can’t wait to see if that chocolate cake and cream filling really come together in just 30 minutes.
★★★★
Saving this for my book club meeting next week! That chocolate ganache swirl on top looks exactly like the classic treat, and I can’t believe it’s ready so fast.
★★★★
I’ve been craving a good chocolate cupcake but never have hours to bake. That 30-minute promise is exactly what I need for a weeknight treat.
★★★★
I’ve been craving a quick chocolate fix and 30 minutes is totally doable on a weeknight. That ganache drizzle is exactly what my box-mix cupcakes have been missing.
★★★★
Saving this for my next potluck! That 30-minute promise is exactly what I need, and I can’t wait to see if my version finally nails that Hostess-style filling.
★★★★
I’ve been craving a good chocolate cupcake but can’t handle complicated recipes. The promise of that classic Hostess-style filling in 30 minutes is exactly what I needed.
★★★★
Just found a recipe that actually tackles that Hostess cupcake craving! The chocolate cake part looks spot-on, and I’m excited to try making that signature filling at home.
★★★★
I’ve been craving a good chocolate cupcake that doesn’t take all afternoon. The fact that these are ready in 30 minutes is exactly what I needed for a quick treat.
★★★★
I’ve been craving a quick chocolate fix and 30 minutes is exactly the commitment level I have tonight. That ganache swirl on top looks just like the real thing!
★★★★
Saving this for my book club meeting next week! That ganache drizzle looks so professional, and I can’t believe they’re ready in 30 minutes.
★★★★
I’ve been wanting a quick chocolate cupcake recipe for after-school snacks. The 30-minute promise is exactly what I need for those last-minute requests.
★★★★
I’ve been craving a good chocolate cupcake but can’t handle complicated recipes. The 30-minute promise and that specific frosting technique are exactly what I need.
★★★★
I’ve been wanting to make a quick chocolate dessert for book club, and 30 minutes is perfect. The ganache topping sounds way easier than I thought it would be.
★★★★
I’ve been craving a good chocolate cupcake but can’t handle a complicated recipe right now. That 30-minute promise is exactly what I needed to see.
★★★★
I’ve been craving a good chocolate cupcake but can’t stand complicated recipes. The 30-minute promise and that “Hostess-style” filling have me totally sold.
★★★★
I’ve been craving a good chocolate cupcake but can’t handle a complicated recipe. The 30-minute promise is exactly what I need for a weeknight treat.
★★★★
Finally a recipe that promises to be quick and easy! I’m always intimidated by fancy bakery-style frosting, so the simplified method here is a huge relief. Can’t wait to surprise my kids with these after school.
★★★★
I’ve been craving a good chocolate cupcake but most recipes take forever. That 30-minute promise is exactly what I need for a last-minute treat.
★★★★
I’ve been craving a good homemade Hostess-style cupcake. That marshmallow filling trick is exactly what I’ve been missing!
★★★★
Saving this for my book club meeting this weekend! That 30-minute promise is exactly what I need, and I can’t wait to see if the chocolate really tastes like the classic Hostess kind.
★★★★
Saving this for my book club meeting this weekend! That 30-minute promise is exactly what I need, and I can’t wait to see if the chocolate frosting turns out as glossy as it sounds.
★★★★
Finally found a recipe that promises to be quick and easy! I can’t wait to see if that chocolate ganache comes together as smoothly as it sounds.
★★★★
Just found a recipe that tackles that 83% struggle! I’m definitely trying the chocolate ganache technique you mentioned this weekend.
★★★★
Finally found a recipe that promises the Hostess taste without the hassle! I’m gonna try that marshmallow filling technique this weekend.
★★★★
I’ve been craving a quick chocolate fix and 30 minutes is totally doable. The ganache swirl on top looks just like the real thing!
★★★★
Finally a recipe that promises to be quick and easy! I can’t wait to see if that chocolate ganache is as simple as it sounds.
★★★★
Finally a recipe that tackles that tricky Hostess-style chocolate cake texture! I’m gonna try the technique you mentioned this weekend.
★★★★
I’ve been craving a quick chocolate fix and 30 minutes is totally doable on a weeknight. That ganache drizzle is gonna make them feel extra special.
★★★★
I’ve been craving a good copycat Hostess cupcake! That 30-minute timeframe is exactly what I need for a last-minute treat. Can’t wait to try that marshmallow filling technique.
★★★★
I’ve been craving a good copycat Hostess cupcake but thought they were too complicated. The fact that these are ready in 30 minutes is a game-changer!
★★★★
I’ve been craving a quick chocolate fix and 30 minutes is exactly what I need. That ganache swirl on top looks just like the real thing.
★★★★
I’ve been craving a quick chocolate fix and 30 minutes is totally doable on a weeknight. That ganache drizzle looks like the perfect finishing touch.
★★★★
I’ve been craving a quick chocolate fix and 30 minutes is totally doable. The ganache topping sounds like it would make them feel really special.
★★★★
Finally found a recipe that promises Hostess-style cupcakes without the fuss! That chocolate filling trick is gonna be a game-changer for my weekend bake.
★★★★
Wow, ready in 30 minutes is exactly what I need for last-minute guests! I can’t wait to see if that chocolate trick really works.
★★★★
Finally found a recipe that promises a quick chocolate fix! I’m definitely gonna try that one-bowl method this weekend.
★★★★
I’ve been craving a quick chocolate fix and 30 minutes is totally doable on a weeknight. That ganache drizzle in the picture looks like the perfect finishing touch.
★★★★
I’ve been craving a good copycat Hostess cupcake but thought they were too fussy. Thirty minutes and that chocolate ganache filling is gonna be my weekend project!
★★★★
I’ve been craving a good chocolate cupcake but can’t stand complicated recipes. That 30-minute promise is exactly what I need for a weeknight treat.
★★★★
I’ve been craving a quick chocolate fix and 30 minutes is totally doable. That ganache frosting technique sounds foolproof, which I need.
★★★★
I’ve been craving a quick chocolate fix and 30 minutes is totally doable on a weeknight. The ganache topping sounds way better than canned frosting.
★★★★
I’ve been craving a good chocolate cupcake but can’t handle complicated recipes. The 30-minute promise and that “Hostess” style have me sold—gonna try these tonight!
★★★★
I’ve been wanting a quick chocolate cupcake recipe for school bake sales! That 30-minute promise is exactly what I need.
★★★★
I’ve been craving a good copycat Hostess cupcake but thought they’d be too fussy. Thirty minutes and no fancy techniques? I’m definitely trying this weekend.
★★★★
I’ve been craving a good chocolate cupcake but can’t handle complicated recipes. The fact that these are ready in 30 minutes is exactly what I need for a weeknight treat.
★★★★
Saving this for my daughter’s bake sale next week! That chocolate ganache technique is exactly what I needed to make them look professional.
★★★★
Finally found a recipe that promises a quick chocolate fix! I’m definitely gonna try that ganache technique this weekend.
★★★★
I’ve been craving a quick chocolate fix and 30 minutes is exactly what I need. The ganache topping sounds like it makes them extra special.
★★★★
I’ve been wanting to make a quick, classic dessert like this. The promise of getting that Hostess-style cupcake in just 30 minutes is exactly what I need for after-school treats.
★★★★
Finally found a recipe that promises a quick chocolate fix! I’m always intimidated by copycat recipes, so the 30-minute timeline is a huge relief.
★★★★
I’ve been craving a good chocolate cupcake that doesn’t take all afternoon. That 30-minute promise is exactly what I need for last-minute treats!
★★★★
I’ve been craving a good copycat Hostess cupcake but thought they were too tricky to make at home. That 30-minute promise is exactly what I needed to see!
★★★★
I’ve been craving a good chocolate cupcake but most recipes take forever. That 30-minute promise is exactly what I need for a weeknight treat.
★★★★
Just found a recipe that might solve my bakery-style cupcake struggles! The promise of a 30-minute timeline is exactly what I need for last-minute treats. Can’t wait to see if that chocolate trick really works.
★★★★
Finally found a recipe that promises to be quick and easy! I can’t wait to see if that chocolate ganache is as simple as it sounds.
★★★★
Wow, that 30-minute promise is exactly what I need for last-minute bake sales! Can’t wait to see if the method really makes them taste like the real thing.
★★★★
I’ve been craving a quick chocolate fix and 30 minutes is totally doable on a weeknight. The ganache topping sounds way easier than I thought it would be.
★★★★
I’ve been craving a quick chocolate fix and 30 minutes is totally doable on a weeknight. Love that it’s a homemade version of a classic treat.
★★★★
I’ve been craving a quick chocolate fix and 30 minutes is totally doable on a weeknight. That ganache drizzle is gonna make them look so fancy!
★★★★
I’ve been craving a quick chocolate fix and 30 minutes is totally doable on a weeknight. That ganache swirl on top looks just like the real thing!
★★★★
I’ve been craving a good chocolate cupcake but most recipes take forever. That 30-minute promise and the Hostess-style filling have me sold!
★★★★
I’ve been wanting to make a quick, impressive dessert for book club! The promise of a Hostess-style cupcake in 30 minutes is exactly what I need.
★★★★
Wow, 30 minutes from start to finish is exactly what I need on busy weeknights! I can’t wait to see if that chocolate ganache is as simple as it sounds.
★★★★
I’ve been wanting to make a copycat Hostess cupcake at home! The 30-minute timeline means I can actually whip these up for a last-minute treat.
★★★★
I’ve been wanting to make a copycat Hostess cupcake for ages, and that marshmallow filling trick sounds brilliant. Can’t wait to try it this weekend!
★★★★
I’ve been craving a good chocolate cupcake that doesn’t take all afternoon. That 30-minute promise and the Hostess-style filling have me sold!
★★★★
I’ve been craving a good copycat Hostess cupcake but thought they were too fussy. That 30-minute promise is exactly what I needed to see!
★★★★
I’ve been wanting to make a quick, classic chocolate cupcake from scratch! That 30-minute promise is exactly what I need for last-minute school events.
★★★★
I’ve been wanting a quick chocolate cupcake recipe for last-minute school events. That 30-minute promise is exactly what I need.
★★★★
I’ve been craving a quick chocolate fix and 30 minutes is totally doable. That ganache swirl on top looks just like the real thing!
★★★★
Saving this for my niece’s birthday party this weekend! The promise of a 30-minute Hostess-style cupcake is exactly what I need.
★★★★
I’ve been craving a classic Hostess-style cupcake but thought they were too fussy to make at home. That chocolate filling trick is brilliant, and 30 minutes is totally doable.
★★★★
I’ve been craving a quick chocolate fix and 30 minutes is totally doable on a weeknight. That ganache swirl on top looks just like the real thing!
★★★★
I’ve been craving a good chocolate cupcake but always get intimidated by complicated recipes. The fact that these are ready in 30 minutes is a total game-changer for my sweet tooth emergencies!
★★★★
I’ve been craving a quick chocolate fix and 30 minutes from bowl to cupcake is exactly what I need. That ganache topping sounds like the perfect shortcut to a fancy finish.
★★★★
I’ve been craving a good chocolate cupcake but can’t handle complicated recipes. That 30-minute promise and the Hostess-style filling have me sold!
★★★★
I’ve been craving a good chocolate cupcake but most recipes take forever. That 30-minute promise and the Hostess-style filling have me sold.
★★★★
I’ve been wanting to make a quick, classic dessert like this! That chocolate glaze technique sounds like the perfect finishing touch.
★★★★
I’ve been craving a good chocolate cupcake but most recipes take forever. That 30-minute promise is exactly what I need for a weeknight treat.
★★★★
I’ve been craving a quick chocolate fix and 30 minutes is totally doable on a weeknight. Love that it replicates the Hostess style without being overly complicated.
★★★★
I’ve been craving a good chocolate cupcake but can’t handle fussy recipes. That 30-minute promise and the Hostess-style filling are exactly what I need.
★★★★
I’ve been wanting to make a quick, nostalgic dessert like this! The promise of that classic Hostess-style filling in just 30 minutes is exactly what I need for a treat tonight.
★★★★
I’ve been craving a quick, classic chocolate cupcake and this 30-minute recipe is exactly what I needed. The ganache topping sounds like it will be perfect for satisfying that Hostess-style craving.
★★★★
I’ve been craving a classic Hostess-style treat but thought they were too complicated. That chocolate filling trick is brilliant, and 30 minutes is totally doable for a weeknight.
★★★★
I’ve been craving a quick chocolate fix and 30 minutes is totally doable on a weeknight. That ganache swirl on top looks just like the real thing!
★★★★
Just found a recipe that promises Hostess-style cupcakes in 30 minutes! That’s exactly what I need for last-minute school treats. Can’t wait to see if that chocolate filling is as good as the original.
★★★★
I’ve been craving a good chocolate cupcake that doesn’t take all afternoon. The 30-minute promise and that specific Hostess-style filling have me sold.
★★★★
Finally found a recipe that promises Hostess-style cupcakes without the hassle. That chocolate filling trick is brilliant, and I’m so glad it’s all doable in 30 minutes.
★★★★
I’ve been craving a quick chocolate fix and 30 minutes is totally doable. That ganache drizzle in the photo looks just like the real thing!
★★★★
I’ve been craving a quick chocolate fix and 30 minutes is totally doable on a weeknight. That ganache swirl on top looks just like the real deal!
★★★★
I’ve been craving a good chocolate cupcake but can’t handle complicated recipes. The promise of a 30-minute Hostess-style version is exactly what I need for my sweet tooth!
★★★★
I’ve been craving a quick chocolate fix and 30 minutes from start to finish is exactly what I need. Can’t wait to see if that ganache trick really makes them taste like the classic snack.
★★★★
Finally a recipe that promises to be quick and actually looks doable! I can’t wait to see if that chocolate ganache comes together as fast as it says.
★★★★
I’ve been craving a classic Hostess-style cupcake but thought they were too fussy to make at home. That chocolate filling trick is brilliant, and 30 minutes is totally doable.
★★★★
I’ve been wanting to recreate those classic snack cakes at home! The promise of that signature chocolate cake and creamy filling in 30 minutes is exactly what I need.
★★★★
I’ve been craving a quick chocolate fix and 30 minutes is totally doable on a weeknight. The ganache topping sounds like it makes them extra special.
★★★★
I’ve been craving a quick chocolate fix and 30 minutes is totally doable on a weeknight. Can’t wait to see if that cocoa and buttermilk combo really nails the Hostess flavor.
★★★★
I’ve been craving a good chocolate cupcake but can’t handle complicated recipes. The 30-minute promise and that ganache topping are exactly what I need.
★★★★
Saving this for my book club meeting next week! That chocolate ganache technique is exactly what I’ve been wanting to try, and 30 minutes is a lifesaver.
★★★★
I’ve been craving a good chocolate cupcake but can’t handle complicated recipes right now. Thirty minutes from start to finish is exactly what I need for a weeknight treat.
★★★★
I’ve been craving a quick chocolate fix and 30 minutes is totally doable. That ganache drizzle is exactly what my box-mix cupcakes have been missing.
★★★★
Finally found a recipe that promises to be quick and easy! I can’t wait to see if that chocolate ganache is as simple as it sounds.
★★★★
I’ve been wanting to make a quick dessert for book club, and 30 minutes is perfect. The chocolate ganache topping sounds like it’ll make them feel really special.
★★★★
I’ve been craving a quick chocolate fix and 30 minutes is totally doable. The trick with the pudding mix in the batter sounds like it would make them super moist.
★★★★
I’ve been craving a quick chocolate fix and 30 minutes is perfect. Can’t wait to see if that secret ingredient really makes them taste like the real thing.
★★★★
I’ve been craving a good chocolate cupcake but most recipes take forever. That 30-minute promise is exactly what I need for last-minute treats!
★★★★
Finally a recipe that promises Hostess-style cupcakes without the fuss! That chocolate ganache swirl is exactly what I’ve been trying to master. Can’t wait to see if this solves my frosting struggles.
★★★★
I’ve been craving a quick chocolate fix and 30 minutes from start to finish is exactly what I need. That ganache topping looks so professional.
★★★★
I’ve been craving a good chocolate cupcake that doesn’t take all afternoon. The fact that these are ready in 30 minutes is a total game-changer for last-minute treats.
★★★★
Finally a recipe that promises the Hostess cupcake taste without the struggle! That chocolate filling technique is exactly what I’ve been missing. Can’t wait to try it this weekend.
★★★★
I’ve been wanting to make a quick, classic chocolate cupcake for ages. The promise of that Hostess-style frosting ready in 30 minutes is exactly what I need.
★★★★
I’ve been craving a good chocolate cupcake but never have hours to bake. That 30-minute promise is exactly what I need for a weeknight treat!
★★★★
I’ve been craving a classic Hostess-style cupcake but thought they were too fussy to make. That chocolate filling trick is brilliant, and 30 minutes is totally doable.
★★★★
I’ve been craving a quick chocolate fix and 30 minutes is totally doable on a weeknight. That ganache topping looks just like the real thing!
★★★★
Saving this for my book club meeting this weekend! That 30-minute promise is exactly what I need, and I’m a sucker for anything that tastes like a Hostess cupcake.
★★★★
Love that you can get a Hostess-style treat in just 30 minutes! I’m gonna try that marshmallow filling trick this weekend.
★★★★
Finally a recipe that promises Hostess-style cupcakes without the fuss! That chocolate ganache swirl is exactly what I’ve been trying to master. Can’t wait to try this method this weekend.
★★★★
I’ve been craving a quick chocolate fix and 30 minutes is totally doable on a weeknight. That ganache drizzle is exactly what my old recipe was missing.
★★★★
I’ve been craving a good chocolate cupcake but most recipes take forever. That 30-minute promise is exactly what I need for a weeknight treat.
★★★★
I’ve been craving a quick chocolate fix and 30 minutes is totally doable on a weeknight. That ganache drizzle is gonna be the perfect finishing touch.
★★★★
Finally found a recipe that promises a quick chocolate fix! I’m definitely trying that one-bowl method this weekend.
★★★★
I’ve been wanting a quick chocolate cupcake recipe that actually tastes like the real deal. That 30-minute promise is exactly what I need for last-minute school events.
★★★★
Finally a recipe that promises a quick Hostess-style cupcake! That chocolate filling technique is exactly what I’ve been missing. Can’t wait to see if it really works in 30 minutes.
★★★★
I’ve been craving a quick chocolate fix and 30 minutes is totally doable. That ganache drizzle in the photo looks just like the real thing.
★★★★
Finally a recipe that promises Hostess-style cupcakes without the fuss! That chocolate filling trick is exactly what I’ve been missing. Can’t wait to see if my family can tell the difference from the real thing.
★★★★
I’ve been craving a good chocolate cupcake but can’t handle complicated recipes right now. That 30-minute promise and the Hostess-style filling have me sold.
★★★★
I’ve been craving a good homemade Hostess-style treat! That chocolate filling technique sounds like it’s gonna be a game-changer for my baking. Can’t wait to try it this weekend.
★★★★
I’ve been craving a good chocolate cupcake that doesn’t take all afternoon. The promise of that Hostess-style filling in 30 minutes is exactly what I need this weekend!
★★★★
I’ve been craving a quick chocolate fix and 30 minutes is totally doable. That ganache swirl on top looks just like the real thing!
★★★★
I’ve been craving a good chocolate cupcake but never seem to have hours to bake. That 30-minute promise and the easy frosting technique are exactly what I need.
★★★★
I’ve been craving a good chocolate cupcake but can’t handle complicated recipes. The 30-minute promise and that “Hostess” style filling have me totally sold.
★★★★
I’ve been craving a classic Hostess-style treat but thought they were too complicated. That chocolate filling trick is brilliant and I can’t believe it’s ready so fast!
★★★★
I’ve been wanting a quick chocolate cupcake recipe for last-minute guests. The 30-minute promise is exactly what I need, and that ganache drizzle looks so professional.
★★★★
I’ve been craving a quick chocolate fix and 30 minutes is totally doable. The ganache topping sounds like it would make them feel really special.
★★★★
I’ve been craving a good copycat Hostess cupcake but thought they’d be too fussy. That ganache filling in 30 minutes is exactly what I needed!
★★★★
Finally found a recipe that promises Hostess-style cupcakes in 30 minutes! I’m gonna try that marshmallow filling technique this weekend.
★★★★
I’ve been craving a quick chocolate fix and 30 minutes is totally doable. That ganache drizzle in the picture is calling my name.
★★★★
Finally found a recipe that promises Hostess-style cupcakes in 30 minutes! I can’t wait to see if that chocolate filling is as good as the original.
★★★★
Finally found a recipe that promises to be quick and easy! I’m always intimidated by those perfect-looking cupcakes, so I’m definitely gonna try your 30-minute version this weekend.
★★★★
I’ve been craving a good homemade chocolate cupcake that doesn’t take all afternoon. The fact that these are ready in 30 minutes is a total game-changer for my last-minute dessert needs.
★★★★
I’ve been craving a good chocolate cupcake that doesn’t take all afternoon. The promise of getting that Hostess-style treat in 30 minutes is exactly what I need this weekend.
★★★★
I’ve been craving a quick chocolate fix and 30 minutes is exactly what I need. Can’t wait to see if that cocoa trick really replicates the Hostess taste.
★★★★
I’ve been craving a good homemade Hostess-style treat! That chocolate filling trick is brilliant, and 30 minutes is totally doable on a weeknight.
★★★★
Saving this for my book club meeting this weekend! The 30-minute promise is exactly what I need, and I’m curious to see if I can finally nail that Hostess-style chocolate cake texture.
★★★★
Finally found a recipe that promises to be quick and easy! I’m always intimidated by copycat desserts, so that 30-minute timeline is a lifesaver.
★★★★
I’ve been craving a good chocolate cupcake but most recipes take forever. That 30-minute promise is exactly what I need for last-minute treats.
★★★★
Finally found a recipe that promises Hostess-style cupcakes without the fuss! That chocolate filling technique is exactly what I’ve been missing. Gonna try these for the kids’ lunchboxes this week.
★★★★
I’ve been craving a quick chocolate fix and 30 minutes is totally doable on a weeknight. That ganache swirl on top looks exactly like the classic treat.
★★★★
Finally a recipe that promises to be quick and easy! I’m always intimidated by copycat Hostess treats, but the 30-minute timeline has me convinced to give it a try this weekend.
★★★★
Finally a recipe that promises to be quick and easy! I’m always intimidated by bakery-style frosting, so the 30-minute timeline is a huge relief.
★★★★
I’ve been craving a quick chocolate fix and 30 minutes is totally doable on a weeknight. That ganache swirl on top looks just like the real deal!
★★★★
I’ve been craving a quick chocolate fix and 30 minutes is totally doable on a weeknight. That ganache swirl on top looks just like the real deal!
★★★★
I’ve been wanting to make a copycat Hostess treat at home! The 30-minute timeline means I can actually whip these up for an after-school surprise.
★★★★
I’ve been craving a quick chocolate fix and 30 minutes is totally doable on a weeknight. That ganache swirl on top looks just like the real thing!
★★★★
Finally found a recipe that promises a quick chocolate fix! I’m definitely trying that one-bowl method this weekend.
★★★★
I’ve been craving a good chocolate cupcake but can’t handle complicated recipes. The fact that these are ready in 30 minutes is exactly what I need for a weeknight treat.
★★★★
I’ve been craving a good copycat Hostess cupcake but thought it was too complicated. Thirty minutes and no fancy techniques? I’m definitely trying this tonight.
★★★★
I’ve been craving a quick chocolate fix and 30 minutes is totally doable on a weeknight. That ganache drizzle looks like the perfect finishing touch.
★★★★
Finally a recipe that tackles that tricky Hostess-style frosting! I’ve always struggled to get that perfect swirl and chocolatey filling just right. Can’t wait to try your method this weekend.
★★★★
I’ve been craving a quick chocolate fix and 30 minutes is totally doable on a weeknight. That ganache swirl on top looks just like the real deal!
★★★★
I’ve been craving a quick chocolate fix and 30 minutes is totally doable on a weeknight. The ganache topping sounds way better than canned frosting.
★★★★
Just found a recipe that might solve my cupcake struggles! The 30-minute promise is exactly what I need for last-minute school events.
★★★★
Finally found a recipe that promises those classic Hostess flavors at home! I’m definitely trying that marshmallow filling technique this weekend.
★★★★
I’ve been craving a quick chocolate fix and 30 minutes is totally doable on a weeknight. The ganache topping sounds way easier than I expected.
★★★★
Finally a recipe that promises to tackle that tricky Hostess-style cupcake! I can’t wait to see if that chocolate cake method really works in under 30 minutes.
★★★★
I’ve been craving a good chocolate cupcake but most recipes take forever. That 30-minute promise is exactly what I need for a last-minute treat!
★★★★
I’ve been craving a good chocolate cupcake but can’t stand complicated recipes. That 30-minute promise is exactly what I need for a weeknight treat.
★★★★
Just found a recipe that might crack that 83% statistic! I’m definitely trying the chocolate ganache technique you mentioned this weekend.
★★★★
Finally found a recipe that promises Hostess-style cupcakes in 30 minutes! I’m definitely gonna try that marshmallow filling technique this weekend.
★★★★
Finally found a recipe that promises Hostess-style cupcakes in 30 minutes! I’m gonna try that marshmallow filling technique this weekend.
★★★★
Finally found a recipe that promises Hostess-style cupcakes in 30 minutes! I can’t wait to see if that chocolate filling is as good as the original.
★★★★
Wow, 30 minutes is a game-changer for a last-minute dessert! I’m definitely gonna try that chocolate ganache trick for the topping.
★★★★
Just found a recipe that might solve my cupcake struggles! The 30-minute promise is exactly what I need for last-minute school events. Can’t wait to see if that chocolate trick really works.
★★★★
I’ve been craving a good copycat Hostess cupcake but thought they’d be too fussy. That ganache swirl technique is exactly what I need to try.
★★★★
Finally a recipe that promises Hostess-style cupcakes without the all-day project! That 30-minute timeline is exactly what I need for last-minute school treats.
★★★★
Just found a recipe that might finally crack that Hostess cupcake code! The 30-minute promise is exactly what I need for last-minute school events.
★★★★
I’ve been craving a quick chocolate fix and 30 minutes is totally doable on a weeknight. That ganache swirl on top looks just like the real deal.
★★★★
I’ve been craving a quick chocolate fix and 30 minutes is totally doable on a weeknight. That ganache drizzle technique sounds like it makes them look fancy without the fuss.
★★★★
I’ve been craving a classic Hostess-style cupcake but thought they were too complicated. That chocolate filling trick is brilliant, and 30 minutes is totally doable.
★★★★
Just found a recipe that might solve my cupcake struggles! The 30-minute promise is exactly what I need for last-minute treats.
★★★★
I’ve been craving a quick chocolate fix and 30 minutes is totally doable. That ganache swirl technique is exactly what I need to master.
★★★★
Saving this for my book club meeting next week! That chocolate ganache looks so much easier than I thought it would be.
★★★★
I’ve been craving a quick chocolate fix and 30 minutes is totally doable on a weeknight. That ganache drizzle is exactly what my boxed mixes are missing.
★★★★
I’ve been wanting to make a quick, impressive dessert for ages. The 30-minute promise on these chocolate cupcakes is exactly what I need for last-minute guests.
★★★★
Saving this for my book club meeting this weekend! That 30-minute promise is exactly what I need, and I can’t wait to see if the chocolate ganache is as simple as it sounds.
★★★★
Just found a recipe that might solve my cupcake struggles! The 30-minute promise is exactly what I need for last-minute treats.
★★★★
Saving this for my book club meeting next week! That chocolate glaze technique is exactly what I’ve been missing to get that signature Hostess shine. Can’t wait to surprise everyone with these.
★★★★
I’ve been craving a good chocolate cupcake but most recipes take forever. That 30-minute promise is exactly what I need for a weeknight treat!
★★★★
I’ve been craving a classic Hostess-style cupcake but thought they were too fussy to make at home. That chocolate filling trick is brilliant, and 30 minutes is totally doable for a weeknight treat.
★★★★
I’ve been wanting a quick chocolate cupcake recipe for last-minute guests. The 30-minute promise is exactly what I need.
★★★★
I’ve been wanting to make a quick, classic chocolate cupcake from scratch. The promise of that Hostess-style treat in 30 minutes is exactly what I need for last-minute cravings.
★★★★
I’ve been craving a quick chocolate fix and 30 minutes is totally doable on a weeknight. That ganache swirl on top looks just like the real thing!
★★★★
I’ve been craving a quick chocolate fix and 30 minutes is totally doable on a weeknight. The ganache swirl on top looks just like the real thing!
★★★★
Finally found a recipe that promises Hostess-style cupcakes in 30 minutes! I’m gonna try that marshmallow filling technique this weekend.
★★★★
Finally a recipe that promises a quick, bakery-style chocolate cupcake! I’m always skeptical of the 30-minute claims, but the method here sounds genuinely doable for a weeknight treat.
★★★★
I’ve been craving a good chocolate cupcake but most recipes take forever. Thirty minutes from start to finish is exactly what I need for a weeknight treat!
★★★★
I’ve been craving a good copycat Hostess cupcake but thought they’d be too fussy. That 30-minute promise and the specific chocolate technique have me convinced to try!
★★★★
I’ve been craving a good chocolate cupcake but can’t handle fussy recipes. The promise of a 30-minute frosting-to-cake ratio like a Hostess treat is exactly what I need.
★★★★
I’ve been craving a quick chocolate fix and 30 minutes is totally doable on a weeknight. That ganache drizzle looks like the perfect finishing touch.
★★★★
Wow, 30 minutes for a Hostess-style cupcake? That’s a game-changer for last-minute treats, and I can’t believe it’s that simple.
★★★★
I’ve been craving a quick chocolate fix and 30 minutes is totally doable on a weeknight. That ganache drizzle in the picture looks absolutely perfect.
★★★★
I’ve been craving a quick chocolate fix and 30 minutes is totally doable on a weeknight. That ganache drizzle technique sounds like the perfect finishing touch.
★★★★
Finally found a recipe that promises those classic Hostess cupcakes without the fuss! I’m gonna try that marshmallow filling technique this weekend.
★★★★
I’ve been craving a quick chocolate fix and 30 minutes is totally doable on a weeknight. The ganache topping sounds way easier than I thought it would be.
★★★★
I’ve been wanting a quick chocolate cupcake recipe for last-minute guests. The 30-minute promise is exactly what I need for those surprise visits.
★★★★
Just found a recipe that might finally solve my Hostess cupcake craving! That chocolate filling technique is exactly what I’ve been missing. Gonna try these for the kids’ lunchboxes this week.
★★★★
I’ve been craving a quick chocolate fix and 30 minutes is totally doable on a weeknight. That ganache swirl on top looks just like the real thing!
★★★★
I’ve been craving a good chocolate cupcake but most recipes take forever. That 30-minute promise is exactly what I need for a weeknight treat.
★★★★
I’ve been craving a quick chocolate fix and 30 minutes is totally doable on a weeknight. That ganache drizzle in the photo is calling my name.
★★★★
I’ve been craving a good chocolate cupcake but can’t handle complicated recipes. The 30-minute promise and that specific ganache technique are exactly what I need.
★★★★
Finally found a recipe that promises Hostess-style cupcakes in 30 minutes! I’m gonna try that marshmallow filling technique this weekend.
★★★★
Finally a recipe that promises to be quick and actually looks doable! I’m always intimidated by copycat desserts, so seeing a 30-minute version is a game-changer.
★★★★
Finally found a recipe that promises those classic Hostess flavors at home! I’m gonna try that marshmallow filling technique this weekend.
★★★★
I’ve been craving a good chocolate cupcake but can’t handle complicated recipes. The promise of that classic Hostess-style filling in 30 minutes is exactly what I need.
★★★★
I’ve been craving a good homemade chocolate cupcake and 30 minutes is totally doable on a weeknight. The ganache topping sounds like the perfect finishing touch.
★★★★
I’ve been craving a quick chocolate fix and 30 minutes is totally doable on a weeknight. That ganache swirl on top looks just like the real deal!
★★★★
I’ve been craving a good chocolate cupcake that doesn’t take all afternoon. That 30-minute promise is exactly what I need for last-minute school events.
★★★★
Finally found a recipe that promises the Hostess cupcake magic in 30 minutes! I can’t wait to see if that chocolate cake and cream filling really comes together that fast.
★★★★
I’ve been craving a quick chocolate fix and 30 minutes is exactly what I need. Can’t wait to try that Hostess-style filling.
★★★★
I’ve been craving a quick chocolate fix and 30 minutes is totally doable. The ganache swirl on top looks just like the real deal!
★★★★
I’ve been craving a quick chocolate fix and 30 minutes is totally doable on a weeknight. Gonna see if that trick with the coffee really makes the chocolate flavor pop.
★★★★
Just found a recipe that might finally solve my Hostess cupcake craving! That chocolate cake base looks perfectly moist, and I’m excited to try that marshmallow filling technique.
★★★★
I’ve been craving a quick chocolate fix and 30 minutes is totally doable on a weeknight. That ganache drizzle in the photo looks exactly like the real deal.
★★★★
I’ve been craving a good chocolate cupcake but can’t handle complicated recipes. The promise of a 30-minute timeline and that specific Hostess-style filling has me sold.
★★★★
I’ve been craving a quick chocolate fix and 30 minutes is totally doable on a weeknight. That ganache swirl on top looks just like the real deal!
★★★★
I’ve been craving a quick chocolate fix and 30 minutes is totally doable. That ganache swirl on top looks just like the real thing!
★★★★
I’ve been craving a quick chocolate fix and 30 minutes is totally doable. The ganache swirl on top looks just like the real thing!
★★★★
I’ve been craving a good chocolate cupcake but can’t handle complicated recipes. The fact that these are ready in 30 minutes is exactly what I need for a last-minute treat.
★★★★
Finally a recipe that promises a quick chocolate fix! I’m always skeptical of “ready in 30 minutes” claims, but I’m gonna give this one a shot this weekend.
★★★★
I’ve been craving a quick chocolate fix and 30 minutes from bowl to cupcake is exactly what I need. The ganache topping sounds so much better than canned frosting.
★★★★
I’ve been craving a good chocolate cupcake that doesn’t take all afternoon. That 30-minute promise is exactly what I need for a last-minute treat!
★★★★
Finally a recipe that promises to tackle that tricky Hostess-style chocolate cupcake! I’m definitely gonna try that marshmallow filling technique this weekend.
★★★★
I’ve been craving a quick chocolate fix and 30 minutes is totally doable on a weeknight. Can’t wait to see if that ganache trick really makes them taste like the real thing.
★★★★
I’ve been craving a quick chocolate fix and 30 minutes is totally doable on a weeknight. That ganache drizzle looks just like the real thing!
★★★★
I’ve been wanting to make a quick, classic chocolate cupcake from scratch. The promise of that Hostess-style treat in 30 minutes is exactly what my week needs.
★★★★
I’ve been craving a quick chocolate fix and 30 minutes is totally doable on a weeknight. That ganache swirl on top looks just like the real thing!
★★★★
I’ve been wanting to make a quick, impressive dessert for book club. These look like they’ll be a hit, and that 30-minute promise is exactly what I need.
★★★★
I’ve been craving a quick chocolate fix and 30 minutes is totally doable on a weeknight. That ganache swirl on top looks just like the real deal.
★★★★
I’ve been wanting to make a quick, classic chocolate cupcake for ages. That 30-minute promise is exactly what I need for last-minute treats.
★★★★
Just found a recipe that might solve my bakery-style cupcake struggles. The 30-minute promise is exactly what I need for last-minute school events.
★★★★
Finally found a recipe that promises to be quick and easy! I can’t wait to see if that chocolate ganache is as simple as it sounds.
★★★★
I’ve been craving a good chocolate cupcake but most recipes take forever. That 30-minute promise is exactly what I need for last-minute treats!
★★★★
I’ve been craving a good chocolate cupcake that doesn’t take all afternoon. The 30-minute promise is exactly what I need for last-minute treats.
★★★★
I’ve been craving a good chocolate cupcake but can’t handle a complicated recipe right now. The promise of that classic Hostess-style filling in 30 minutes is exactly what I need.
★★★★
I’ve been craving a quick chocolate fix and 30 minutes is totally doable on a weeknight. That ganache drizzle in the picture looks just like the real thing!
★★★★
I’ve been craving a good chocolate cupcake but can’t handle complicated recipes. That 30-minute promise is exactly what I need for a weeknight treat.
★★★★
I’ve been craving a good copycat Hostess cupcake! That marshmallow filling is exactly what I’ve been searching for, and 30 minutes is totally doable.
★★★★
I’ve been craving a good chocolate cupcake but never have hours to bake. That 30-minute promise and the specific cocoa technique are exactly what I need.
★★★★
Finally a recipe that promises Hostess-style cupcakes without the all-day project! The 30-minute timeline is exactly what I need for last-minute school events.
★★★★
I’ve been wanting a quick chocolate cupcake recipe for last-minute guests. That 30-minute promise is exactly what I need, and using coffee to boost the chocolate flavor is a great tip.
★★★★
Just found a recipe that tackles that 83% statistic head-on! I’m definitely trying the chocolate ganache technique this weekend.
★★★★
I’ve been craving a quick chocolate fix and 30 minutes is exactly what I needed. Can’t wait to see if that cocoa trick really replicates the Hostess taste.
★★★★
Finally found a recipe that promises those classic Hostess flavors at home! I’m definitely gonna try that marshmallow filling technique this weekend.
★★★★
Finally a recipe that promises a quick chocolate fix! I’m always skeptical of “ready in 30 minutes” claims, but I’m gonna try this method with the Dutch-process cocoa.
★★★★
Finally a recipe that promises a classic Hostess-style cupcake without taking all day! That 30-minute timeline is exactly what I need for last-minute school events.
★★★★
I’ve been craving a good chocolate cupcake that doesn’t take all afternoon. The fact that these are ready in 30 minutes is exactly what I need for a last-minute treat.
★★★★
Just found a recipe that promises Hostess-style cupcakes in 30 minutes—that’s my kind of project for a last-minute treat! The chocolate cake base sounds perfectly fudgy.
★★★★
I’ve been craving a quick chocolate fix and 30 minutes is totally doable on a weeknight. That ganache drizzle technique sounds like the perfect finishing touch.
★★★★
I’ve been wanting to make a quick dessert for book club. The fact that these are ready in 30 minutes is a total game-changer!
★★★★
Finally found a recipe that promises a quick chocolate fix! I can’t wait to see if that 30-minute claim holds true in my kitchen.
★★★★
I’ve been craving a good chocolate cupcake but can’t handle complicated recipes. The 30-minute promise and that specific ingredient list have me sold. Gonna try these for my book club this weekend!
★★★★
Finally a recipe that might crack the Hostess cupcake code! I’m definitely trying that marshmallow filling technique this weekend.
★★★★
Finally found a recipe that promises Hostess-style cupcakes in 30 minutes! I can’t wait to see if that chocolate filling is as good as the original.
★★★★
I’ve been craving a good chocolate cupcake but hate complicated recipes. The fact that these are ready in 30 minutes is exactly what I need for a last-minute treat.
★★★★
I’ve been wanting a quick chocolate cupcake recipe for last-minute guests. The 30-minute promise is exactly what I need for those surprise visits.
★★★★
Just found a recipe that tackles that 83% statistic head-on! I’m definitely trying this method for the chocolate frosting this weekend.
★★★★
Saving this for my book club meeting next week! That chocolate ganache looks so much easier than I thought it would be.
★★★★
I’ve been craving a quick chocolate fix and 30 minutes from start to finish is exactly what I need. That ganache drizzle looks just like the real thing!
★★★★
I’ve been craving a good copycat Hostess cupcake but thought they were too fussy. That chocolate cake base you described sounds exactly like what I need for a quick fix.
★★★★
I’ve been craving a quick chocolate fix and 30 minutes is totally doable. That ganache swirl on top looks just like the real thing!
★★★★
I’ve been craving a quick chocolate fix and 30 minutes is totally doable. That ganache drizzle in the picture looks absolutely perfect.
★★★★
I’ve been craving a good copycat Hostess cupcake but thought they’d be too fussy. That chocolate ganache swirl is exactly what I need to try!
★★★★
I’ve been craving a quick chocolate fix and 30 minutes is totally doable on a weeknight. That ganache swirl on top looks just like the real thing!
★★★★
I’ve been craving a quick chocolate fix and 30 minutes is totally doable for a weeknight. That ganache swirl on top looks just like the real thing!
★★★★
I’ve been craving a quick chocolate fix and 30 minutes is exactly what I need. That ganache topping sounds like the perfect shortcut.
★★★★
I’ve been craving a good chocolate cupcake that doesn’t take all afternoon. The 30-minute promise and that “Hostess” style filling have me totally sold.
★★★★
I’ve been wanting to make a quick dessert for book club, and these look perfect. Love that they’re ready in 30 minutes!
★★★★
I’ve been craving a quick chocolate fix and 30 minutes is totally doable on a weeknight. Can’t wait to see if that cocoa trick really replicates the Hostess flavor.
★★★★
I’ve been craving a quick chocolate fix and 30 minutes is totally doable! That ganache swirl on top looks just like the real thing.
★★★★
I’ve been craving a quick chocolate fix and 30 minutes is totally doable on a weeknight. That ganache swirl on top looks just like the real thing!
★★★★
Saving this for my book club meeting this weekend! That 30-minute promise is exactly what I need, and I can’t resist a good chocolate cupcake.
★★★★
Finally found a recipe that promises to be quick and easy! I’m definitely gonna try that chocolate ganache swirl technique this weekend.
★★★★
Finally found a recipe that promises a quick chocolate fix! I’m always intimidated by copycat recipes, so the 30-minute timeline is a huge relief.
★★★★
I’ve been craving a quick chocolate fix and 30 minutes from bowl to table is exactly what I need. That ganache topping sounds like it’ll give me that classic Hostess taste without the fuss.
★★★★
I’ve been craving a good copycat Hostess cupcake but thought they’d be too fussy. Thirty minutes and no fancy ingredients? I’m definitely trying this weekend.
★★★★
I’ve been craving a quick chocolate fix and 30 minutes is totally doable. That ganache swirl on top looks just like the real thing!
★★★★
I’ve been craving a good chocolate cupcake but can’t stand complicated recipes. That ganache drizzle in the photo is exactly what I was hoping to find!
★★★★
Love that you don’t need any special equipment for this. I’m always intimidated by fancy frosting, so the simple chocolate glaze is perfect for a quick treat.
★★★★
Finally a recipe that promises a quick chocolate fix! I’m always skeptical of the “ready in 30 minutes” claim, but your method seems totally doable.
★★★★
Finally a recipe that promises to be quick and easy! I’m always intimidated by those perfect-looking cupcakes, so seeing a 30-minute version gives me hope.
★★★★
I’ve been wanting to make a quick dessert for book club, and 30 minutes is perfect. That chocolate ganache technique sounds foolproof.
★★★★
Just found a recipe that might finally crack that 83% statistic! Gonna try your method this weekend and see if I can nail that perfect chocolate cupcake texture.
★★★★
I’ve been craving a quick chocolate fix and 30 minutes is totally doable on a weeknight. That ganache topping sounds like it makes them extra special.
★★★★
I’ve been craving a quick chocolate fix and 30 minutes is totally doable on a weeknight. The copycat Hostess filling is what really sold me.
★★★★
I’ve been craving a good chocolate cupcake that doesn’t take all afternoon. The promise of a 30-minute Hostess-style treat is exactly what I need for my sweet tooth.
★★★★
Finally found a recipe that promises a quick chocolate fix! I’m definitely trying that trick with the ganache frosting this weekend.
★★★★
Finally found a recipe that promises those classic Hostess cupcakes without the fuss! I can’t wait to see if that chocolate filling is as good as the original.
★★★★
Finally found a recipe that promises Hostess-style cupcakes in 30 minutes! I can’t wait to see if that chocolate cake base really nails the texture.
★★★★
Finally found a recipe that promises Hostess-style cupcakes in 30 minutes! I can’t wait to see if that chocolate cake and cream filling really comes together that fast.
★★★★
Saving this for my book club meeting next week! That chocolate ganache swirl on top looks exactly like the bakery version I can never get right.
★★★★
I’ve been craving a good chocolate cupcake but can’t stand complicated recipes. That 30-minute promise and the Hostess-style filling have me sold!
★★★★
Finally found a recipe that promises Hostess-style cupcakes in 30 minutes! I can’t wait to see if that chocolate filling is as good as the original.
★★★★
I’ve been craving a quick chocolate fix and 30 minutes is totally doable on a weeknight. That ganache drizzle looks just like the real thing!
★★★★
Wow, 30 minutes from start to finish is exactly the kind of win I need for a last-minute treat! I can’t wait to see if that chocolate trick really solves the common baking struggle you mentioned.
★★★★
I’ve been craving a quick chocolate fix and 30 minutes is totally doable. That ganache drizzle technique is exactly what my usual cupcakes are missing.
★★★★
Just found a recipe that might finally crack that Hostess cupcake code! I’m definitely trying the marshmallow filling trick this weekend.
★★★★
Finally a recipe that promises to be quick and easy! I can’t wait to try that chocolate ganache technique you mentioned.
★★★★
I’ve been craving a quick chocolate fix and 30 minutes is totally doable on a weeknight. That ganache swirl on top looks just like the real thing!
★★★★
Saving this for my book club meeting next week! That chocolate ganache technique is exactly what I’ve been wanting to try, and 30 minutes is totally doable.
★★★★
I’ve been wanting to recreate those classic snack cakes at home! The trick with the filling and that shiny glaze sounds totally doable in 30 minutes.
★★★★
Finally found a recipe that promises Hostess-style cupcakes without the fuss! That chocolate filling technique is exactly what I’ve been missing.
★★★★
Just found a recipe that might crack that 83% struggle stat! The ganache technique here sounds like the secret to getting that classic Hostess texture. Definitely trying this for my kid’s bake sale next week.
★★★★
I’ve been craving a good chocolate cupcake but can’t handle complicated recipes. The promise of a 30-minute bake time and that Hostess-style filling has me sold.
★★★★
Finally found a recipe that promises Hostess-style cupcakes in 30 minutes! I can’t wait to see if that chocolate filling is as good as the original.
★★★★
I’ve been craving a quick chocolate fix and 30 minutes is totally doable on a weeknight. That ganache drizzle in the photo looks absolutely perfect.
★★★★
I’ve been craving a quick chocolate fix and 30 minutes is totally doable on a weeknight. That ganache swirl on top looks just like the real thing!
★★★★
Saving this for my next potluck! That 30-minute promise is exactly what I need, and I can’t wait to see if my version of the chocolate frosting turns out.
★★★★
I’ve been craving a good chocolate cupcake but most recipes take forever. That 30-minute promise is exactly what I need for last-minute treats.
★★★★
I’ve been craving a good chocolate cupcake but most recipes take forever. That 30-minute promise and the Hostess-style filling are exactly what I needed.
★★★★
I’ve been wanting a quick chocolate cupcake recipe for last-minute guests. The 30-minute promise is exactly what I need.
★★★★
I’ve been wanting a quick chocolate cupcake recipe for after-school snacks. The fact that these are ready in 30 minutes is exactly what I need.
★★★★
I’ve been craving a good copycat Hostess cupcake but thought they’d be too fussy. That chocolate filling trick is brilliant, and 30 minutes is totally doable!
★★★★
I’ve been wanting to make a quick, nostalgic treat like those classic snack cakes! The 30-minute promise is exactly what I need for a last-minute bake sale contribution.
★★★★
I’ve been craving a good chocolate cupcake but can’t stand complicated recipes. That 30-minute promise is exactly what I need for a weeknight treat.
★★★★
Just found a recipe that might finally crack the Hostess cupcake code! That 83% stat is so real, so I’m excited to see if your method is the trick. Definitely trying these this weekend.
★★★★
I’ve been craving a good chocolate cupcake but can’t stand complicated recipes. That 30-minute promise is exactly what I need for a weeknight treat.
★★★★
Finally found a recipe that promises to be quick and easy! I can’t wait to see if that chocolate ganache is as simple as it sounds.
★★★★
I’ve been craving a quick chocolate fix and 30 minutes is totally doable. The ganache topping sounds way better than canned frosting.
★★★★
Finally a recipe that promises to replicate that classic chocolate cupcake! I’m definitely trying the tip from the excerpt this weekend.
★★★★
Finally a recipe that promises to be quick and actually looks it! I can’t wait to see how that chocolate ganache turns out in under 30 minutes.
★★★★
I’ve been wanting a quick chocolate cupcake recipe for last-minute guests. The 30-minute promise is exactly what I need, and I can’t wait to see if that ganache sets up as fast as you say.
★★★★
I’ve been craving a good copycat Hostess cupcake but thought they were too fussy. That chocolate cake base and marshmallow filling you described sounds totally doable in 30 minutes!
★★★★
Finally found a recipe that promises Hostess-style cupcakes in 30 minutes! That chocolate filling technique is exactly what I’ve been missing.
★★★★
Finally found a recipe that promises a quick chocolate fix! I’m definitely gonna see if it solves that 83% struggle statistic in my own kitchen this weekend.
★★★★
Finally found a recipe that promises Hostess-style cupcakes in 30 minutes! I’m gonna try that marshmallow filling technique this weekend.
★★★★
I’ve been craving a quick chocolate fix and 30 minutes is totally doable. Love that it’s a homemade version of a classic treat.
★★★★
I’ve been craving a good copycat Hostess cupcake but thought they’d be too fussy. That 30-minute timeline is exactly what I needed to see!
★★★★
I’ve been craving a good chocolate cupcake but can’t handle complicated recipes. The promise of a 30-minute bake is exactly what I need for a weeknight treat.
★★★★
Finally found a recipe that promises to be quick and easy! I can’t wait to see if that chocolate ganache is as simple as it sounds.
★★★★
Finally a recipe that promises the Hostess cupcake taste without the fuss! That chocolate filling technique is exactly what I’ve been missing in my attempts.
★★★★
I’ve been craving a quick chocolate fix and 30 minutes is totally doable. That ganache swirl on top looks just like the real thing!
★★★★
I’ve been craving a good copycat Hostess cupcake but thought they were too fussy. That chocolate filling trick is brilliant, and 30 minutes is totally doable.
★★★★
I’ve been craving a good copycat Hostess cupcake but most recipes seem too complicated. That chocolate filling technique you described is exactly what I was missing!
★★★★
I’ve been craving a quick chocolate fix and 30 minutes is totally doable on a weeknight. That ganache swirl on top looks exactly like the real thing!
★★★★
I’ve been craving a good copycat Hostess cupcake but thought they were too complicated. That chocolate filling trick is brilliant, and 30 minutes is totally doable for a weeknight treat.
★★★★
I’ve been wanting to make a quick, classic dessert like this. The fact that it mimics a Hostess cupcake in just 30 minutes is exactly what I need for last-minute treats.
★★★★
I’ve been wanting to make a copycat Hostess cupcake at home! That chocolate ganache swirl on top is exactly what I’ve been craving.
★★★★
I’ve been craving a quick chocolate fix and 30 minutes is totally doable on a weeknight. That ganache swirl on top looks just like the real thing!
★★★★
I’ve been craving a good chocolate cupcake but most recipes take forever. That 30-minute promise and the simple ingredients are exactly what I need for a weeknight treat.
★★★★
I’ve been craving a quick chocolate fix and 30 minutes is totally doable on a weeknight. That ganache drizzle in the photo looks absolutely perfect.
★★★★
I’ve been craving a quick chocolate fix and 30 minutes is totally doable on a weeknight. That ganache topping looks just like the real deal!
★★★★
I’ve been craving a good chocolate cupcake but most recipes take forever. That 30-minute promise and the Hostess-style filling have me sold.
★★★★
I’ve been craving a good chocolate cupcake but never have hours to bake. That 30-minute promise is exactly what I need for a weeknight treat.
★★★★
I’ve been craving a quick chocolate fix and 30 minutes is totally doable on a weeknight. That ganache drizzle looks just like the real thing!
★★★★
I’ve been craving a good chocolate cupcake but can’t handle complicated recipes. The promise of a 30-minute bake and that “Hostess” style swirl has me sold.
★★★★
I’ve been craving a good chocolate cupcake but can’t handle a complicated recipe. The promise of a 30-minute bake time is exactly what I need for a last-minute treat.
★★★★
I’ve been craving a good chocolate cupcake but can’t handle complicated recipes. The 30-minute promise and that specific ganache technique are exactly what I need.
★★★★
I’ve been craving a quick chocolate fix and 30 minutes is totally doable on a weeknight. The ganache topping sounds way better than canned frosting.
★★★★
I’ve been craving a good copycat Hostess cupcake and 30 minutes is totally doable. That chocolate ganache swirl on top is exactly what I was hoping to find.
★★★★
Finally found a recipe that promises Hostess-style cupcakes without the all-day project! That chocolate filling technique is exactly what I’ve been missing. Can’t wait to surprise the kids with these after school.
★★★★
Finally a recipe that promises to be quick and easy! I’m always intimidated by those perfect-looking cupcakes, so the 30-minute timeline is a huge relief.
★★★★
I’ve been wanting to make a quick, nostalgic dessert like the classic Hostess cupcakes! The fact that these are ready in 30 minutes is a total game-changer for last-minute treats.
★★★★
I’ve been craving a quick chocolate fix and 30 minutes is totally doable on a weeknight. That ganache drizzle is gonna make them look so fancy.
★★★★
Finally a recipe that promises to be quick and easy! I can’t wait to see if that chocolate ganache is as simple as it sounds.
★★★★
I’ve been craving a quick chocolate fix and 30 minutes is totally doable! That ganache swirl on top looks just like the real thing.
★★★★
Finally found a recipe that promises to be quick and easy! I can’t wait to see if that chocolate ganache is as simple as it sounds.
★★★★
I’ve been craving a quick chocolate fix and 30 minutes is totally doable. The ganache topping sounds way better than canned frosting.
★★★★
I’ve been craving a quick chocolate fix and 30 minutes is totally doable on a weeknight. Love that it’s a homemade version of the classic Hostess treat.
★★★★
Finally found a recipe that promises a classic treat in under 30 minutes! I’m gonna try that chocolate glaze technique this weekend.
★★★★
Wow, ready in 30 minutes is a lifesaver for last-minute treats! I can’t wait to see if that chocolate trick really works for that Hostess-style taste.
★★★★
I’ve been craving a good chocolate cupcake that doesn’t take all afternoon. The 30-minute promise and that specific Hostess-style filling have me sold!
★★★★
I’ve been craving a quick chocolate fix and 30 minutes is totally doable on a weeknight. That ganache topping sounds like it’s gonna be the star.
★★★★
I’ve been craving a quick chocolate fix and 30 minutes is totally doable. Can’t wait to see if that cocoa ratio really nails the Hostess flavor.
★★★★
I’ve been craving a quick chocolate fix and 30 minutes is totally doable on a weeknight. Can’t wait to see if that cocoa powder trick really gives it that Hostess-style richness.
★★★★
Saving this for my daughter’s bake sale next week! The promise of a 30-minute frosting-to-cupcake ratio that rivals the real thing is exactly what I need.
★★★★
Finally a recipe that promises to tackle that tricky Hostess-style chocolate cake texture! I’m definitely gonna try that marshmallow filling technique this weekend.
★★★★
I’ve been craving a quick chocolate fix and 30 minutes is totally doable on a weeknight. The ganache topping sounds way better than canned frosting.
★★★★
Finally found a recipe that promises Hostess-style cupcakes without the hassle. That chocolate filling technique is exactly what I’ve been missing.
★★★★
Finally found a recipe that promises to be quick and easy! I’m always intimidated by those perfect-looking cupcakes, so I’m excited to try your 30-minute version this weekend.
★★★★
I’ve been craving a good chocolate cupcake but most recipes take forever. That 30-minute promise is exactly what I need for a last-minute treat.
★★★★
I’ve been craving a good chocolate cupcake that doesn’t take all afternoon. The promise of a 30-minute recipe with that classic Hostess style is exactly what I needed to see today.
★★★★
I’ve been craving a good chocolate cupcake but most recipes take forever. That 30-minute promise is exactly what I need for a weeknight treat.
★★★★
Finally a recipe that tackles that tricky Hostess-style chocolate cake! I can’t wait to see if that marshmallow filling technique works as well as it sounds.
★★★★
Finally found a recipe that promises Hostess-style cupcakes in 30 minutes! I’m definitely gonna try that marshmallow filling technique this weekend.
★★★★
I’ve been craving a good copycat Hostess cupcake! The 30-minute promise is what’s really gonna get me to try this recipe tonight.
★★★★
Saving this for my book club meeting this weekend! That 30-minute promise is exactly what I need, and I can’t wait to see if I can finally nail that classic Hostess flavor.
★★★★
I’ve been wanting a quick chocolate cupcake recipe for last-minute guests. The 30-minute promise is exactly what I need for those surprise visits.
★★★★
Finally a recipe that promises to be quick and actually is! I’m gonna try that trick with the pudding mix in the batter this weekend.
★★★★
I’ve been craving a good chocolate cupcake but can’t handle complicated recipes. The fact that these are ready in 30 minutes is exactly what I need for a weeknight treat.
★★★★
Finally found a recipe that promises Hostess-style cupcakes in 30 minutes! I’m gonna try that marshmallow filling technique this weekend.
★★★★
I’ve been craving a good copycat Hostess cupcake but thought they were too fussy. That 30-minute promise is exactly what I needed to see!
★★★★
Finally found a recipe that promises to be quick and easy! I can’t wait to see if that chocolate ganache is as simple as it sounds.
★★★★
I’ve been craving a good chocolate cupcake that doesn’t take all afternoon. That 30-minute promise is exactly what I need for last-minute treats!
★★★★
I’ve been craving a quick chocolate fix and 30 minutes is totally doable on a weeknight. That ganache swirl on top looks just like the real deal!
★★★★
I’ve been craving a good chocolate cupcake but can’t handle complicated recipes. The fact that these are ready in 30 minutes is a total game-changer for last-minute treats.
★★★★
I’ve been craving a good chocolate cupcake but most recipes seem so fussy. That 30-minute promise and the Hostess-style filling has me totally convinced to try these this weekend!
★★★★
I’ve been craving a quick chocolate fix and 30 minutes is totally doable on a weeknight. That ganache frosting technique sounds foolproof, which is exactly what I need.
★★★★
Saving this for my book club meeting next week! That chocolate ganache technique is exactly what I’ve been trying to master, and 30 minutes is a lifesaver.
★★★★
Finally found a recipe that promises those classic Hostess flavors at home! I’m definitely trying that marshmallow filling technique this weekend.
★★★★
I’ve been craving a good chocolate cupcake that doesn’t take all afternoon. That 30-minute promise is exactly what I need, and using buttermilk is a great tip for moisture.
★★★★
I’ve been wanting a quick homemade version of those snack cakes! The 30-minute promise is exactly what I need for last-minute bake sales.
★★★★
I’ve been craving a classic Hostess-style treat but thought they were too fussy to make at home. Thirty minutes from bowl to table is a game-changer!
★★★★
Finally a recipe that tackles that tricky Hostess-style cupcake! I’ve always struggled to get that perfect filling and chocolate glaze just right at home. Can’t wait to try your method this weekend.
★★★★
I’ve been craving a quick chocolate fix and 30 minutes is totally doable on a weeknight. That ganache swirl on top looks just like the real thing!
★★★★
I’ve been craving a good chocolate cupcake but can’t handle complicated recipes. The fact that these are ready in 30 minutes is exactly what I need for a last-minute treat.
★★★★
I’ve been craving a good chocolate cupcake but can’t handle complicated recipes. The promise of a 30-minute Hostess-style version is exactly what I need!
★★★★
I’ve been craving a good chocolate cupcake but can’t handle a complicated recipe. The 30-minute promise and that specific baking tip in the excerpt are exactly what I need.
★★★★
I’ve been craving a quick chocolate fix and 30 minutes is totally doable. That ganache swirl on top looks just like the real thing!
★★★★
Finally found a recipe that promises to be quick and easy! I’m always intimidated by bakery-style frosting, so the 30-minute timeline gives me hope.
★★★★
Saving this for my book club meeting next week! That 30-minute promise is exactly what I need, and I can’t wait to see if that chocolate trick really works.
★★★★
I’ve been craving a quick chocolate fix and 30 minutes is totally doable. The ganache topping sounds like it would make them feel really special.
★★★★
I’ve been craving a good copycat Hostess cupcake but thought they were too fussy. That ganache filling trick is a game-changer!
★★★★
Finally found a recipe that promises a quick Hostess-style treat! That chocolate filling technique is exactly what I’ve been missing.
★★★★
Saving this for my book club meeting next week! That 30-minute promise is exactly what I need, and I can’t wait to see if the chocolate really tastes like the real thing.
★★★★
I’ve been craving a good chocolate cupcake that doesn’t take all afternoon. The fact that these are ready in 30 minutes is exactly what I need for last-minute treats.
★★★★
I’ve been craving a classic Hostess-style cupcake but thought they were too complicated to make at home. That chocolate filling trick is brilliant, and 30 minutes is totally doable for a weeknight treat.
★★★★
Wow, 30 minutes from start to finish for a chocolate cupcake is a game-changer! I’m gonna try that one-bowl method you mentioned this weekend.
★★★★
I’ve been craving a quick chocolate fix and 30 minutes is exactly what I need. The ganache technique you mentioned sounds foolproof.
★★★★
Finally found a recipe that promises a quick chocolate fix! I’m definitely gonna try that trick with the ganache swirl this weekend.
★★★★
I’ve been craving a quick chocolate fix and 30 minutes is totally doable. That ganache drizzle is exactly what my boxed mixes have been missing.
★★★★
Saving this for my daughter’s bake sale next week! The promise of a 30-minute Hostess-style cupcake is exactly what I need.
★★★★
I’ve been craving a quick chocolate fix and 30 minutes is totally doable on a weeknight. That ganache drizzle looks exactly like the real deal!
★★★★
I’ve been craving a quick chocolate fix and 30 minutes is totally doable on a weeknight. Can’t wait to see if that cocoa trick really replicates the classic taste.
★★★★
I’ve been wanting to make a quick, impressive dessert for ages. The promise of a Hostess-style cupcake in 30 minutes is exactly what I need!
★★★★
I’ve been craving a quick chocolate fix and 30 minutes is totally doable on a weeknight. That ganache swirl technique looks like it gives such a professional finish.
★★★★
Saving this for my book club meeting next week! That chocolate glaze technique is exactly what I’ve been trying to master, and 30 minutes is a lifesaver.
★★★★
I’ve been wanting a quick chocolate cupcake recipe for last-minute guests! That 30-minute promise is exactly what I need.
★★★★
Finally found a recipe that promises Hostess-style cupcakes without the fuss! That 30-minute timeline is exactly what I need for last-minute school events. Can’t wait to see if that chocolate filling is as good as the original.
★★★★
I’ve been craving a good chocolate cupcake that doesn’t take all afternoon. That 30-minute promise and the classic Hostess-style filling are exactly what I need.
★★★★
I’ve been wanting a quick chocolate cupcake recipe for last-minute guests. That 30-minute promise is exactly what I need, and I’m definitely gonna try that ganache technique.
★★★★
I’ve been craving a quick chocolate fix and 30 minutes is totally doable on a weeknight. That ganache swirl on top looks just like the real thing!
★★★★
Finally a recipe that promises the Hostess cupcake taste without all the fuss! That chocolate filling trick is exactly what I’ve been missing.
★★★★
I’ve been craving a classic Hostess-style cupcake but thought they were too fussy to make. That chocolate filling trick is brilliant, and 30 minutes is totally doable.
★★★★
I’ve been wanting to make a quick, impressive dessert for book club! That 30-minute promise and the chocolate ganache tip are exactly what I need.
★★★★
I’ve been wanting to make a quick, impressive dessert for book club. These cupcakes with that marshmallow filling sound like the perfect solution.
★★★★
I’ve been craving a quick chocolate fix and 30 minutes is totally doable on a weeknight. The ganache topping sounds way easier than I thought it would be.
★★★★
I’ve been craving a good chocolate cupcake but most recipes take forever. That 30-minute promise and the simple ingredient list are exactly what I need.
★★★★
Wow, 30 minutes is a game-changer for last-minute treats! I’m definitely gonna try that chocolate glaze technique this weekend.
★★★★
Finally a recipe that promises the Hostess cupcake magic at home! I’ve always wondered how to get that perfect filling and shiny chocolate glaze without spending hours.
★★★★
I’ve been craving a good chocolate cupcake that doesn’t take all afternoon. The promise of that Hostess-style filling in just 30 minutes is exactly what I need.
★★★★
I’ve been craving a good chocolate cupcake but most recipes take forever. That 30-minute promise is exactly what I need for a weeknight treat!
★★★★
I’ve been craving a good chocolate cupcake but can’t stand complicated recipes. That 30-minute promise is exactly what I need for a quick treat.
★★★★
Just found a recipe that might solve my Hostess cupcake cravings! That 30-minute promise is exactly what I need for last-minute treats. Can’t wait to see if the chocolate filling is as good as the original.
★★★★
I’ve been craving a quick chocolate fix and 30 minutes is totally doable on a weeknight. That ganache drizzle in the photo is calling my name.
★★★★
Finally found a recipe that promises Hostess-style cupcakes in 30 minutes! I can’t wait to see if that chocolate filling is as good as the original.
★★★★
I’ve been craving a quick chocolate fix and 30 minutes is totally doable. That ganache drizzle technique sounds perfect for a last-minute treat.
★★★★
I’ve been craving a good copycat Hostess cupcake but thought they were too fussy. That 30-minute promise has me sold, and I’m definitely trying that marshmallow filling trick.
★★★★
Finally found a recipe that promises Hostess-style cupcakes in 30 minutes! I’m gonna try that marshmallow filling technique this weekend.
★★★★
Finally a recipe that promises the Hostess cupcake taste without all the fuss! I’m definitely gonna try that marshmallow filling technique this weekend.
★★★★
Finally found a recipe that promises to be quick and easy! I can’t wait to see if that chocolate ganache is as simple as it sounds.
★★★★
I’ve been craving a quick chocolate fix and 30 minutes is totally doable on a weeknight. That ganache swirl on top looks just like the real thing!
★★★★
Finally found a recipe that promises to be quick and easy! I can’t wait to see if that chocolate frosting really tastes like the classic kind.
★★★★
Finally found a recipe that promises a quick Hostess-style cupcake! That chocolate filling is exactly what I’ve been missing in my homemade versions. Can’t wait to try it this weekend.
★★★★
Finally a recipe that promises to beat the bakery-style cupcake struggle! The 30-minute timeline is exactly what I need for last-minute treats.
★★★★
I’ve been craving a good chocolate cupcake that doesn’t take all afternoon. The fact that these are ready in 30 minutes is exactly what I needed for a weeknight treat.
★★★★
Finally a recipe that promises those classic Hostess flavors without the fuss! I’m definitely trying that marshmallow filling technique this weekend.
★★★★
I’ve been craving a good chocolate cupcake that doesn’t take all afternoon. That 30-minute promise is exactly what I need for last-minute treats!
★★★★
Finally a recipe that promises to be quick and actually delivers! I can’t wait to see if that chocolate cake hack really works.
★★★★
I’ve been craving a quick chocolate fix and 30 minutes is totally doable on a weeknight. That ganache drizzle in the photo looks just like the real thing!
★★★★
Finally a recipe that promises to be quick and easy! I’m always intimidated by copycat Hostess treats, but the 30-minute timeframe gives me hope. Can’t wait to see if that chocolate cake base is as good as the original.
★★★★
I’ve been craving a good chocolate cupcake but can’t stand complicated recipes. That 30-minute promise is exactly what I need for a weeknight treat.
★★★★
Wow, 30 minutes for a Hostess-style cupcake is a game-changer! I can’t wait to try that marshmallow filling technique this weekend.
★★★★
Finally a recipe that promises to be quick and actually looks it! I can’t wait to see how that chocolate ganache turns out in under 30 minutes.
★★★★
Finally found a recipe that promises a quick chocolate fix! I’m definitely gonna try that trick with the instant pudding mix in the batter this weekend.
★★★★
I’ve been craving a quick chocolate fix and 30 minutes is totally doable on a weeknight. That ganache drizzle technique you mentioned is exactly what my cupcakes usually need.
★★★★
Finally a recipe that promises to be quick and easy! I’m always intimidated by bakery-style cupcakes, but the 30-minute timeline has me convinced to give these a try this weekend.
★★★★
I’ve been wanting a quick chocolate cupcake recipe for last-minute guests! The 30-minute promise is exactly what I need.
★★★★
Wow, 30 minutes for a Hostess-style cupcake? That’s a game-changer for last-minute treats! I’m definitely trying that marshmallow filling trick this weekend.
★★★★
I’ve been craving a quick chocolate fix and 30 minutes is totally doable on a weeknight. That ganache swirl on top looks just like the real deal!
★★★★
I’ve been craving a good chocolate cupcake but can’t handle complicated recipes. The fact that these are ready in 30 minutes is exactly what I need for a last-minute treat.
★★★★
I’ve been wanting to make a quick, classic chocolate cupcake for ages. That 30-minute promise and the Hostess-style idea are exactly what I need for after-school snacks.
★★★★
I’ve been craving a good chocolate cupcake but most recipes take forever. That 30-minute promise is exactly what I need for last-minute treats.
★★★★
I’ve been craving a classic Hostess-style treat but thought they were too fussy to make at home. Thirty minutes and that chocolate filling? I’m definitely gonna try these this weekend.
★★★★
I’ve been craving a good chocolate cupcake but can’t stand complicated recipes. The promise of that classic Hostess-style filling in just 30 minutes is exactly what I needed to see today.
★★★★
I’ve been wanting to make a copycat Hostess cupcake for ages! The marshmallow filling and that signature chocolate ganache are exactly what I was craving.
★★★★
I’ve been craving a good copycat Hostess cupcake but thought they were too fussy. That ganache swirl on top is exactly what I needed to see!
★★★★
I’ve been craving a good chocolate cupcake that doesn’t take all afternoon. The promise of a 30-minute version with that classic Hostess style is exactly what I need.
★★★★
I’ve been craving a good chocolate cupcake that doesn’t take all afternoon. The promise of a 30-minute version with that classic Hostess style is exactly what I need.
★★★★
I’ve been craving a quick chocolate fix and 30 minutes is totally doable! The ganache swirl on top looks just like the real deal.
★★★★
I’ve been craving a classic Hostess-style treat but thought they were too fussy to make. Thirty minutes and a simple ganache filling is exactly what I needed to see!
★★★★
Finally found a recipe that promises the Hostess cupcake magic in 30 minutes! I can’t wait to see if that chocolate cake and cream filling really come together that fast.
★★★★
Finally a recipe that promises to be quick and simple! I can’t wait to see if that chocolate ganache is as easy to whip up as it sounds.
★★★★
I’ve been craving a good chocolate cupcake that doesn’t take all afternoon. That 30-minute promise is exactly what I need for a last-minute treat.
★★★★
I’ve been craving a good homemade chocolate cupcake but never seem to have hours to spare. That 30-minute promise and the Hostess-style filling are exactly what I need.
★★★★
I’ve been craving a quick chocolate fix and 30 minutes is totally doable on a weeknight. That ganache drizzle in the photo is calling my name.
★★★★
I’ve been craving a good copycat Hostess cupcake but thought they’d be too fussy. That 30-minute promise is exactly what I needed to see!
★★★★
I’ve been craving a good chocolate cupcake but most recipes take forever. That 30-minute promise is exactly what I need for a last-minute treat.
★★★★
I’ve been wanting to make a quick, nostalgic treat like Hostess cupcakes. That chocolate glaze and cream filling in 30 minutes is exactly what I need.
★★★★
I’ve been craving a quick chocolate fix and 30 minutes is totally doable. Can’t wait to see if that cocoa trick really works.
★★★★
Saving this for my daughter’s bake sale next week! That 30-minute promise is exactly what I need, and I can’t wait to see if my version finally nails that Hostess-style filling.
★★★★
I’ve been craving a quick chocolate fix and 30 minutes is totally doable on a weeknight. That ganache drizzle in the photo looks exactly like the real thing!
★★★★
I’ve been craving a quick chocolate fix and 30 minutes is totally doable on a weeknight. That ganache swirl on top looks just like the real thing!
★★★★
Finally found a recipe that promises those classic Hostess cupcakes at home! I can’t wait to see if that chocolate cake and marshmallow filling really come together in just 30 minutes.
★★★★
I’ve been wanting to make a quick, nostalgic dessert like the classic Hostess cupcakes. That chocolate filling trick is exactly what I need to try this weekend.
★★★★
I’ve been wanting to make a quick dessert that actually looks like the bakery version. The trick for that perfect swirl of frosting is exactly what I need.
★★★★
I’ve been craving a quick chocolate fix and 30 minutes is totally doable on a weeknight. That ganache drizzle in the picture looks absolutely perfect.
★★★★
I’ve been craving a quick chocolate fix and 30 minutes is totally doable on a weeknight. That ganache drizzle in the photo looks exactly like the real thing!
★★★★
I’ve been craving a quick chocolate fix and 30 minutes is totally doable on a weeknight. That ganache swirl on top looks just like the real deal!
★★★★
I’ve been craving a quick chocolate fix and 30 minutes is totally doable on a weeknight. The ganache topping sounds way better than canned frosting.
★★★★
I’ve been wanting to make a quick dessert for book club, and 30 minutes is perfect. That chocolate ganache technique sounds foolproof.
★★★★
I’ve been craving a good copycat Hostess cupcake but thought they’d be too fussy. That 30-minute promise is exactly what I needed to see!
★★★★
Finally found a recipe that promises those classic Hostess cupcakes at home! I’m definitely trying that marshmallow filling technique this weekend.
★★★★
Finally a recipe that promises to be quick and easy! I can’t wait to see if that chocolate ganache is as simple as it sounds.
★★★★
I’ve been wanting to make a quick, classic chocolate cupcake for ages. The promise of that Hostess-style frosting in under 30 minutes is exactly what I need for after-school treats.
★★★★
I’ve been craving a good chocolate cupcake but can’t handle fussy recipes. That 30-minute promise is exactly what I need for a weeknight treat.
★★★★
Finally found a recipe that promises Hostess-style cupcakes in 30 minutes! I can’t wait to see if that chocolate cake and cream filling really comes together that fast.
★★★★
I’ve been craving a good chocolate cupcake that doesn’t take all day. The promise of getting that Hostess-style treat in 30 minutes is exactly what I needed.
★★★★
I’ve been craving a quick chocolate fix and 30 minutes is totally doable on a weeknight. That ganache swirl on top looks just like the real deal!
★★★★
Finally a recipe that promises the Hostess cupcake taste without the fuss! That chocolate filling technique is exactly what I’ve been missing.
★★★★
I’ve been wanting to make a quick dessert for book club, and 30 minutes is perfect. The chocolate ganache topping sounds like the best part!
★★★★
I’ve been craving a classic Hostess-style cupcake but thought they were too fussy to make. That chocolate filling trick is brilliant, and 30 minutes is totally doable.
★★★★
I’ve been craving a good copycat Hostess cupcake but thought they were too complicated. That chocolate filling trick is brilliant, and 30 minutes is totally doable.
★★★★
Just found a recipe that might solve my cupcake struggles! That 30-minute promise is exactly what I need for last-minute school events.
★★★★
I’ve been wanting to make a copycat Hostess cupcake for ages! That chocolate cake base and marshmallow filling sound spot-on.
★★★★
I’ve been wanting to make a homemade version of those classic snack cakes! Using coffee in the batter is such a smart trick to boost the chocolate flavor. Can’t wait to try these this weekend.
★★★★
Wow, getting that Hostess-style chocolate cake texture in 30 minutes is a game changer! I can’t wait to see if that marshmallow filling trick really works.
★★★★
I’ve been craving a quick chocolate fix and 30 minutes is totally doable. That ganache drizzle technique is exactly what my cupcakes usually need.
★★★★
I’ve been craving a quick chocolate fix and 30 minutes is totally doable. The ganache topping sounds like it would make these feel really special.
★★★★
I’ve been craving a good chocolate cupcake but can’t handle complicated recipes. That 30-minute promise is exactly what I need for a quick treat.
★★★★
I’ve been craving a good chocolate cupcake but can’t handle a complicated recipe. The promise of that classic Hostess-style filling in 30 minutes is exactly what I need.
★★★★
Finally a recipe that promises to be quick and easy! I’m always looking for a fast, impressive dessert for last-minute guests, and that 30-minute timeline is exactly what I need.
★★★★
Finally found a recipe that promises Hostess-style cupcakes without the hassle! The 30-minute timeline is exactly what I need for last-minute school events. Can’t wait to see if that chocolate filling is as good as the original.
★★★★
Just found a recipe that might crack that 83% statistic! The promise of a Hostess-style cupcake in 30 minutes is exactly what I need for last-minute treats.
★★★★
I’ve been craving a good chocolate cupcake but most recipes take forever. That 30-minute promise is exactly what I needed for my sudden sweet tooth.
★★★★
I’ve been craving a good chocolate cupcake but most recipes take forever. That 30-minute promise is exactly what I need for last-minute cravings!
★★★★
I’ve been craving a good chocolate cupcake that doesn’t take all afternoon. The promise of getting that Hostess-style treat in 30 minutes is exactly what I needed to see today.
★★★★
I’ve been craving a classic Hostess-style cupcake but thought they were too fussy to make. That chocolate filling trick is brilliant, and 30 minutes is totally doable.
★★★★
Wow, 30 minutes for a Hostess-style cupcake is a game-changer! I can’t wait to see how the marshmallow filling turns out.
★★★★
Finally found a recipe that promises Hostess-style cupcakes without the all-day project! That chocolate filling technique is exactly what I’ve been missing.
★★★★
I’ve been craving a quick chocolate fix and 30 minutes is totally doable on a weeknight. Love that it’s a simple replica of the classic treat.
★★★★
I’ve been craving a quick chocolate fix and 30 minutes is totally doable on a weeknight. That ganache topping sounds like it makes them extra special.
★★★★
Finally found a recipe that promises to be quick and easy! I can’t wait to see if that chocolate ganache is as simple as it sounds.
★★★★
I’ve been craving a good copycat Hostess cupcake but thought they’d be too fussy. That chocolate filling trick is brilliant, and 30 minutes is totally doable.
★★★★
Saving this for my book club meeting tomorrow! That chocolate glaze looks exactly like the classic Hostess kind, and I can’t believe it’s ready so fast.
★★★★
Finally a recipe that promises to be quick and easy! I’m definitely trying that chocolate glaze technique this weekend.
★★★★
I’ve been craving a quick chocolate fix and 30 minutes is totally doable on a weeknight. That ganache swirl on top looks just like the real deal!
I’ve been craving a good chocolate cupcake but can’t handle complicated recipes. The 30-minute promise and that specific ingredient tip in the excerpt have me convinced to try these tonight!
★★★★
Finally found a recipe that promises Hostess-style cupcakes in 30 minutes! I’m definitely gonna try that marshmallow filling technique this weekend.
★★★★
I’ve been craving a quick chocolate fix and 30 minutes is totally doable on a weeknight. That ganache drizzle is gonna make them feel extra special.
★★★★
I’ve been wanting to make a copycat Hostess treat at home! The 30-minute timeline is perfect for a last-minute bake sale contribution.
★★★★
I’ve been craving a quick chocolate fix and 30 minutes is totally doable on a weeknight. The ganache topping sounds like it makes them extra special.
★★★★
Just found a chocolate cupcake recipe that promises to be quick! I’m always skeptical of those “ready in 30 minutes” claims, but I’m gonna test that timing this weekend.
★★★★
Finally found a recipe that promises to be quick and easy! I can’t wait to see if that chocolate cake base really tastes like the classic snack.
★★★★
I’ve been craving a quick chocolate fix and 30 minutes is totally doable on a weeknight. That ganache drizzle looks like the perfect finishing touch.
★★★★
I’ve been craving a quick chocolate fix and 30 minutes is totally doable on a weeknight. The ganache topping sounds like it would make them feel really special.
★★★★
I’ve been wanting a quick chocolate cupcake recipe for last-minute guests. The 30-minute promise is exactly what I need, and that ganache topping sounds so rich.
★★★★
I’ve been craving a good copycat Hostess cupcake but thought they were too tricky to make at home. That 30-minute timeline is exactly what I needed to see!
★★★★
I’ve been craving a quick chocolate fix and 30 minutes is totally doable on a weeknight. That ganache drizzle is calling my name.
★★★★
Saving this for my next potluck! The promise of a Hostess-style cupcake in 30 minutes is exactly the kind of magic I need.
★★★★
I’ve been craving a quick chocolate fix and 30 minutes is totally doable. That ganache swirl on top looks just like the real thing!
★★★★
I’ve been craving a good copycat Hostess cupcake but thought they’d be too fussy. That 30-minute promise is exactly what I needed to see!
★★★★
I’ve been craving a quick chocolate fix and 30 minutes is totally doable on a weeknight. That ganache drizzle is exactly what my cupcakes usually miss.
★★★★
Just found a recipe that might finally solve my Hostess cupcake craving! That 30-minute promise is exactly what I need for last-minute treats.
★★★★
Finally a recipe that promises to be quick and easy! I’m always intimidated by copycat recipes, so seeing a 30-minute version is a huge relief.
★★★★
I’ve been craving a quick chocolate fix and 30 minutes is totally doable on a weeknight. That ganache drizzle is gonna make them look so fancy.
★★★★
Finally found a recipe that promises to be quick and easy! I can’t wait to see if that chocolate ganache is as simple as it sounds.
★★★★
I’ve been wanting to make a copycat Hostess cupcake at home! That 30-minute timeframe is exactly what I need for a last-minute treat.
★★★★
Finally found a recipe that promises Hostess-style cupcakes in 30 minutes! That chocolate filling technique is exactly what I’ve been missing.
★★★★
Saving this for my daughter’s bake sale next week! The promise of a 30-minute frosting is exactly what I need.
★★★★
I’ve been wanting to make a quick, impressive dessert for book club. The 30-minute promise and that chocolate glaze are exactly what I need.
★★★★
I’ve been craving a quick chocolate fix and 30 minutes is totally doable. The ganache swirl on top looks just like the real deal!
★★★★
Finally found a recipe that promises a quick Hostess-style treat! That chocolate filling technique is exactly what I’ve been missing.
★★★★
Love that you included the tip about not over-mixing the batter. I’m always guilty of that, and it’s why my cupcakes turn out dense. Gonna try your method this weekend!
★★★★
Finally found a recipe that promises a quick chocolate fix! I’m gonna try it with that ganache technique you mentioned.
★★★★
I’ve been craving a good chocolate cupcake but can’t handle complicated recipes right now. That 30-minute promise is exactly what I need for a quick treat tonight.
★★★★
I’ve been craving a quick chocolate fix and 30 minutes is totally doable on a weeknight. That ganache topping sounds like it makes them extra special.
★★★★
Finally found a recipe that promises a quick chocolate fix! I’m definitely gonna try that one-bowl method this weekend.
★★★★
Saving this for my next potluck! That 30-minute promise is exactly what I need, and I can’t wait to see if the chocolate ganache is as simple as it sounds.
★★★★
I’ve been craving a good copycat Hostess cupcake but thought they were too fussy to make. That chocolate filling trick is brilliant, and 30 minutes is totally doable.
★★★★
I’ve been craving a good copycat Hostess cupcake but thought they’d be too complicated. Thirty minutes and pantry ingredients sounds like my kind of project!
★★★★
I’ve been wanting to make a quick dessert that feels fancy. The 30-minute promise and that chocolatey Hostess-style filling are exactly what I need.
★★★★
Finally a recipe that tackles that Hostess cupcake craving without taking all day! I’m definitely trying that marshmallow filling trick this weekend.
★★★★
I’ve been wanting a quick chocolate cupcake recipe for last-minute guests! The 30-minute promise is exactly what I need.
★★★★
Finally found a recipe that promises the Hostess cupcake taste! I’m gonna try it this weekend and see if it solves that 83% struggle.
★★★★
I’ve been craving a quick chocolate fix and 30 minutes is totally doable on a weeknight. That ganache swirl on top looks just like the real deal!
★★★★
I’ve been craving a quick chocolate fix and 30 minutes is totally doable. The ganache topping sounds like it makes them extra special.
★★★★
Love that you included a tip to prevent over-mixing the batter. I’m always nervous about that step, so that’s super helpful.
★★★★
Just found a recipe that might finally solve my chocolate cupcake struggles! The 30-minute promise is exactly what I need for last-minute treats.
★★★★
I’ve been craving a good chocolate cupcake but most recipes take forever. That 30-minute promise is exactly what I need for last-minute treats!
★★★★
Finally a recipe that promises to be quick and easy! I can’t wait to see if that chocolate ganache is as simple as it sounds.
★★★★
I’ve been craving a good chocolate cupcake but can’t handle a complicated recipe right now. That 30-minute promise is exactly what I need for a quick treat.
★★★★
Just found a recipe that actually tackles that Hostess-style filling! I can’t wait to see if that chocolate ganache method works as well as the original.
★★★★
Finally found a recipe that promises Hostess-style cupcakes without the fuss. That chocolate filling is exactly what I’ve been missing in my homemade versions.
★★★★
Finally a recipe that promises Hostess-style cupcakes in 30 minutes! I’m always intimidated by filled cupcakes, so the simplified method here is a lifesaver.
★★★★
I’ve been craving a quick chocolate fix and 30 minutes is totally doable. The ganache topping sounds like it makes them extra special.
★★★★
Finally found a recipe that promises those classic Hostess flavors at home! I can’t wait to see if that chocolate cake and marshmallow filling really come together in just 30 minutes.
★★★★
I’ve been craving a good chocolate cupcake but can’t handle complicated recipes. That 30-minute promise is exactly what I need for a weeknight treat.
★★★★
Finally found a recipe that promises to be quick and easy! I can’t wait to see if that chocolate ganache is as simple as it sounds.
★★★★
Love that you can get a Hostess-style treat in just 30 minutes! I’m always looking for a quick chocolate fix, and that ganache drizzle sounds perfect.
★★★★
Finally a recipe that tackles that tricky Hostess-style cupcake! I can’t wait to try that marshmallow filling technique this weekend.
★★★★
Finally a recipe that promises to be quick and actually looks doable! I’m always intimidated by copycat recipes, so seeing one ready in 30 minutes gives me hope.
★★★★
I’ve been craving a good chocolate cupcake but hate complicated recipes. That 30-minute promise is exactly what I need for a last-minute treat.
★★★★
Finally found a recipe that promises those classic Hostess flavors without taking all day. I’m definitely trying that marshmallow filling technique this weekend.
★★★★
Finally a recipe that promises to be quick! I can’t wait to try that chocolate frosting technique you mentioned.
★★★★
Saving this for my book club meeting next week! The promise of a 30-minute Hostess-style cupcake is exactly what I need when I’m short on time.
★★★★
I’ve been craving a quick chocolate fix and 30 minutes is totally doable on a weeknight. That ganache swirl on top looks just like the real thing!
★★★★
I’ve been craving a good chocolate cupcake but never have hours to bake. That 30-minute promise is exactly what I need for a last-minute treat.
★★★★
I’ve been craving a good homemade chocolate cupcake and 30 minutes is totally doable on a weeknight. That ganache swirl on top looks just like the real deal!
★★★★
I’ve been wanting a quick homemade version of those classic snack cakes! The 30-minute promise is exactly what I need for last-minute bake sales.
★★★★
I’ve been craving a quick chocolate fix and 30 minutes is totally doable. That ganache drizzle looks exactly like the classic Hostess kind.
★★★★
I’ve been craving a good chocolate cupcake that doesn’t take all afternoon. That 30-minute promise is exactly what I need for last-minute treats!
★★★★
Just found a recipe that might finally solve my Hostess cupcake craving! That 30-minute timeline is exactly what I need for last-minute treats.
★★★★
Just found a recipe that might solve my cupcake struggles! The 30-minute promise is exactly what I need for last-minute school events.
★★★★
I’ve been craving a quick chocolate fix and 30 minutes is exactly the kind of commitment I can handle. The ganache topping sounds like it makes them extra special.
★★★★
Just found a recipe that might solve my cupcake struggles! The 30-minute timeline is exactly what I need for last-minute treats.
★★★★
I’ve been craving a good copycat Hostess cupcake but thought they’d be too fussy. That 30-minute promise is exactly what I needed to see!
★★★★
Just found a recipe that tackles that 83% statistic head-on! I’m definitely trying that marshmallow filling technique this weekend.
★★★★
I’ve been craving a quick, classic chocolate cupcake and 30 minutes is perfect. Can’t wait to see how you get that signature Hostess-style filling in there!
★★★★
Finally found a recipe that promises Hostess-style cupcakes in 30 minutes! I’m gonna try that chocolate filling technique this weekend.
★★★★
Just found a recipe that actually tackles that Hostess cupcake craving! I’m so tired of the dry versions out there. Can’t wait to see if that chocolate cake hack really works.
★★★★
I’ve been wanting to make a quick dessert for book club, and 30 minutes is perfect. The chocolate ganache technique you mentioned sounds foolproof.
★★★★
Finally a recipe that promises to be quick and easy! I can’t wait to see how that chocolate ganache turns out in under 30 minutes.
★★★★
I’ve been craving a classic Hostess-style cupcake but thought they were too fussy to make. That chocolate filling technique is exactly what I’ve been searching for!
★★★★
I’ve been craving a good chocolate cupcake but can’t stand complicated recipes. The fact that these are ready in 30 minutes is exactly what I need for a last-minute treat.
★★★★
I’ve been wanting to make a copycat Hostess cupcake at home. That marshmallow filling and chocolate glaze you described sound exactly right.
★★★★
Finally a recipe that promises to be quick and easy! I can’t wait to try that chocolate frosting technique you mentioned.
★★★★
Finally a recipe that tackles that Hostess cupcake craving without taking all day! I’m definitely trying that marshmallow filling trick this weekend.
★★★★
Finally found a recipe that promises Hostess-style cupcakes without the hassle! That chocolate filling technique is exactly what I’ve been missing.
★★★★
I’ve been wanting to make a quick dessert for book club, and 30 minutes for a Hostess-style cupcake is perfect. That chocolate filling technique sounds like a game-changer.
★★★★
Finally a recipe that promises to be quick and easy! I can’t wait to see if that chocolate ganache is as simple as it sounds.
★★★★
Finally found a recipe that promises Hostess-style cupcakes without the fuss! That chocolate filling trick is gonna be a game-changer for my baking. Can’t wait to try it this weekend.
★★★★
I’ve been craving a good chocolate cupcake but most recipes seem so fussy. That 30-minute promise and the Hostess-style idea are exactly what I need.
★★★★
Finally found a recipe that promises to be quick and easy! I can’t wait to see if that chocolate ganache is as simple as it sounds.
★★★★
I’ve been craving a good chocolate cupcake that doesn’t take all afternoon. The promise of getting that Hostess-style treat in 30 minutes is exactly what I need.
★★★★
Finally a recipe that promises to be quick and easy! I’m always intimidated by copycat recipes, so seeing one ready in 30 minutes gives me hope I can actually make them.
★★★★
I’ve been craving a good copycat Hostess cupcake but thought they’d be too fussy. That ganache filling you described sounds totally doable in 30 minutes.
★★★★
I’ve been craving a good copycat Hostess cupcake but thought it would take hours. That chocolate ganache swirl is exactly what I needed to see!
★★★★
I’ve been wanting a quick chocolate cupcake recipe for last-minute guests. The fact that it’s ready in 30 minutes is a total game-changer for me.
★★★★
Finally a recipe that promises the Hostess cupcake taste! I can’t wait to see if that chocolate cake and cream filling really come together in just 30 minutes.
★★★★
Finally a recipe that promises Hostess-style cupcakes in 30 minutes! I’m definitely trying that marshmallow filling technique this weekend.
★★★★
I’ve been craving a quick chocolate fix and 30 minutes is totally doable on a weeknight. The ganache topping sounds way better than canned frosting.
★★★★
Just found a recipe that might finally crack the Hostess cupcake code! That 83% stat is so real, so I’m excited to see if your method is the trick.
★★★★
I’ve been craving a quick chocolate fix and 30 minutes is totally doable on a weeknight. The ganache technique you mentioned sounds like it’s gonna solve my usual frosting struggles.
★★★★
I’ve been craving a quick chocolate fix and 30 minutes is totally doable on a weeknight. That ganache drizzle looks exactly like the classic Hostess ones!
★★★★
Finally found a recipe that promises to be quick and easy! I’m definitely gonna try that chocolate frosting technique this weekend.
★★★★
Finally found a recipe that promises to be quick and easy! I can’t wait to see if that chocolate frosting is as simple as it sounds.
★★★★
I’ve been craving a quick chocolate fix and 30 minutes is totally doable. That ganache swirl on top looks just like the real thing!
★★★★
I’ve been craving a good chocolate cupcake but never have hours to bake. That 30-minute promise is exactly what I need for a weeknight treat!
★★★★
Finally a recipe that promises real Hostess-style cupcakes in 30 minutes! I’m gonna try that chocolate cake base with the creamy filling this weekend.
★★★★
I’ve been craving a quick chocolate fix and 30 minutes is totally doable on a weeknight. The ganache topping sounds way easier than I expected.
★★★★
I’ve been craving a good chocolate cupcake but most recipes take forever. That 30-minute promise is exactly what I need for a last-minute treat!
★★★★
I’ve been wanting a quick chocolate cupcake recipe for school bake sales. The 30-minute promise is exactly what I need.
★★★★
I’ve been wanting a quick chocolate cupcake recipe for after-school snacks. The 30-minute promise is exactly what I need on busy weekdays.
★★★★
Finally found a recipe that promises Hostess-style cupcakes in 30 minutes! I can’t wait to see if that chocolate filling is as good as the original.
★★★★
I’ve been craving a quick chocolate fix and 30 minutes is totally doable on a weeknight. That ganache drizzle in the photo looks just like the real deal!
★★★★
I’ve been craving a quick chocolate fix and 30 minutes is totally doable on a weeknight. That ganache drizzle in the picture looks absolutely perfect.
★★★★
Saving this for my next potluck! That 30-minute promise is exactly what I need, and I can’t wait to see if these really taste like the classic snack.
★★★★
I’ve been craving a good chocolate cupcake but never have hours to spare. The fact that these are ready in 30 minutes is exactly what I need for a last-minute treat.
★★★★
I’ve been craving a quick chocolate fix and 30 minutes is totally doable on a weeknight. The ganache topping sounds way better than canned frosting.
★★★★
I’ve been craving a good chocolate cupcake that doesn’t take all afternoon. The promise of that classic Hostess style in 30 minutes is exactly what I needed to see today.
★★★★
Finally a recipe that promises a quick chocolate fix! I’m always skeptical of the “ready in 30 minutes” claim, but your method sounds totally doable for a weeknight treat.
★★★★
I’ve been craving a quick chocolate fix and 30 minutes is exactly the commitment I have. That ganache swirl on top looks just like the real thing!
★★★★
I’ve been craving a good chocolate cupcake but always get intimidated by complicated recipes. The fact that these are ready in 30 minutes is a total game-changer for a weeknight treat.
★★★★
I’ve been craving a good copycat Hostess cupcake! That marshmallow filling is the key, and I’m glad it’s included here. Gonna try these for my kid’s lunchbox treats.
★★★★
I’ve been craving a good chocolate cupcake but can’t handle complicated recipes. The 30-minute promise and that “Hostess” style filling have me totally sold.
★★★★
I’ve been craving a quick chocolate fix and 30 minutes is totally doable. The ganache technique you mentioned sounds way easier than I thought it would be.
★★★★
I’ve been craving a good chocolate cupcake but most recipes seem so fussy. That 30-minute promise and the simple ingredients are exactly what I need.
★★★★
I’ve been craving a good chocolate cupcake but most recipes take forever. That 30-minute promise is exactly what I need for a weeknight treat.
★★★★
Finally found a recipe that promises Hostess-style cupcakes without the hassle. That chocolate filling is exactly what I’ve been missing in my homemade versions.
★★★★
Finally found a recipe that promises a quick chocolate fix! I can’t wait to see if that 30-minute time holds true for my oven.
★★★★
Just found a recipe that might crack the 83% struggle statistic! The promise of a Hostess-style cupcake in 30 minutes is exactly what I need for last-minute treats.
★★★★
Just found a recipe that might finally solve my Hostess cupcake craving! The 30-minute promise is exactly what I need for last-minute treats.
★★★★
Saving this for my next potluck! That 30-minute promise is exactly what I need, and I can’t wait to see if the frosting technique really is that easy.
★★★★
I’ve been craving a good chocolate cupcake but can’t handle complicated recipes. The promise of that classic Hostess-style filling in just 30 minutes is exactly what I need.
★★★★
I’ve been wanting to make a copycat Hostess cupcake at home! That chocolate cake base and marshmallow filling sound spot-on.
★★★★
Finally found a recipe that promises Hostess-style cupcakes in 30 minutes! I’m gonna try that marshmallow filling technique this weekend.
★★★★
Just found a recipe that might finally crack that Hostess cupcake code! The 30-minute promise is exactly what I need for last-minute school events.
★★★★
I’ve been craving a good chocolate cupcake but never have hours to bake. That 30-minute promise is exactly what I need for a weeknight treat!
★★★★
I’ve been wanting to make a quick homemade version of those classic snack cakes! The fact that these are ready in 30 minutes is a total game changer for my last-minute cravings.
★★★★
Just found a recipe that tackles that 83% statistic head-on! I’m definitely trying the chocolate glaze technique this weekend.
★★★★
Finally found a recipe that promises Hostess-style cupcakes without the fuss! That chocolate filling is exactly what I’ve been missing in my homemade versions. Can’t wait to try this after work tonight.
★★★★
Finally found a recipe that promises Hostess-style cupcakes without the all-day project! That chocolate filling technique is exactly what I’ve been missing. Can’t wait to surprise my kids with these after school.
★★★★
Finally found a recipe that promises to be quick and easy! I can’t wait to see if that chocolate ganache really comes together in just 30 minutes.
★★★★
Saving this for my book club meeting next week! That chocolate glaze looks exactly like the classic Hostess kind, and I can’t believe it’s ready so fast.
★★★★
I’ve been wanting to make a copycat Hostess cupcake at home! That marshmallow filling and chocolate ganache glaze sound spot-on.
★★★★
Finally found a recipe that promises those classic Hostess flavors at home! I’m definitely trying that marshmallow filling technique this weekend.
★★★★
Just found a recipe that might crack the Hostess cupcake code! That 30-minute promise is exactly what I need for last-minute school events.
★★★★
Saving this for my book club meeting next week! The promise of a 30-minute Hostess-style cupcake is exactly what I need. Can’t wait to see if that chocolate filling is as good as the original.
★★★★
Finally a recipe that promises to be quick and easy! I’m always intimidated by bakery-style frosting, so the 30-minute timeline is a huge relief.
★★★★
I’ve been craving a good chocolate cupcake but never have hours to spare. That 30-minute promise is exactly what I need for a last-minute treat.
★★★★
I’ve been craving a good chocolate cupcake but can’t handle complicated recipes. That 30-minute promise and the simple ingredient list are exactly what I need.
★★★★
Just found a recipe that promises Hostess-style cupcakes in 30 minutes! I’m always skeptical of quick chocolate cake, but that timing has me intrigued.
★★★★
I’ve been craving a good copycat Hostess cupcake but thought they’d be too complicated. That chocolate filling trick is brilliant, and 30 minutes is totally doable.
★★★★
Finally a recipe that promises to be quick and actually looks doable! I’m always intimidated by copycat desserts, so the 30-minute timeline is a huge relief.
★★★★
Finally found a recipe that promises those classic Hostess cupcakes at home! I’m definitely trying that marshmallow filling technique this weekend.
★★★★
I’ve been craving a good chocolate cupcake but most recipes take forever. That 30-minute promise is exactly what I need for a last-minute treat.
★★★★
Saving this for my book club meeting tomorrow! That 30-minute promise is exactly what I need, and I can’t wait to see if the chocolate ganache turns out as glossy as yours.
★★★★
Wow, a chocolate cupcake that’s actually ready in 30 minutes? That’s a game changer for last-minute cravings!
★★★★
Perfect for when those chocolate cravings hit and I don’t have hours to spend in the kitchen! That 83% stat makes me feel better about my own cupcake flops.
★★★★
I’ve been craving those Hostess chocolate cupcakes for weeks, so seeing a 30-minute homemade version is a total game-changer. Can’t wait to try that creamy filling technique!
★★★★
Perfect for a last-minute bake sale – my kids would devour these. Love that it’s ready in 30 minutes with no fussy ingredients.
★★★★
I’ve been craving a good chocolate cupcake but hate complicated recipes. The fact that these are ready in 30 minutes is exactly what I need for a last-minute treat.
★★★★
I’ve been craving a quick chocolate fix and 30 minutes is totally doable. That ganache swirl on top looks just like the real deal.
★★★★
Finally found a recipe that promises Hostess-style cupcakes without the hassle! That chocolate filling technique is exactly what I’ve been missing. Can’t wait to try them this weekend.
★★★★
Finally found a recipe that promises the Hostess cupcake magic in 30 minutes! I can’t wait to see if that chocolate cake and cream filling really come together that fast.
★★★★
I’ve been craving a good copycat Hostess cupcake but thought they were too fussy. That 30-minute promise is exactly what I needed to see!
★★★★
I’ve been craving a quick chocolate fix and 30 minutes is totally doable on a weeknight. That ganache drizzle is exactly what my box-mix cupcakes have been missing.
★★★★
I’ve been wanting to make a quick dessert for book club, and 30 minutes is perfect. The chocolate ganache technique you mentioned sounds foolproof.
★★★★
I’ve been craving a good chocolate cupcake but can’t handle complicated recipes right now. That 30-minute promise is exactly what I need for a quick treat after the kids’ bedtime.
★★★★
Finally a recipe that promises the Hostess cupcake taste without the struggle! That chocolate filling technique is exactly what I’ve been missing.
★★★★
Saving this for my book club meeting this weekend! That 30-minute promise is exactly what I need, and I can’t wait to see if I can finally nail that classic Hostess-style filling.
★★★★
I’ve been craving a good chocolate cupcake but can’t handle complicated recipes right now. That 30-minute promise is exactly what I need for a quick treat.
★★★★
Just found a recipe that might solve my cupcake struggles! The 30-minute timeline is exactly what I need for last-minute treats.
★★★★
I’ve been wanting to make a quick dessert for book club, and 30 minutes is perfect. That chocolate glaze technique sounds like the key to getting that classic Hostess look right.
★★★★
I’ve been craving a quick chocolate fix and 30 minutes is totally doable. That ganache swirl on top looks just like the real deal.
★★★★
I’ve been wanting to make a quick, impressive dessert for book club. The 30-minute promise and that chocolate frosting are exactly what I need.
★★★★
Saving this for my daughter’s bake sale next week! That 30-minute promise is exactly what I need, and I can’t wait to see if the frosting technique really is that easy.
★★★★
I’ve been craving that classic Hostess flavor without all the preservatives, so this 30-minute version sounds like a lifesaver. Can I use regular cocoa powder instead of Dutch-processed for the sponge?
★★★★
Wow, coffee in the cupcake batter to boost the chocolate flavor? That’s a real pro move I’ve gotta try this weekend
★★★★
I’ve been craving that classic Hostess flavor but didn’t want to deal with a complicated filling, so this 30-minute version sounds perfect.
★★★★
Wow, homemade Hostess cupcakes in 30 minutes? That’s a total game-changer for last-minute cravings!
★★★★
Wow, 83% of home bakers struggling to replicate hostess cupcakes—so glad this one promises to be easy and ready in 30 minutes!
★★★★
Thanks for showing me how to get that shiny, crackly top like the real Hostess cupcakes—my kids are gonna lose their minds when I make these!
★★★★
Type B: I’ve been craving that classic Hostess chocolate cupcake taste but didn’t want to deal with a complicated recipe. Thirty minutes and simple ingredients sound like exactly what I need for a quick chocolate fix.
★★★★
I’ve been craving a Hostess cupcake but didn’t want to buy a whole box. That 30-minute cook time is exactly what I needed for a quick chocolate fix on a busy weeknight!
★★★★
Wow, a chocolate cupcake in 30 minutes? That’s a game-changer for last-minute dessert emergencies!
★★★★
My kids are gonna lose their minds over these Hostess-style cupcakes. Thanks for sharing a version that’s actually doable in 30 minutes!
★★★★
Wow, 83% of home bakers struggle with that—glad this recipe cuts through the hassle with easy hostess-style cupcakes in just 30 minutes!
★★★★
Thank you for this recipe! I’ve been craving those nostalgic Hostess cupcakes but wanted something homemade without all the preservatives.
★★★★
Perfect for when that Hostess craving hits but you don’t want to leave the house! I’m definitely trying these this weekend.
★★★★
Wow, 83% of home bakers struggle with this? I’m gonna try these cupcakes tonight and see if I can beat the odds!
★★★★
My kids have been begging for Hostess cupcakes, and I’m definitely saving this to surprise them after school tomorrow.
★★★★
Wow, that 83% statistic for home bakers hits home—I’m definitely in that camp when it comes to getting that shiny, smooth icing right. Love that this recipe keeps it simple enough for a weeknight treat.
★★★★
Just found a recipe that actually tackles the 83% struggle stat! Gonna try these for my kid’s bake sale, the 30-minute claim is exactly what I need.
★★★★
Wow, that 83% stat is wild because I’m definitely one of them—can’t wait to try this shortcut for those hostess-style cupcakes with the creamy center!
★★★★
I’ve been craving that classic Hostess cupcake taste without a complicated recipe, and 30 minutes sounds almost too good to be true. That cream filling is what I’m really after—hope it comes together as easily as the cake part!
★★★★
Wow, 83% of home bakers struggle? I’m definitely in that camp, so this 30-minute Hostess cupcake hack sounds like my new go-to for when a sweet tooth strikes fast.
★★★★
Gratitude – Thanks for the genius tip about using sour cream to keep the cupcakes moist—I’m always battling dry cakes and that’s a total game-changer!
★★★★
I’ve been craving Hostess cupcakes but didn’t want to deal with a complicated recipe. Can’t wait to try these with my kids this weekend, especially since they turn out in just 30 minutes!
★★★★
Wow, 83% of home bakers struggle with this? I’m definitely trying these cupcakes now to see if I can beat the odds.
★★★★
Wow, that 83% stat is spot on—I’ve definitely struggled getting that shiny top on my homemade Hostess cupcakes before!
★★★★
Wow, real talk about how hard it is to get that iconic Hostess flavor—83% is a crazy stat! I’ve definitely had my share of flat failures, so I’m all in for this simplified 30-minute hack, especially if it nails that creamy center.
★★★★
Wow, 83% of home bakers struggle with these? I’m definitely saving this for my next party—bet the secret is in the batter technique.
★★★★
Wow, 83% of home bakers struggle with copycat recipes? I’m definitely trying these chocolate cupcakes for my next last-minute dessert emergency.
★★★★
Wow, a classic hostess-style cupcake in just 30 minutes? That’s my kind of shortcut!
★★★★
Perfect for a last-minute party treat, and I love that they’re done in 30 minutes! That 83% stat makes me feel better about my own cupcake fails, so I’m definitely trying these.
★★★★
Wow, 83% of home bakers struggle to replicate Hostess cupcakes and this one’s ready in 30 minutes – count me in for that shortcut! Can’t wait to try that creamy filling trick.
★★★★
Wow, 83% of home bakers struggle with hostess cupcakes? That statistic makes me feel way better about my past failed attempts, so I’m definitely trying this 30-minute version tonight!
★★★★
Has anyone tried making these with a cream cheese filling in the middle? I’m always nervous about messing up the cupcake-to-frosting ratio.
★★★★
Family game night just got a whole lot sweeter! My kids are gonna go crazy for these hostess-style cupcakes, especially if I sneak some extra cream filling inside.
★★★★
Type D: Vanilla extract is always the secret weapon in homemade cupcakes! Can’t wait to try this shortcut version when I’m craving that Hostess fix.
★★★★
Gratitude: Thank you for including the cream cheese filling trick—that’s what makes these taste just like the real Hostess ones, and I’m definitely trying it this weekend.
★★★★
Perfect for when I need a last-minute dessert and don’t want to spend all day in the kitchen. That 30-minute promise is exactly what I’m looking for.
★★★★
Perfect for when those Hostess cravings hit but I don’t want to make a trip to the store. Gonna use cocoa powder I already have in the pantry.
★★★★
Perfect for when I need a chocolate fix but don’t have hours to bake! That 30-minute timeline is exactly what I need on a busy weekday.
★★★★
Gratitude: Thanks for sharing a copycat Hostess recipe that actually looks doable in half an hour! I’m always skeptical of quick cupcake recipes, but that 83% stat makes me feel way better about my past fails.
★★★★
Wow, 83% struggle with homemade hostess treats, so I’m definitely trying this shortcut! Can’t beat that classic chocolate and cream filling combo in under half an hour.
★★★★
Just found a recipe that claims to beat store-bought Hostess cupcakes in 30 minutes – I’m definitely trying this for my kid’s bake sale this weekend! That cream filling better be spot-on.
★★★★
Just found a chocolate cupcake recipe that’s actually quick enough for weeknights. Gonna try these with a dollop of cream cheese frosting instead.
★★★★
My kids would lose it if I surprised them with homemade Hostess cupcakes. Can’t wait to try that filling technique!
★★★★
Wow, 83% of home bakers struggle with these? I’m definitely trying this shortcut version for my kid’s school bake sale—can’t beat homemade cupcakes in 30 minutes!
★★★★
Just found a recipe for those classic Hostess cupcakes! Swear I’ve been chasing that perfect creamy filling for years, so excited to try this.
★★★★
Perfect for when those store-bought cravings hit but you only have half an hour! Love that it skips the fussy piping and just uses a spoon for the filling.
★★★★
Wow, 83% of home bakers struggle to replicate these? I’m definitely in that camp, so I’m saving this Easy Hostess Chocolate Cupcakes recipe to finally nail that perfect creamy filling!
★★★★
Wow, 83% of home bakers struggle with this? Love that this recipe promises to fix that in just 30 minutes!
★★★★
Wow, 83% of home bakers struggle with these? I’m definitely trying this shortcut for my kid’s school bake sale.
★★★★
Wow, 83% of home bakers struggle to replicate Hostess cupcakes—so glad you cracked the code for a quick 30-minute version! I’m definitely trying these out for my kids’ after-school snack.
★★★★
Wow, a homemade Hostess cupcake in just 30 minutes? That’s genius for when the craving hits!
★★★★
Perfect for when you need a last-minute dessert and those store-bought Hostess cravings hit hard. Gonna try these with a little extra vanilla in the filling.
★★★★
Wow, 83% of home bakers have trouble with these, but 30 minutes for hostess cupcakes sounds like a total game-changer! I’m definitely trying that filling trick next time I need a quick treat.
★★★★
Gratitude: Thanks for tackling that 83% stat—so true! I’m definitely trying these for my next potluck.
★★★★
Wow, 83% of home bakers struggle with these? I’m definitely trying this shortcut for my next last-minute hostess gift.
★★★★
**Type C – Action:** Making these for the kids’ bake sale this weekend—love that they come together in just 30 minutes!
★★★★
Wow, 83% of home bakers struggle with that? I’m definitely trying these cupcakes this weekend since I can never get that creamy filling right.
★★★★
Perfect for those last-minute guests who need a chocolate fix! I’m definitely gonna whip up a batch my kids can help frost.
★★★★
Wow, 83% of home bakers struggle, so I’m glad this one actually promises to be simple. Probably gonna swap the oil for melted butter to get that rich Hostess flavor.
★★★★
Just found the trick to get that shiny chocolate crust without a bakery kitchen. The 30-minute timeline is exactly what I need for last-minute cravings.
★★★★
Wow, 83% of home bakers struggle with replicating these? I’m definitely saving this for when I need a quick chocolate fix without the fuss.
★★★★
Perfect for Sunday baking with the kids—that 30-minute promise is a lifesaver! Love that it’s got that classic Hostess look without all the fancy equipment.
★★★★
I’ve been craving that Hostess chocolate cupcake taste forever, and 30 minutes is a game-changer!
★★★★
Saving this for when I need a quick dessert fix—30 minutes is a game changer for homemade cupcakes. I’m definitely gonna try the shortcut for the frosting.
★★★★
Wow, 83% of home bakers struggle to replicate Hostess cupcakes, so I’m thrilled this one promises to be easy and ready in 30 minutes! I’m definitely trying this for my kids’ after-school snack—bet they won’t even know it’s homemade.
★★★★
Saving this for when that chocolate craving hits hard – 30 minutes for homemade hostess cupcakes sounds like a lifesaver.
★★★★
Perfect for a last-minute dessert that looks way more impressive than it actually took to make. I’m definitely gonna try these for my next game night.
★★★★
Wow, 83% of home bakers struggling to replicate these? I’m definitely trying this easy 30-minute version to see if I can finally nail those chocolate cupcakes without the hassle.
★★★★
Has anyone tried these without the cream filling to make them more like little cakes instead? I’m thinking they’d still be super moist and chocolaty.
★★★★
Wow, 83% of home bakers struggle with the same thing I do—so glad this recipe breaks it down! Can’t wait to try the frosting technique for that classic twirl.
★★★★
Wow, 83% struggle with hostess cupcakes? That makes me feel better about my past attempts, but this recipe sounds like it actually works without the fuss.
★★★★
Wow, 83% of home bakers can’t get these right? I’m definitely gonna try that shortcut in the frosting to see if it really cuts down the time.
★★★★
Saving this for when I need a quick dessert that actually looks impressive. That 30-minute promise has me sold.
★★★★
Saving this for when I need a quick dessert fix—30 minutes for chocolate cupcakes that look that good? That’s a game changer for busy weeknights.
★★★★
Wow, 83% of home bakers struggle with these, so I’m definitely giving this easy 30-minute version a shot for my next last-minute hostess gift!
★★★★
Wow, cream cheese in the filling to get that tangy center? That’s such a smart shortcut for that classic Hostess taste.
★★★★
Wow, 83% of home bakers struggling to recreate Hostess cupcakes? I’m definitely saving this for when my sweet tooth hits later tonight.
★★★★
I’ve been craving those Hostess cupcakes but didn’t want to deal with a complicated recipe, so this is exactly what I needed. Can’t believe they’re ready in 30 minutes!
★★★★
Saving this for my next party – that 83% stat makes me feel better about my failed attempts! Gonna try these with a cream cheese filling instead of the standard buttercream.
★★★★
Wow, 83% of home bakers struggle to replicate Hostess cupcakes? I’m definitely in that camp, so I’m trying this quick 30-minute version this weekend.
★★★★
Wow, easy hostess cupcakes in 30 minutes is exactly what I need for my kid’s bake sale tomorrow!
★★★★
Wow, that 83% statistic is so true—getting that shiny, crack-free cupcake top is always my struggle. Can’t wait to try this quick version with the simple cocoa frosting for last-minute dessert emergencies
★★★★
Wow, 83% of home bakers struggle to replicate that iconic Hostess treat?! I’m definitely saving this for the next time I need a quick dessert fix.
★★★★
Wow, 83% of home bakers struggle with that? I’m definitely guilty of trying to get that swirl right, so these easy hostess cupcakes sound like a lifesaver.
★★★★
Wow, 83% of home bakers struggle with this? Glad I found a recipe that promises to get those iconic hostess cupcakes done in just 30 minutes!
★★★★
Thank you for sharing this! I’m always hunting for a quick cupcake fix, and 30 minutes sounds perfect for a last-minute treat.
★★★★
Wow, 83% of home bakers struggle with copycat recipes? I’m definitely trying these Easy Hostess Cupcakes this weekend—hoping the 30-minute promise holds up.
★★★★
I’ve been craving that classic Hostess flavor without all the preservatives, and 30 minutes sounds like a miracle. Definitely trying these for my kids’ after-school snack this week.
★★★★
Type E – Timing: Perfect for when I’m short on time but still want to impress guests with something homemade! That 30-minute promise is exactly what I need on busy days when I’m craving a chocolate cupcake fix.
★★★★
Wow, homemade Hostess cupcakes in just 30 minutes? That’s a game changer for last-minute treats!
★★★★
I’ve been craving something just like this—chocolate cupcakes filled with cream. Perfect for when I need a quick fix.
★★★★
Saving this for when I need a quick chocolate fix—30 minutes for homemade Hostess cupcakes is a game changer. That creamy filling is exactly what I’ve been craving!
★★★★
Wow, 83% of home bakers struggle with this? I’m glad this recipe is supposed to be easy—definitely gonna try these for my next last-minute potluck.
★★★★
Wow, 83% of home bakers struggle with this? I’m totally trying this hack for those fluffy cupcakes with the creamy swirl on top.
★★★★
Wow, that 83% stat totally got me – I’ve definitely been one of those bakers struggling to get that perfect frosting swirl! Can’t wait to try this shortcut version for my kid’s classroom party.
★★★★
Just found a recipe for those Hostess cupcakes without all the weird preservatives. I’m gonna try these for my daughter’s bake sale.
★★★★
Just found a copycat for those classic Hostess cupcakes! I’m totally trying this for my kid’s school bake sale next week.
★★★★
Wow, ready in 30 minutes and they’re supposed to taste just like Hostess? That’s a game changer for last-minute dessert emergencies!
★★★★
My husband would absolutely flip for these, especially since they come together in just 30 minutes.
★★★★
I’ve been craving those iconic Hostess cupcakes but wanted a homemade version, and this 30-minute fix sounds perfect. The chocolate filling and signature white swirl are exactly what I’m after for a quick treat this weekend.
★★★★
Wow, 30 minutes for hostess-style cupcakes? That’s exactly the kind of shortcut I need when a chocolate craving hits.
★★★★
I’ve been craving those Hostess chocolate cupcakes for weeks, so I’m definitely trying this 30-minute version! The 83% statistic makes me feel better about my past failed attempts.
★★★★
My kids are gonna lose their minds over these copycat Hostess cupcakes. Can I use cream cheese in the filling instead of shortening?
★★★★
Saving this for when I need a quick dessert fix—30 minutes and done, that’s my kind of baking! Can’t wait to try the hostess-style frosting trick.
★★★★
Wow, 83% of home bakers struggling with this classic treat—I’m definitely one of them! That cocoa powder trick in the batter sounds like exactly what I’ve been missing to get that Hostess-style flavor.
★★★★
Perfect for a last-minute dessert craving, and I love that it doesn’t require a ton of fancy equipment to pull off!
★★★★
Wow, heavy cream in the cupcake batter itself? That’s gotta make these way more moist than the boxed version—I’m totally trying that trick next time I need a quick dessert.
★★★★
Thanks for sharing a shortcut to those nostalgic Hostess cupcakes—that creamy filling is what I’ve been craving!
★★★★
Saving this for when my kids want a treat that looks fancy but doesn’t take all day. I’m always looking for a quick shortcut to get that creamy filling in the middle.
★★★★
Saving this for my next potluck—I’m always looking for that perfect Hostess copycat, and 30 minutes is a game changer.
★★★★
Wow, that 83% statistic is spot-on – I’ve definitely been one of those bakers struggling with hostess-style cupcakes. Love that this promises to be ready in 30 minutes, might finally give me the courage to try replicating those cream-filled centers.
★★★★
Wow, 83% of home bakers struggle with this? That’s wild, but 30 minutes for hostess cupcakes sounds like a game changer for a last-minute craving.
★★★★
Wow, 83% of home bakers struggle with this, so I’m definitely trying these Easy Hostess Cupcakes! Saving this for when I need a quick chocolate fix without all the fuss.
★★★★
Type H – Question: Can I swap the milk for buttermilk to make these even more moist, or would that mess with the texture?
★★★★
**Type D – Specific ingredient:** Cream cheese in the frosting sounds like the perfect tangy balance to all that cocoa. Can’t wait to try this for my kid’s bake sale this weekend
★★★★
Just found a recipe that actually sounds doable for a weeknight dessert! Love that I don’t need fancy ingredients for those chocolate cupcakes.
★★★★
Perfect for when those Hostess cravings hit but you don’t wanna run to the store! I’m definitely trying these this weekend.
★★★★
Thanks for including the tip about not overmixing the batter – that’s usually where I mess up cupcakes. Can’t wait to try these for my kid’s after-school snack today!
★★★★
I’ve been craving those little packaged chocolate cupcakes and this copycat sounds doable. Making these for my kid’s snack this week!
★★★★
Wow, 83% of home bakers struggle with Hostess cupcakes—glad this one promises to be ready in 30 minutes! Totally gonna try that creamy filling trick myself.
★★★★
Wow, only 30 minutes for hostess-style cupcakes? That’s gonna save me so much time when I’m craving that creamy filling and chocolate frosting!
★★★★
Has anyone tried swapping the cream cheese filling for something like peanut butter? I’m always looking for shortcuts and 30 minutes sounds too good to pass up.
★★★★
Just found a recipe for those Hostess cupcakes I’ve been craving without spending all day in the kitchen. That 30-minute timeline is exactly what I need for a quick chocolate fix!
★★★★
Wow, 83% of home bakers struggle with copycat recipes, so having one that’s ready in 30 minutes is a lifesaver! I’m definitely trying these Hostess cupcakes for my next potluck.
★★★★
Wow, 83% of home bakers struggle with these? I’m definitely trying this shortcut for the cream filling.
★★★★
Perfect for a last-minute hostess gift—those copycat Hostess cupcakes are my weakness. I’m definitely trying these for our next potluck.
★★★★
Wow, 83% of home bakers struggle to replicate Hostess cupcakes? I’m definitely part of that statistic, so I’m trying this 30-minute version asap. Can’t beat that shortcut for a chocolate craving!
★★★★
Wow, 83% of home bakers struggling with hostess cupcakes? That’s wild, I’m definitely saving this because my kids beg me for the store-bought ones all the time.
★★★★
Saving this for the next time I need a quick chocolate fix—love that it’s supposed to be ready in 30 minutes.
★★★★
Just found this and I’m obsessed – 30 minutes for homemade hostess cupcakes is exactly what I need for last-minute bake sale duty. Definitely using milk chocolate frosting instead of the usual buttercream.
★★★★
Saving this for when I need a quick dessert fix—30 minutes for homemade hostess cupcakes is a game changer. Can’t wait to try that creamy filling!
★★★★
Wow, 83% of home bakers struggle to replicate Hostess cupcakes, so I’m definitely trying this 30-minute version this weekend!
★★★★
Gratitude: Thanks for sharing this—83% of home bakers struggling to replicate these is wild, so I’m thrilled to have a shortcut. Gonna try these for my kid’s bake sale this weekend.
★★★★
I’ve been craving that Hostess cupcake flavor but never thought I could pull it off at home. Making these for my kid’s bake sale this weekend!
★★★★
Saving this for my next bake sale—83% of home bakers struggling to replicate something? I’m definitely on that list, so a 30-minute version sounds like a lifesaver.
★★★★
Saving this for when I need a last-minute dessert that looks fancy but doesn’t take all day! That 83% statistic is no joke, so I’m glad this one keeps it simple.
★★★★
Just found a copycat for those Hostess cupcakes I’ve been craving, and 30 minutes is my kind of bake time. Gonna try these for my kid’s snack this weekend!
★★★★
Perfect for a last-minute dessert craving when you need something sweet fast! And that 30-minute promise for homemade Hostess cupcakes is exactly what I need.
★★★★
Perfect for when those chocolate cravings hit but you don’t have hours to bake. I bet the 83% stat is because most recipes overcomplicate it, but this one sounds straightforward.
★★★★
Wow, 83% of home bakers struggle with this but you cracked the code—gotta love a chocolate cupcake that looks fancy without taking all afternoon. I’m definitely trying these for my next potluck.
★★★★
Wow, that 83% stat got my attention! I’ve been hunting for a reliable homemade version of those nostalgic Hostess treats, and this 30-minute promise is exactly what I need for my kids’ lunchboxes this week.
★★★★
Wow, that 83% stat is totally me with chocolate cupcakes—definitely trying this easy version to get that perfect Hostess copycat!
★★★★
Finally found a recipe for those hostess-style cupcakes that actually looks doable in under an hour. Can’t wait to try that creamy filling trick!
★★★★
I’ve been craving those Hostess-style cupcakes forever and this 30-minute version sounds perfect. Definitely gonna try using the pudding in the filling like you suggest!
★★★★
Saving this for when I need a quick dessert—83% of bakers struggling with copycats makes me feel seen! Love that it’s ready in 30 minutes.
★★★★
Wow, 83% of home bakers struggle, so I’m glad this recipe promises to crack the code on those Hostess cupcakes! I’m totally trying this for my kid’s bake sale next week—cream filling and chocolate frosting in 30 minutes sounds like a lifesaver.
★★★★
I’ve been craving that classic Hostess cupcake taste without the hassle, and 30 minutes is exactly what I need. Can I use regular cocoa powder instead of the Dutch-processed kind you mentioned?
★★★★
Just found a recipe that finally cracks the code on those iconic chocolate cupcakes with the cream filling. Can’t wait to try the trick for piping that marshmallowy center without it oozing out everywhere.
★★★★
Type C – Action: “Making these for the book club this weekend—that 83% stat is wild, but this looks so much simpler than the real deal. Love that it’s only 30 minutes!”
★★★★
Wow, 83% of home bakers struggle with these? I’m definitely giving this 30-minute shortcut a go for my next last-minute get-together!
★★★★
Finally a recipe for those copycat Hostess cupcakes that doesn’t look like a total science project. I’m definitely trying this for my kid’s bake sale, and that filling looks way easier than I thought it’d be.
★★★★
Wow, only 30 minutes for homemade Hostess cupcakes? That’s brilliant for a last-minute party treat!
★★★★
Wow, 30 minutes for homemade Hostess cupcakes? That’s a major win when you’re craving that classic chocolate and cream combo but don’t want to spend all day in the kitchen. I’m definitely trying this with a little extra marshmallow fluff in the center!
★★★★