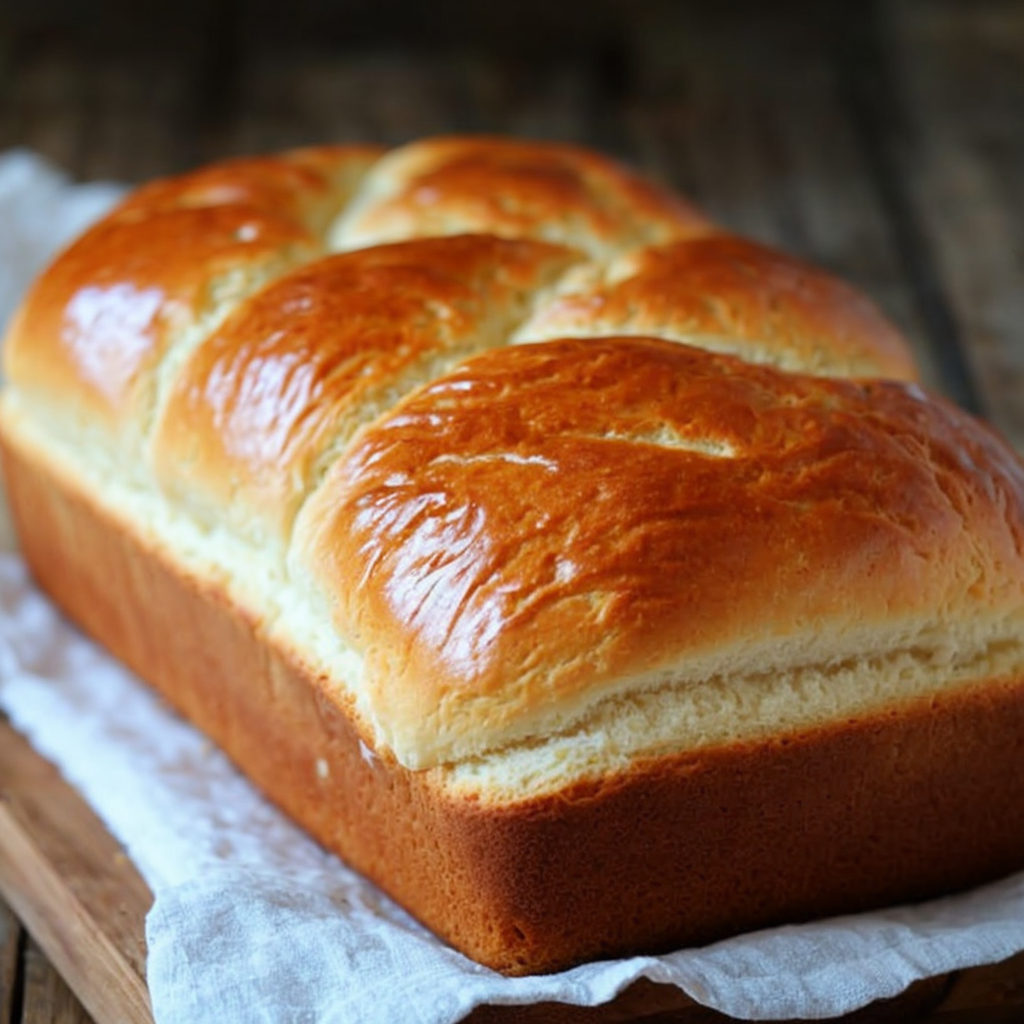
Easy Milk Bread Loaf – Ready in 30 Minutes
Easy Milk Bread Loaf – Ready in 30 Minutes: Soft and Fluffy Delight
Milk bread is the epitome of comfort with its rich taste and pillowy softness. This Easy Milk Bread Loaf can be made at home and requires minimal effort. In just 30 minutes, you can fill your kitchen with the irresistible aroma of freshly baked bread. Whether you’re seeking a satisfying snack or a perfect side for soup, this milk bread will surely win over your taste buds. The creamy flavor makes it a versatile base for both sweet and savory toppings.
Quick Recipe Highlights
- Flavor Profile: This milk bread boasts a subtle sweetness and a rich, creamy flavor that’s enhanced by the warmth of baking.
- Texture: Expect a soft, delicate crumb with just the right amount of chew – it’s light yet satisfying.
- Aroma: As it bakes, anticipate a buttery aroma mixed with a hint of sweetness permeating your kitchen.
- Visual Appeal: The loaf rises with a golden brown crust, creating a beautiful contrast with its snow-white interior.
- Skill Level Needed: Beginner-friendly, this recipe employs simple techniques, perfect for novice bakers.
- Special Equipment: A standard loaf pan is essential to give the bread its classic shape.
Recipe Overview
- Difficulty Level: The ease of this recipe comes from its straightforward ingredients and lack of tricky techniques. It’s perfect for those looking to try bread-making without the intimidation factor.
- Category: Ideal as a breakfast staple, snack, or a side dish to complement any meal.
- Cuisine: Rooted in Asian culinary traditions, milk bread is celebrated for its soft texture and sweet flavor.
- Cost: Affordable, as the ingredients are common pantry items, making it easy on the budget.
- Season: Milk bread is a year-round favorite, though it particularly shines during colder months, providing warmth and comfort.
- Occasion: Suitable for everyday meals but also special enough for holidays and festive gatherings.
Why You’ll Love This Recipe
The taste and texture appeal of this Easy Milk Bread Loaf is unmatched. Its creamy flavor pairs perfectly with just about anything, from a simple spread of butter to a dollop of jam. The texture is airy yet firm, making each bite immensely satisfying.
The convenience and preparation benefits cannot be overstated. With a 5-minute prep time, this recipe is easy to incorporate into any meal plan, requiring little more than mixing and waiting for it to bake.
Nutritionally, milk bread offers essential carbs for energy and depending on any additional ingredients you opt for, can provide fiber as well.
Socially, this bread is perfect for entertaining or sharing with loved ones. Its communal nature brings people together, making it an excellent choice for brunches or potlucks.
Lastly, the cost-effectiveness and accessibility of the ingredients make it a staple in any household. Most items are readily available, allowing you to whip up a loaf without a special trip to the store.
Historical Background and Cultural Significance
Originating from Japan, milk bread, or ‘shokupan’, has been cherished for generations. Its roots trace back to the early 1900s, introduced through Western influences yet adapted to fit local tastes with its unique texture and flavor profile.
Culturally, milk bread reflects a blend of East meets West, merging traditional baking techniques with new flavors. It’s a testament to the global exchange of culinary ideas over time.
The evolution of this recipe has seen it adapt across various countries, with each adding its twist yet maintaining the core pliable and moist texture.
Regional variations showcase milk bread’s versatility, with some areas introducing fillings or using alternative milk products to tweak flavor and texture while staying true to its origins.
Ingredient Deep Dive
Flour is the foundational ingredient, crucial for structure. Opt for bread flour for a chewier texture, though all-purpose flour can work in a pinch. Store it in a cool, dry place to prevent moisture absorption, which can affect the dough.
Milk is integral, providing flavor and richness. Use whole or 2% milk for best results. When selecting milk, ensure it’s fresh for optimal taste and keep it chilled to prolong its life.
Yeast is the leavening agent, necessary for the bread’s rise. Use instant yeast for quicker results and check the expiration to ensure proper activation. Store in a dry place to maintain its potency.
Sugar not only adds sweetness but also aids yeast fermentation, enhancing rise. Brown sugar can be a substitute for a deeper flavor profile.
Butter enriches the dough, contributing to the softness of the final product. Opt for unsalted butter to control sodium levels in your loaf.
Common Mistakes to Avoid
- Overmixing the dough can lead to a dense loaf. Mix just until ingredients are combined to maintain softness.
- Underproofing can result in a poor rise and dense texture. Allow the dough to double in size for the best results.
- Incorrect yeast activation can prevent rise altogether. Ensure the yeast is fresh and properly mixed.
- Skipping the cooling period may result in a gummy interior. Allow the bread to cool before slicing.
- Using too much flour will lead to a dry loaf. Measure accurately and adjust as needed based on dough consistency.
- Inaccurate oven temperature can impact baking. Use an oven thermometer to ensure correct baking temperature.
- Not kneading enough leaves the bread without proper gluten development, affecting texture.
- Avoid storing the bread while still warm to prevent mold growth.
- Don’t rush the mixing process; ensure butter is fully incorporated for an even crumb.
- Avoid using cold ingredients as they can slow down yeast activity.
Essential Techniques
Kneading: This step develops gluten, crucial for the bread’s structure. Knead until the dough is smooth and elastic, which usually takes about 10 minutes by hand.
Proofing: Allow the dough to rise in a warm, draft-free environment for best results. Proper proofing ensures a light and airy texture.
Shaping: Gently shape the dough to fit your loaf pan without deflating its rise. This technique ensures even baking and a uniform shape.
Baking: Pay close attention to crust color and perform a tap test on the bottom of the loaf to check for doneness.
Cooling: Essential to prevent a gummy texture. Let the loaf cool on a wire rack to allow air circulation and complete the baking process.
Pro Tips for Perfect Easy Milk Bread Loaf
For an ultra-soft crust, brush the loaf with melted butter immediately after baking. This adds flavor and keeps the crust tender.
Experiment with different milk types, such as almond or soy milk, for a unique twist. They’ll alter the flavor profile slightly, offering exciting variations.
Use a serrated knife to slice the bread once fully cooled to ensure clean cuts without tearing the loaf.
Always weigh your flour for accuracy. Volume measurements can vary and affect dough consistency.
To test dough elasticity, perform the windowpane test: stretch a small piece of dough gently to see if it forms a thin, translucent membrane without tearing.
If you’re in a hurry, use a preheated oven (turned off) as a makeshift proofing box to speed up the rise time.
Include a small bowl of water in the oven to create steam, which aids in creating a softer crust.
Reheat slices briefly in an oven or toaster, which reinvigorates texture and enhances flavor.
Variations and Adaptations
To adapt this recipe for seasonal preferences, experiment with adding a touch of cinnamon and nutmeg during the holiday season.
For dietary needs, use lactose-free milk or a plant-based alternative and a vegan butter substitute.
Create a savory twist by incorporating fresh herbs like rosemary or thyme into the dough.
Add a layer of texture by including cranberries or nuts throughout the dough or atop the loaf.
Present uniquely by braiding the loaf or creating individual rolls instead of one large loaf.
Serving and Presentation Guide
To elevate presentation, dust the top with powdered sugar for an elegant look or glaze with a light syrup for sheen.
Serve milk bread alongside a flavorful jam or compound butter to contrast its mild taste.
For modern flair, try open-faced sandwiches with vibrant toppings like avocado or heirloom tomatoes.
Temperature matters; serve warm for optimal taste, though room temperature enhances flavor layers.
Cut smaller slices for portion control in meal settings, particularly for gatherings.
Wine and Beverage Pairing
Pair this milk bread with a light, fruity white wine such as a Riesling, which complements its sweetness without overwhelming.
For non-alcoholic alternatives, a sparkling fruit juice or cider matches the bread’s flavors effectively.
Hot drinks such as coffee or green tea can enhance the baked richness of the milk bread.
Ensure beverage temperatures contrast with the bread; a chilled drink pairs beautifully with a warm slice.
Consider garnishing drinks with complementary herbs like basil or mint for added cohesiveness.
Storage and Shelf Life
Store the loaf in a bread box or airtight container at room temperature to maintain freshness for up to three days.
To freeze, wrap slices tightly in foil or plastic wrap and place them in a freezer-safe bag. They remain fresh for up to a month.
Signs of spoilage include mold growth and off smells. Always inspect before consuming if stored over several days.
Reheating can be done in an oven set to 180°C (350°F) until warmed through.
If freezing slices, thaw in the refrigerator overnight before reheating or toasting for best texture.
Make Ahead Strategies
Prepare the dough a day in advance and allow it to rise slowly in the refrigerator for improved flavor complexity.
Store risen dough covered to prevent drying, and bring to room temperature before baking.
To retain quality, shape the loaf without deflating, and refrigerate until ready to bake.
Reheat baked slices in a low oven for a freshly-baked effect.
For added freshness, garnish with fresh berries or herbs after reheating.
Scaling Instructions
Halve the recipe for smaller servings or double for larger gatherings, adjusting ingredient quantities accordingly.
Use multiple loaf pans if scaling up to ensure even baking.
Extend baking time slightly for doubled recipes to account for increased dough volume.
Store leftover dough well-covered to prevent drying, and let it reach room temperature before baking.
Mind the weight of ingredients; precision ensures successful scaling.
Nutritional Deep Dive
This milk bread offers a balanced macronutrient profile, with carbohydrates providing energy, complemented by protein and fat from milk and butter.
It’s a good source of calcium, aiding bone health, and vitamin B, necessary for energy metabolism.
When enjoyed in moderation, the bread’s nutritional benefits align with maintaining a balanced diet.
Ideal for weight management when consumed as a part of a calorie-controlled meal plan.
Dietary Adaptations
For gluten-free needs, substitute a gluten-free all-purpose blend, noting changes in dough texture.
To make dairy-free, use almond milk and vegan butter, which offers a comparable taste and texture.
Create a vegan option by replacing milk with oat milk and using plant-based butter alternatives.
Low-carb variations can be attempted with alternative flours like almond or coconut, albeit with a different texture expectation.
Suitable for Keto adjustments when using respective compliant ingredients; guidance on texture and flavor expectation is essential.
For Paleo adaptations, explore almond flour mixed with tapioca starch, maintaining a similar texture.
Low-FODMAP considerations include lactose-free milk options and careful choice of sweeteners.
The Recipe
Easy Milk Bread Loaf
Serves: 1 loaf
Prep Time: 5 mins
Cook Time: 25 mins
Total Time: 30 mins
Kitchen Equipment Needed
- Loaf pan
- Mixing bowl
- Measuring cups
- Wooden spoon or spatula
- Wire rack
- Serrated knife (for slicing)
Ingredients
- 2 cups all-purpose flour
- 1/2 cup whole milk
- 1/4 cup sugar
- 2 tbsp unsalted butter, softened
- 1 packet instant yeast (about 2 1/4 tsp)
- 1/2 tsp salt
- 1 egg (optional, for brushing)
Directions
- Preheat your oven to 180°C (350°F). Grease a loaf pan or line it with parchment paper.
- In a mixing bowl, combine flour, sugar, salt, and yeast.
- Add in the milk and butter, mixing until a dough forms.
- Knead the dough for about 5 minutes or until smooth and elastic.
- Place the dough in the prepared loaf pan, covering with a cloth. Allow it to rise until doubled in size, about 15 minutes.
- Brush the top with beaten egg (if using) for a glossy finish.
- Bake for 25 minutes or until the top is golden brown and the loaf sounds hollow when tapped.
- Cool on a wire rack before slicing to serve.
Recipe Notes
- For a softer crust, brush the warm loaf with a little extra butter after baking.
- You can add a teaspoon of vanilla extract for an extra layer of flavor.
- Consider adding seeds or nuts on top for a crunchy texture.
Troubleshooting Guide
For texture issues, make sure yeast is active and dough is kneaded enough. If your bread is too dense, you may not have allowed enough time for the dough to rise.
Balance flavors by correctly measuring salt and sugar as directed. Too much salt can inhibit yeast activity, affecting rise.
Baking temperature can affect texture and rise. If your loaf is too hard, lower the temperature slightly in future attempts.
Should you encounter equipment challenges, try using a different loaf pan size or adjust baking time accordingly.
If ingredients are substituted, monitor dough consistency for any necessary adjustments.
Timing concerns could be due to uneven dough thickness; ensure consistent shaping.
Recipe Success Stories
Community feedback shows enthusiasm for its ease and delicious results, even among first-time bakers.
Variations have included adding spices or seeds for new flavor profiles, with readers experimenting and sharing successes.
Adaptation stories often revolve around dietary needs, showing flexibility for lactose-free or plant-based diets.
Reader suggestions include customization with garlic or cheese toppings for a savory twist.
Photography tips shared by the community stress the importance of natural lighting to enhance the bread’s golden hues.
Frequently Asked Questions
A: Absolutely, almond or soy milk are great substitutes that maintain the bread’s moisture and flavor.
Q: What if my bread doesn’t rise properly?
A: Check the yeast for freshness. It should be vigorous to ensure proper leavening, and make sure your proofing area is warm enough.
Q: How do I store leftover bread?
A: Place in an airtight container at room temperature for up to three days or freeze for longer storage.
Q: Can I add different flavors?
A: Yes, herbs, spices, or extracts can be added to the dough for a unique twist.
Q: Is it necessary to use an egg for the glaze?
A: No, it’s optional, for additional sheen. Milk or butter can be used alternatively.
Q: How to ensure even baking?
A: Preheat the oven fully and test doneness by tapping the bottom of the loaf for a hollow sound.
Q: Why is my bread’s crust too hard?
A: It may be overbaked. Shorten the baking time slightly next go, and apply a butter glaze right after baking.
Q: Can this recipe be made by hand?
A: Yes, all steps including kneading can be performed manually with a bit of elbow grease.
Q: What makes this bread so soft?
A: The combination of milk and butter in the dough creates the soft texture that milk bread is known for.
Q: Any tips on cutting bread without tearing it?
A: Use a serrated knife, and allow the bread to cool completely before slicing.
Q: How do I know if my dough has enough gluten development?
A: Perform a windowpane test by stretching a small dough piece into a thin, translucent film.
Q: Can this recipe be doubled or tripled?
A: Yes, adjust ingredients proportionally, and consider the need for multiple pans for even baking.
Additional Resources
Explore related recipes for buns and rolls which can offer similar flavor profiles with different uses.
Check out our technique guides for more advanced bread-making skills and tips.
Ingredient information provides insights into choosing the best flour and yeast for optimal results.
Discover equipment recommendations such as digital thermometers for precision baking.
Seasonal variations guide you in tailoring flavor profiles throughout the year, such as incorporating pumpkin in the fall.
Join the Conversation
Engage with us on social media by sharing your milk bread creations using #EasyMilkBreadLoaf. We love to see your adaptations!
Discuss photography tips to better catch the bread’s texture and color nuances, enhancing its visual appeal.
Submit recipe reviews and feedback in the comments section – your experiences help us refine and improve offerings.
Be part of the community, sharing variations or adaptations you’ve tried. Your input is vital for inspiring others.
Join the newsletter for the latest recipes, tips, and holistic baking guides, making your kitchen adventures even more rewarding.