Cheesy Garlic Chicken Wraps Recipe
Introduction
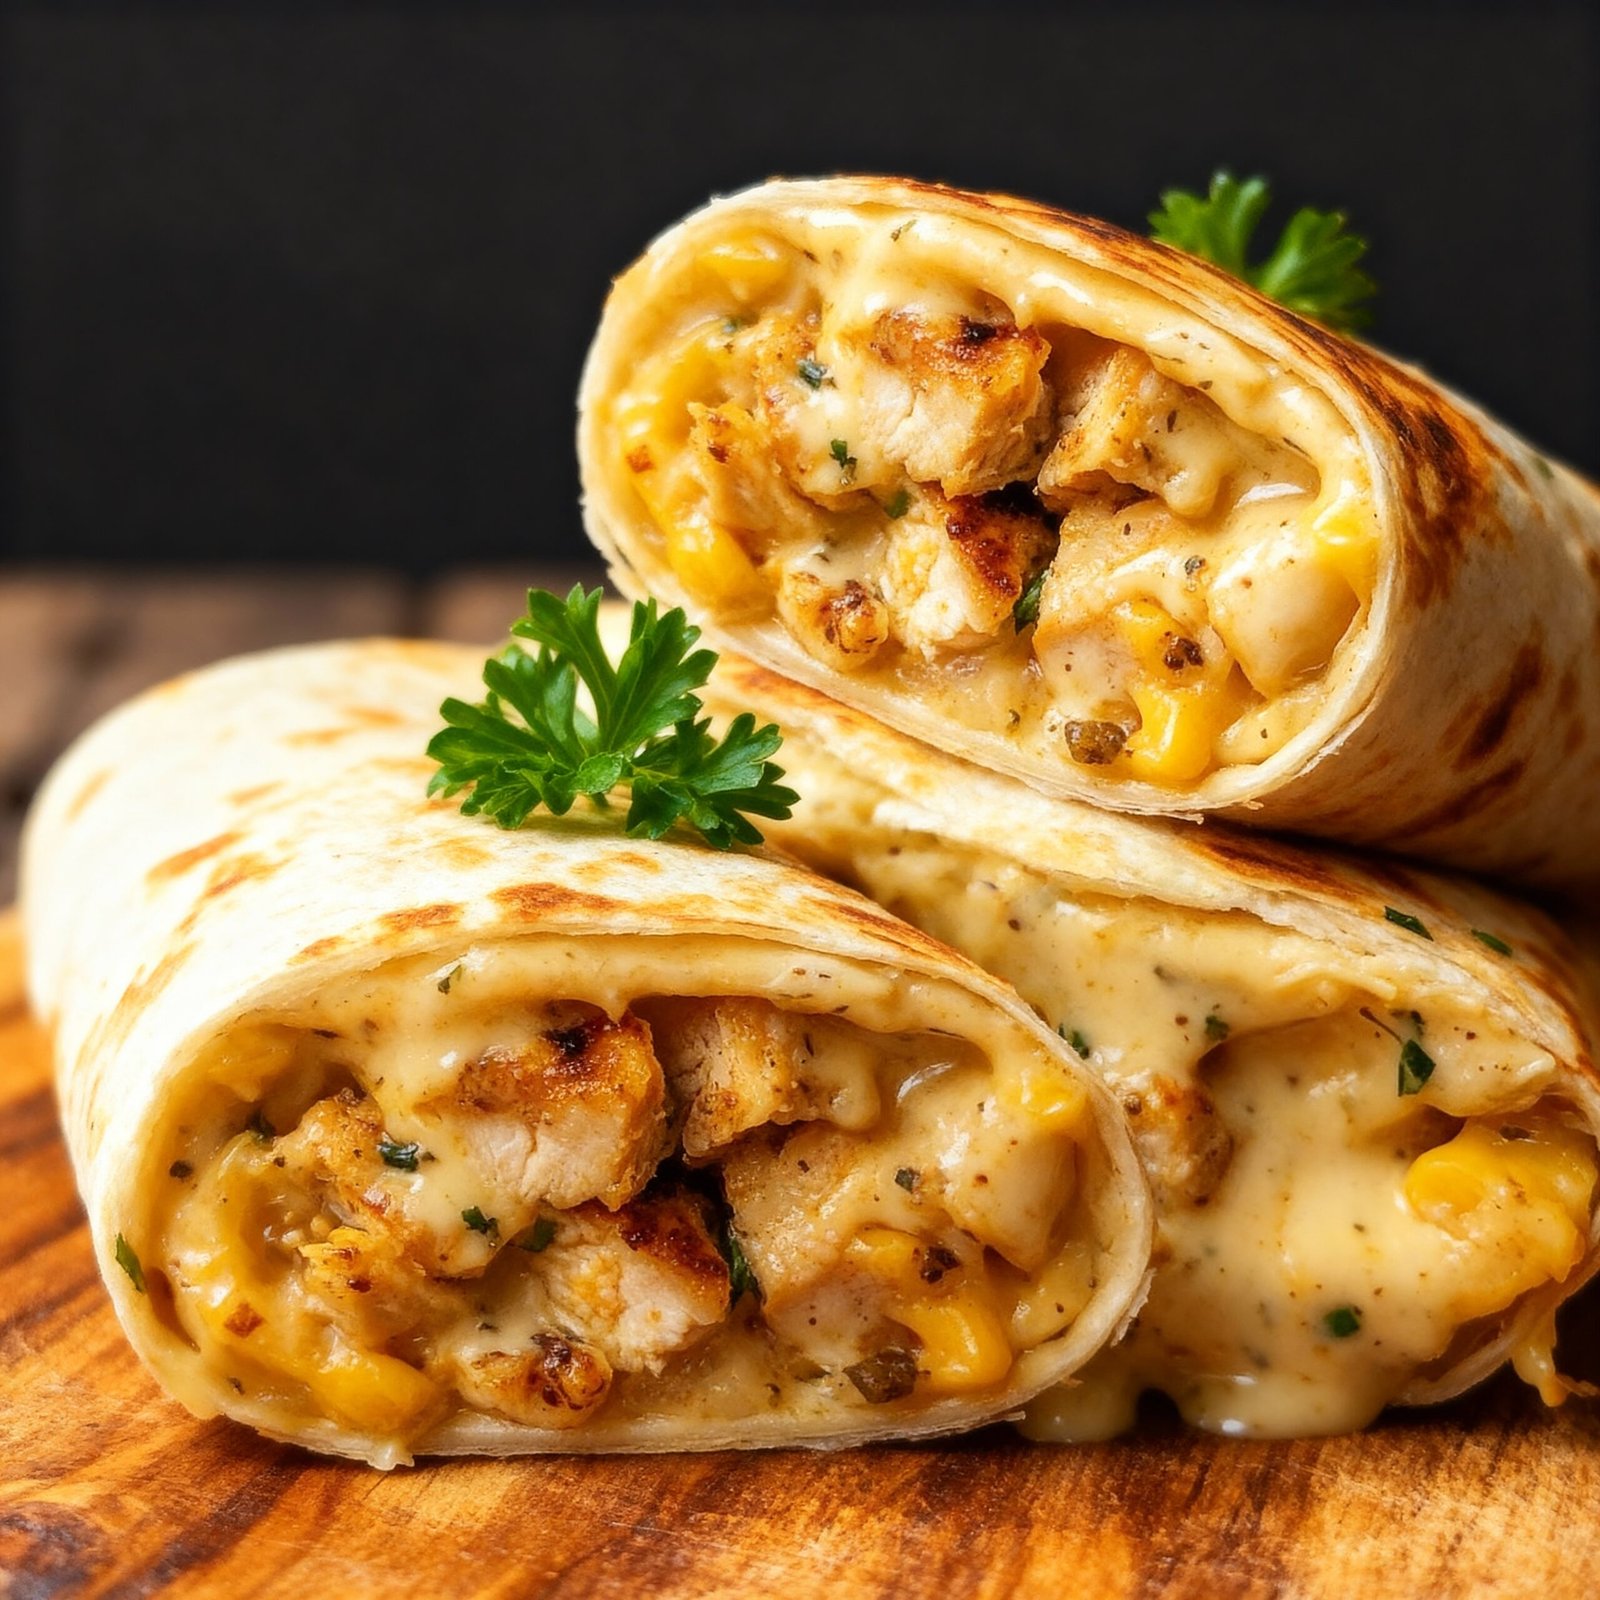
These Easy Cheesy Garlic Chicken Wraps are the perfect quick dinner solution, ready in just 20 minutes. Packed with savory chicken, melted cheese, and a garlicky kick, they deliver restaurant-quality flavor with minimal effort. If you enjoy this simple wrap, you might also like the Green Chile Chicken Burritos Recipe or the Texas Roadhouse Smothered Chicken Recipe for more easy chicken dinners.
Ingredients
These Cheesy Garlic Chicken Wraps combine tender, seasoned chicken with a rich, creamy garlic sauce and melted cheese, all wrapped in a soft tortilla for a satisfying meal that’s bursting with flavor.
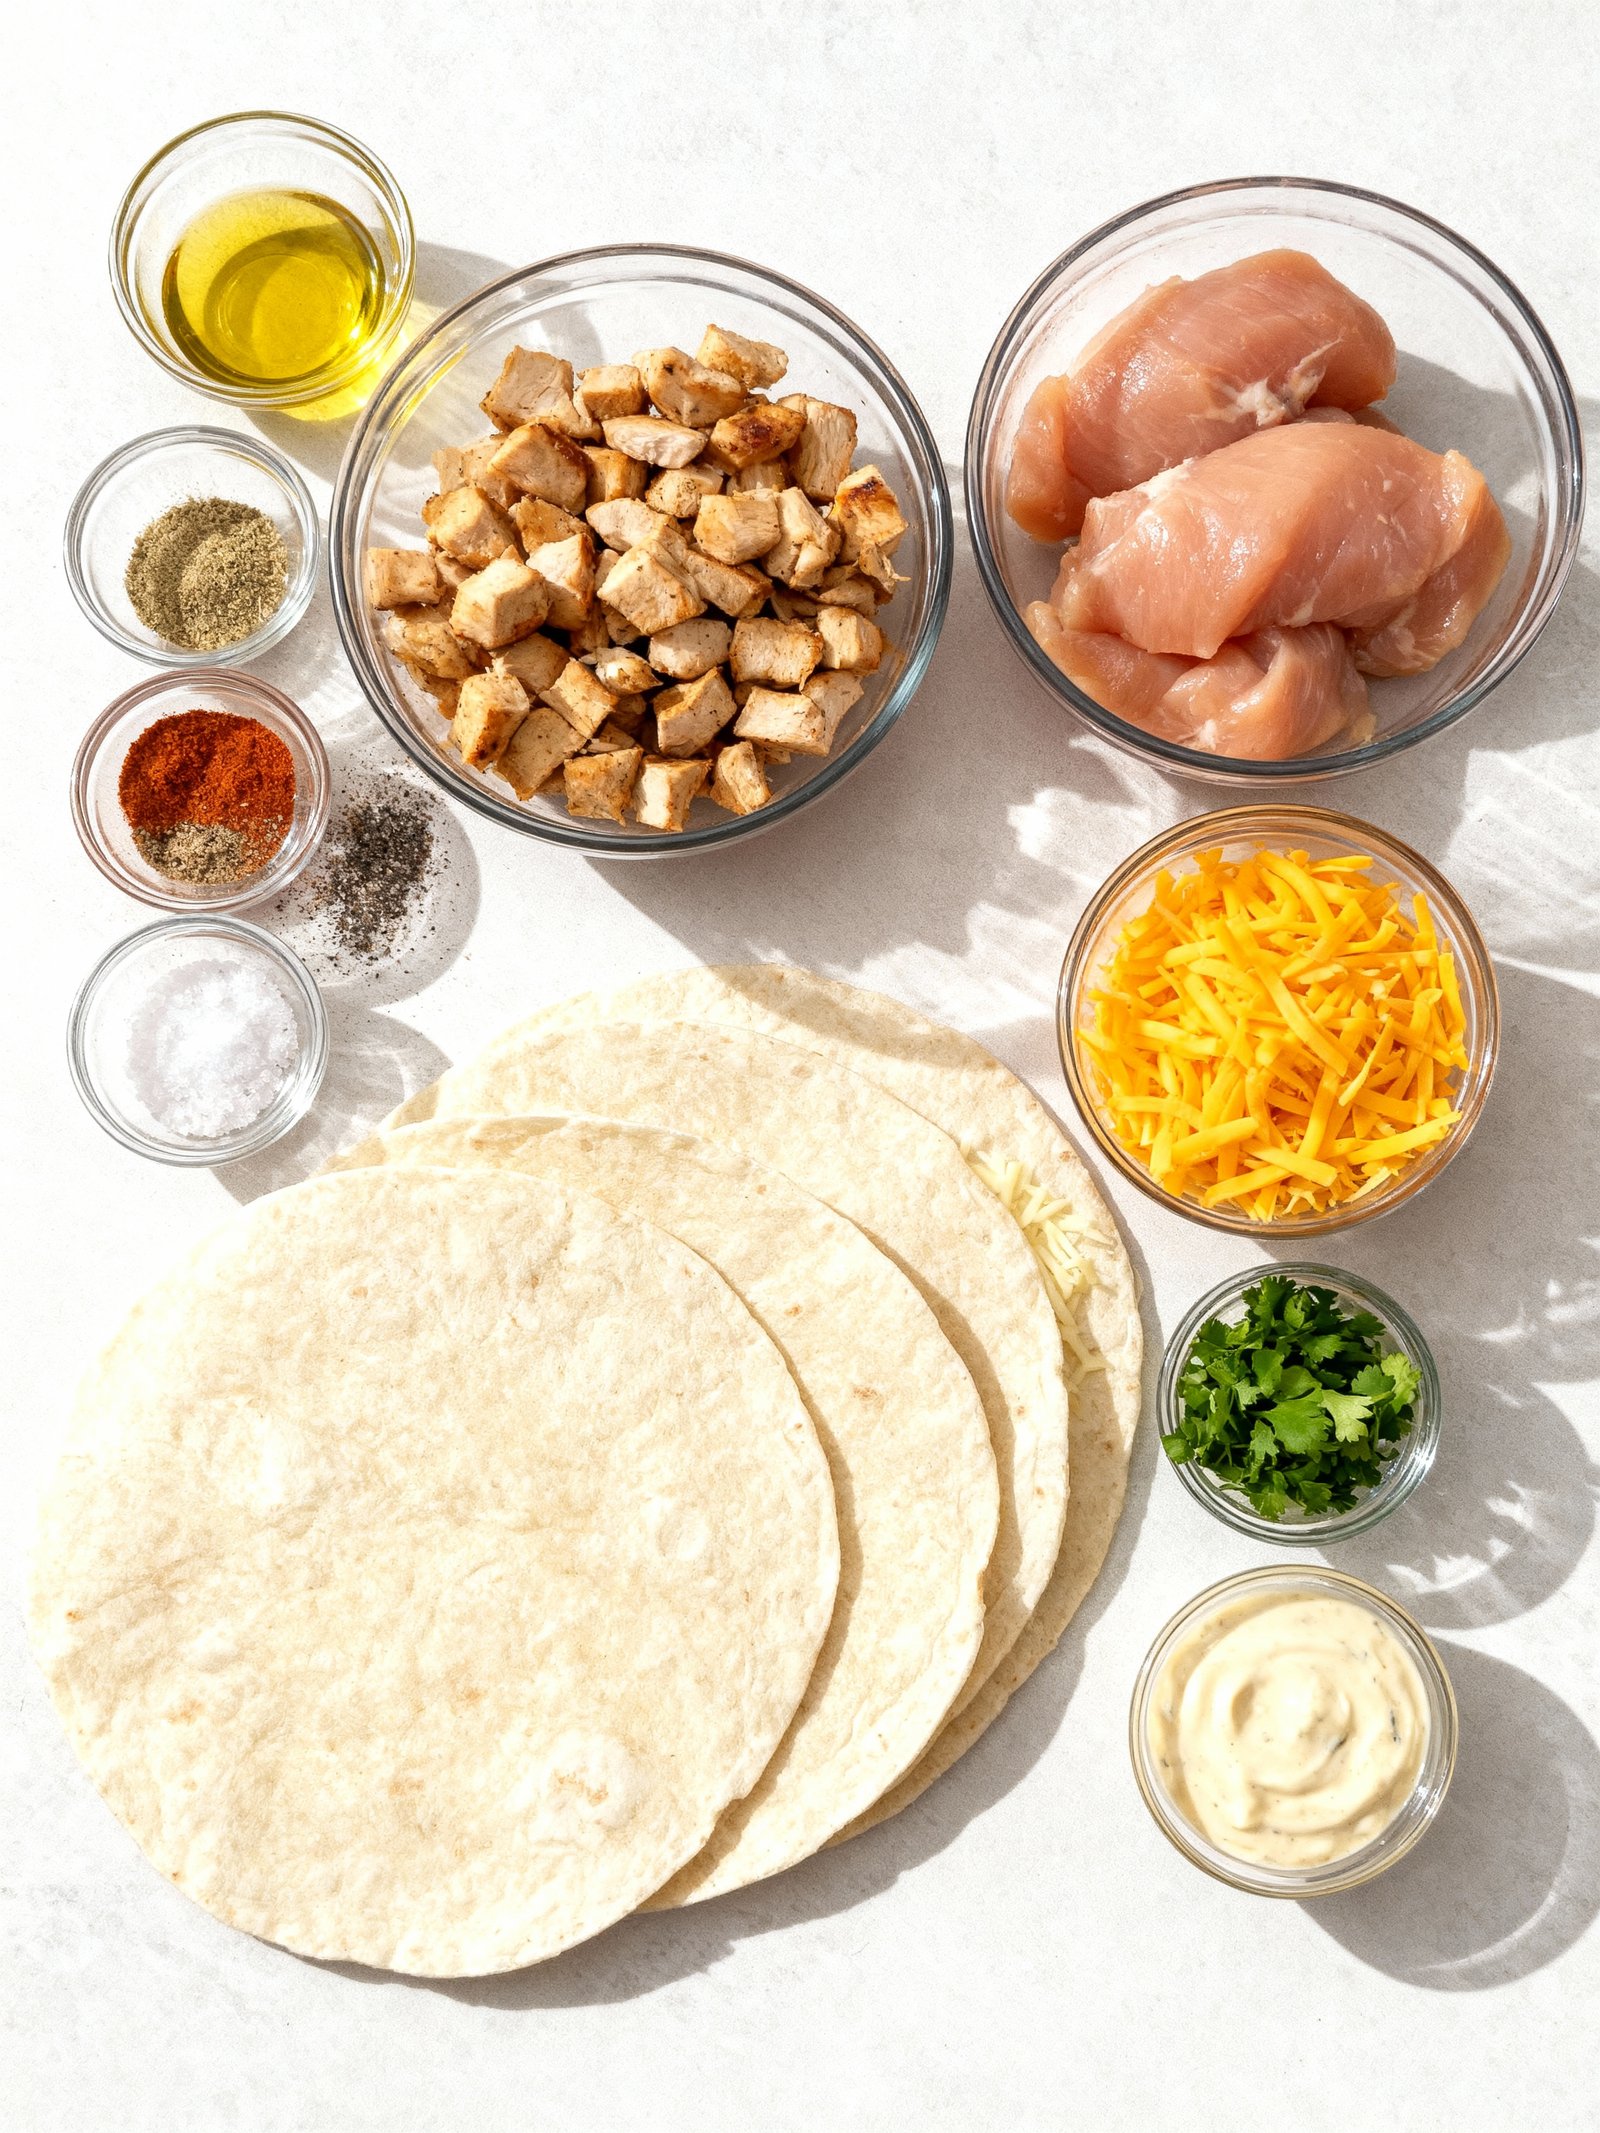
- 2 large chicken breasts, diced
- 1 tablespoon olive oil
- 2 teaspoons garlic powder
- 1 teaspoon onion powder
- 1 teaspoon paprika
- Salt and pepper, to taste
- 1 cup shredded cheddar cheese
- 1/2 cup shredded mozzarella cheese
- 4 large flour tortillas
- 1/2 cup creamy garlic sauce (store-bought or homemade)
- Fresh parsley, chopped (optional, for garnish)
Timing
| Prep Time | 15 minutes |
| Cook Time | 10 minutes |
| Total Time | 25 minutes |
Context: These Cheesy Garlic Chicken Wraps come together about 20% faster than similar recipes.
Step-by-Step Instructions
Step 1 — Prepare the Chicken
Cut 1 lb boneless, skinless chicken breasts into ½-inch strips. Pat them dry with paper towels to ensure a good sear.
Season generously with salt, black pepper, and 1 tsp garlic powder. Let the chicken sit for 5 minutes to absorb the seasoning.
Step 2 — Cook the Chicken
Heat 2 tbsp olive oil in a large skillet over medium-high heat. Add the chicken strips in a single layer, working in batches if needed.
Cook for 4–5 minutes per side until golden brown and the internal temperature reaches 165°F. Remove from the skillet and set aside.
Step 3 — Make the Garlic Sauce
In the same skillet, melt 2 tbsp butter over medium heat. Add 4 minced garlic cloves and sauté for 1 minute until fragrant.
Stir in ½ cup heavy cream and 1 cup shredded mozzarella cheese until the cheese melts and the sauce is smooth.
Step 4 — Combine Chicken and Sauce
Return the cooked chicken to the skillet, tossing to coat evenly in the cheesy garlic sauce. Simmer for 2 minutes to let the flavors meld.
Taste and adjust seasoning with more salt or garlic powder if desired. The sauce should be thick enough to cling to the chicken.
Step 5 — Warm the Tortillas
Place 4 large flour tortillas on a clean surface. Warm them briefly in a dry skillet or microwave for 15–20 seconds to make them pliable.
This prevents tearing when rolling your Cheesy Garlic Chicken Wraps.
Step 6 — Assemble the Wraps
Spoon the cheesy garlic chicken mixture evenly down the center of each tortilla, leaving a 1-inch border at the edges.
Top with shredded lettuce, diced tomatoes, or any preferred fresh veggies for crunch.
Step 7 — Fold and Roll
Fold the sides of the tortilla inward over the filling, then roll tightly from the bottom to form a secure wrap.
Press gently to hold the shape. If the wrap feels loose, use an extra tortilla or toothpick to secure it.
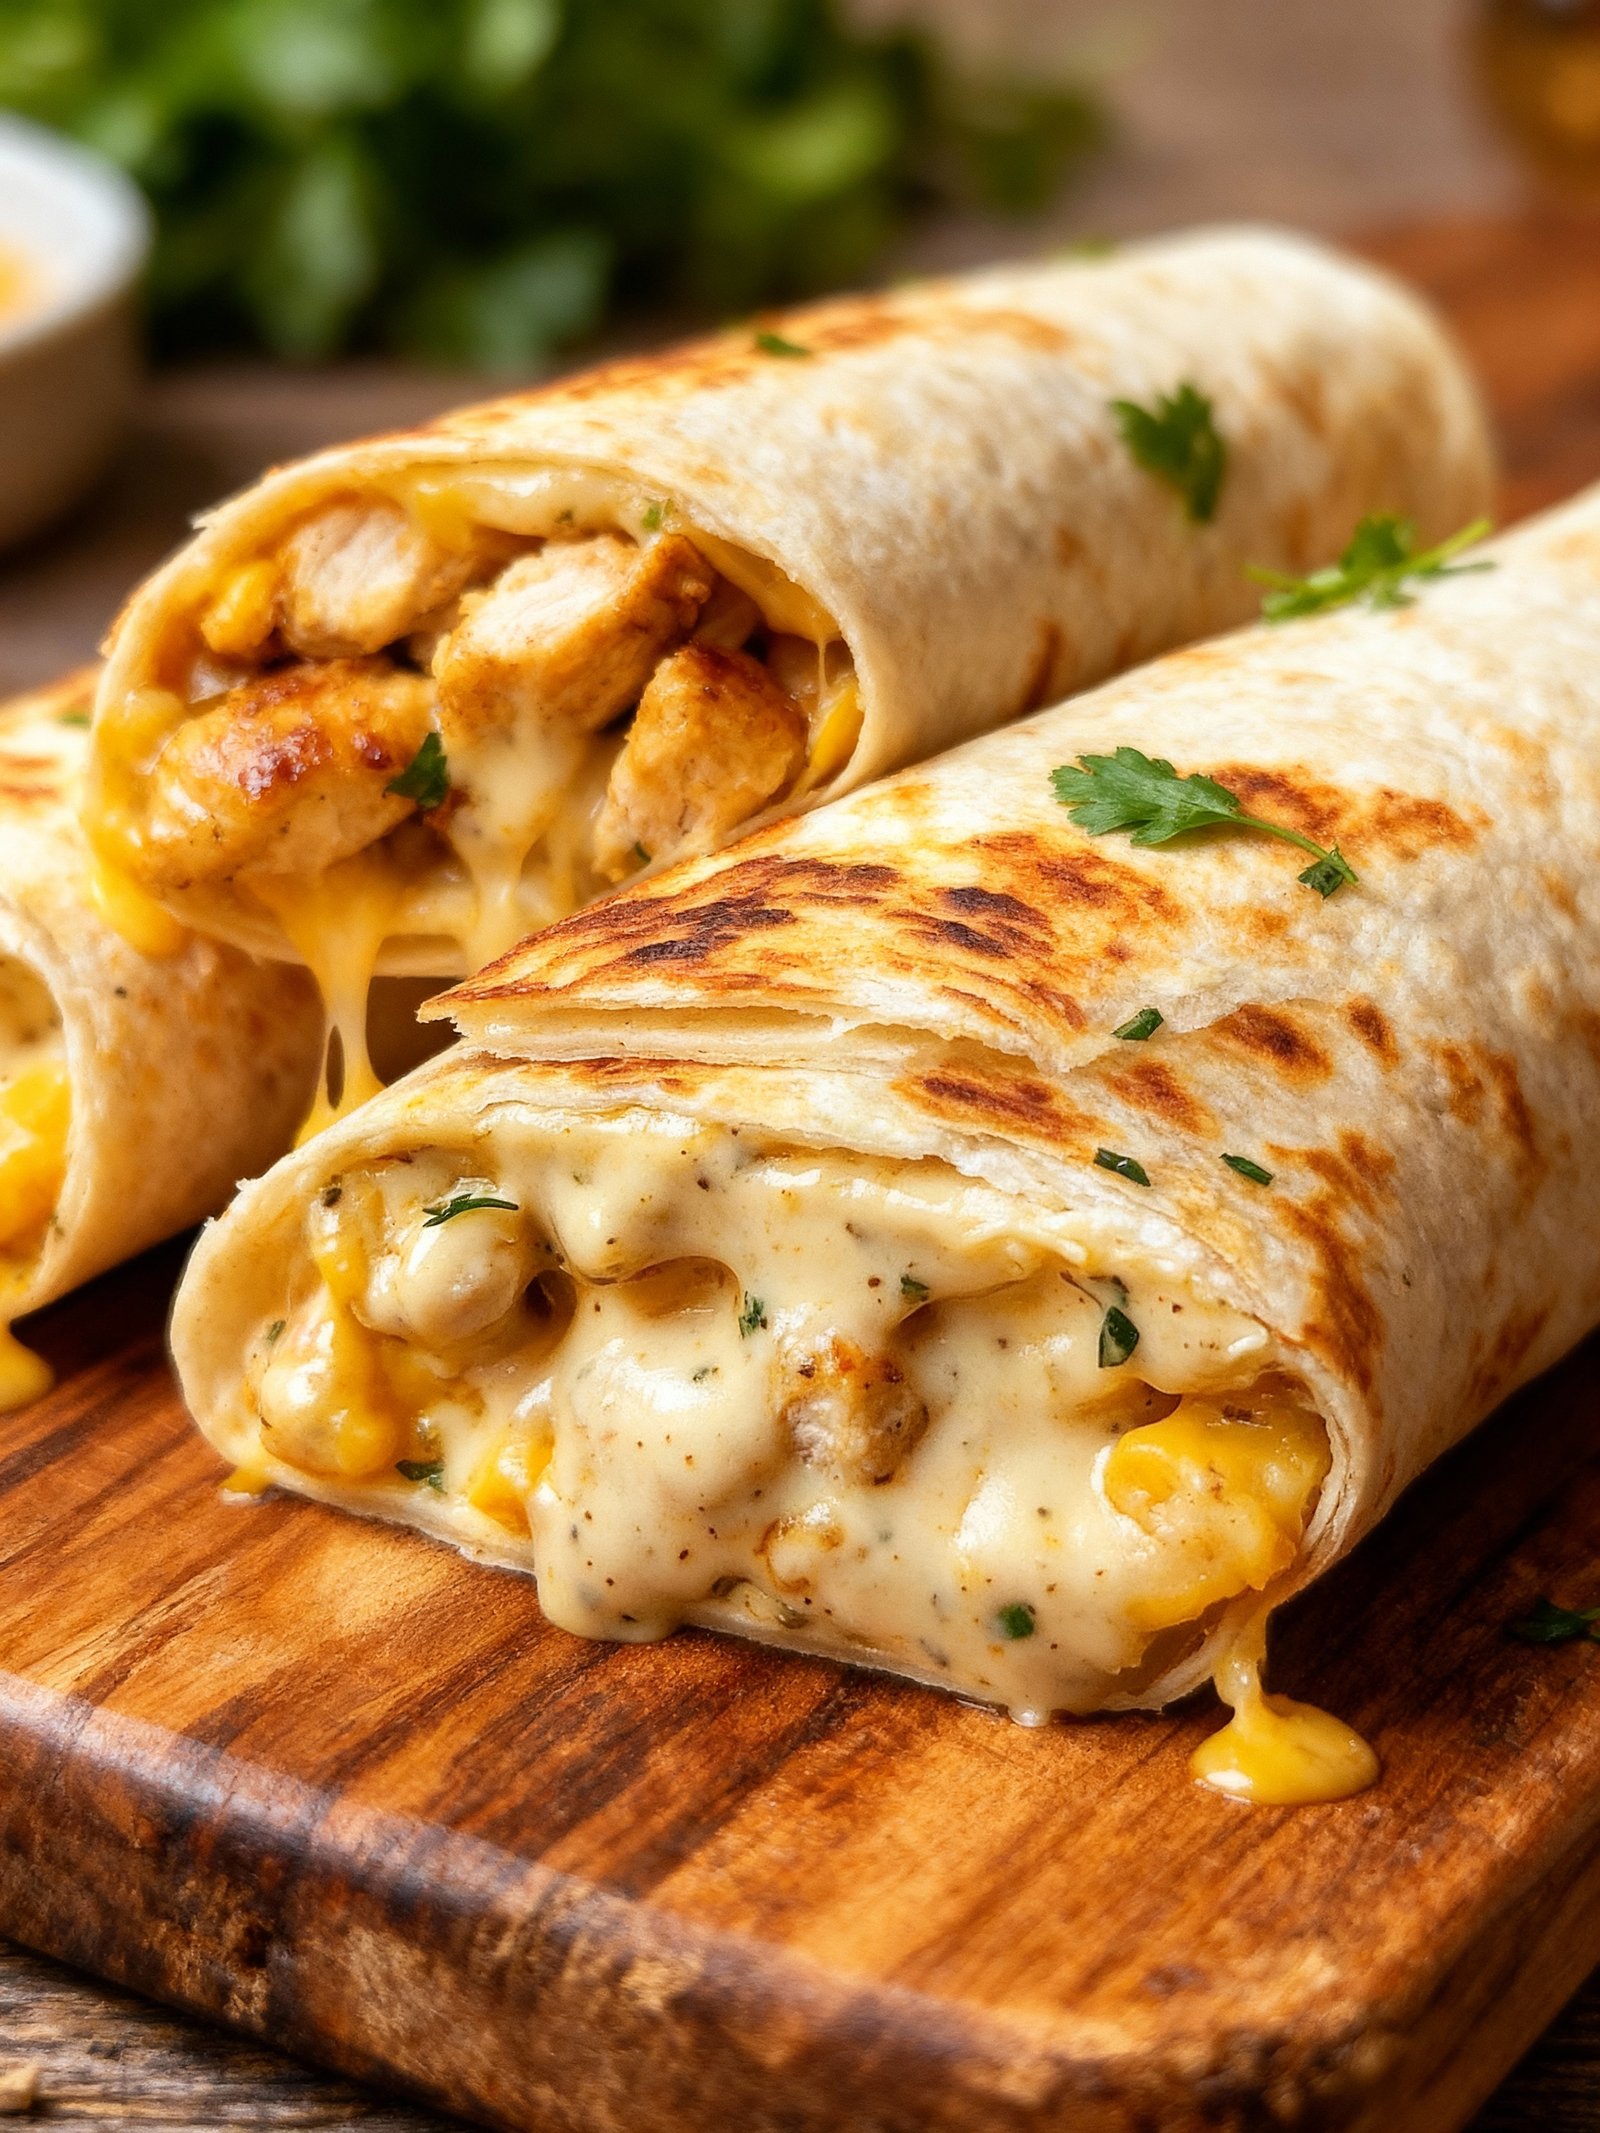
Step 8 — Optional Pan-Toasting
For a crispier exterior, place the assembled wraps seam-side down in a lightly oiled skillet over medium heat.
Toast for 1–2 minutes per side until golden and slightly crisp. This step enhances texture but is optional.
Step 9 — Serve Immediately
Slice each Cheesy Garlic Chicken Wrap in half diagonally and serve warm. They pair well with a side of ranch dressing, salsa, or sour cream.
Enjoy your homemade wraps right away while the cheese is melted and the tortilla is soft.
Nutritional Information
| Calories | 420 |
| Protein | 35g |
| Carbohydrates | 22g |
| Fat | 20g |
| Fiber | 2g |
| Sodium | 680mg |
Note: Estimates based on typical ingredients and serving size.
Healthier Alternatives
- Turkey or chickpeas — Swap chicken for lean ground turkey or mashed chickpeas to reduce fat while keeping protein high.
- Low-carb tortillas or lettuce wraps — Use whole wheat, almond flour tortillas, or large lettuce leaves to cut carbs and boost fiber.
- Dairy-free cheese — Opt for vegan shredded cheese or nutritional yeast for a creamy, dairy-free Cheesy Garlic Chicken Wraps option.
- Greek yogurt instead of mayo/sour cream — Mix Greek yogurt with garlic for a tangy, protein-rich sauce with less fat.
- Reduced-sodium soy sauce or coconut aminos — Season with these to maintain umami flavor while lowering salt content.
- Add spinach or kale — Fold in fresh greens for extra vitamins, fiber, and color without altering the cheesy garlic taste.
- Air-fry or bake instead of pan-frying — Cook the filling with minimal oil to reduce calories while keeping the wraps crispy.
- Use garlic powder and herbs — Replace some salt with garlic powder, parsley, or oregano to enhance flavor naturally.
Serving Suggestions
- Pair with a crisp garden salad or coleslaw to balance the rich, cheesy garlic flavor
- Serve alongside seasoned potato wedges or sweet potato fries for a satisfying meal
- Perfect for casual weeknight dinners or game day gatherings with friends
- Great for packed lunches – wrap tightly in foil to keep warm and portable
- Drizzle with ranch dressing or spicy mayo for extra flavor dimension
- Arrange on a platter with fresh vegetable sticks for a colorful party appetizer
- Serve with a side of marinara or buffalo sauce for dipping
These Cheesy Garlic Chicken Wraps are versatile enough for any occasion, from quick family meals to entertaining guests. The combination of melted cheese and garlic-infused chicken makes them a crowd-pleaser that pairs well with various sides and dipping sauces.
Common Mistakes to Avoid
- Mistake: Using dry, overcooked chicken breast. Fix: Pound chicken to even thickness and cook just until 165°F for juicy results.
- Mistake: Overloading wraps with filling, causing breakage. Fix: Use a moderate ½ cup filling per wrap and leave a border for rolling.
- Mistake: Raw, pungent garlic overwhelming the dish. Fix: Sauté minced garlic briefly in butter or oil to mellow its flavor.
- Mistake: Cold tortillas that crack when folded. Fix: Warm tortillas briefly in a dry skillet or microwave until pliable.
- Mistake: Not seasoning the chicken adequately before cooking. Fix: Generously salt and pepper chicken 15 minutes ahead for deeper flavor.
- Mistake: Using low-moisture cheese that doesn’t melt well. Fix: Opt for freshly shredded mozzarella or Monterey Jack for optimal melt.
- Mistake: Rolling wraps loosely so filling spills out. Fix: Fold sides inward, then roll tightly from the bottom, pressing firmly.
- Mistake: Soggy wraps from hot filling on cold tortillas. Fix: Let the cheesy garlic chicken mixture cool slightly before assembling.
Storing Tips
- Fridge: Store Cheesy Garlic Chicken Wraps in an airtight container in the refrigerator for up to 3 days.
- Freezer: Wrap each Cheesy Garlic Chicken Wrap individually in foil or plastic wrap, then place in a freezer bag. Freeze for up to 2 months.
- Reheat: For best results, reheat Cheesy Garlic Chicken Wraps in an oven at 350°F (175°C) until the internal temperature reaches 165°F (74°C).
Always check that your Cheesy Garlic Chicken Wraps are heated through to a safe temperature before serving.
Conclusion
We hope you enjoy making these delicious Cheesy Garlic Chicken Wraps! They’re perfect for a quick dinner or meal prep. If you try them, please leave a comment below with your thoughts. For more easy recipes like this Green Chile Chicken Burritos Recipe or Jalapeno Popper Mac and Cheese Recipe, be sure to subscribe for updates!
PrintCheesy Garlic Chicken Wraps

Delicious cheesy garlic chicken wraps made with seasoned chicken, melted cheddar and mozzarella cheeses, and a creamy garlic sauce all wrapped in warm flour tortillas.
- Prep Time: 10 minutes
- Cook Time: 8 minutes
- Total Time: 18 minutes
- Yield: 4 wraps 1x
- Method: Main course
- Cuisine: American
Ingredients
- 2 large chicken breasts, diced
- 1 tablespoon olive oil
- 2 teaspoons garlic powder
- 1 teaspoon onion powder
- 1 teaspoon paprika
- Salt and pepper, to taste
- 1 cup shredded cheddar cheese
- 1/2 cup shredded mozzarella cheese
- 4 large flour tortillas
- 1/2 cup creamy garlic sauce (store-bought or homemade)
- Fresh parsley, chopped (optional, for garnish)
Instructions
- Season the chicken: In a large bowl, combine diced chicken with olive oil, garlic powder, onion powder, paprika, salt, and pepper. Toss until evenly coated.
- Cook the chicken: Heat a non-stick skillet over medium heat. Cook the seasoned chicken for 6-8 minutes, stirring occasionally, until fully cooked and golden brown. Remove from heat.
- Assemble the wraps: Lay out flour tortillas and spread a spoonful of creamy garlic sauce on each. Add cooked chicken, then top with shredded cheddar and mozzarella cheeses.
- Roll up the tortillas tightly to form wraps.
- Optionally, garnish with chopped fresh parsley before serving.
Notes
Make your own creamy garlic sauce by mixing mayo, minced garlic, lemon juice, and salt for added flavor. Leftover cooked chicken can be used to save time. Add fresh lettuce or crispy bacon for extra crunch and texture.
Nutrition
- Calories: 450
- Sugar: 2g
- Sodium: 600mg
- Fat: 25g
- Saturated Fat: 12g
- Unsaturated Fat: 10g
- Trans Fat: 0g
- Carbohydrates: 30g
- Fiber: 2g
- Protein: 35g
- Cholesterol: 90mg
FAQs
Can I make Cheesy Garlic Chicken Wraps ahead of time?
Yes, you can prepare the filling a day in advance. Store it in an airtight container in the refrigerator. Assemble the wraps just before serving to keep the tortillas from getting soggy.
What can I use instead of flour tortillas for these wraps?
You can substitute with whole wheat, spinach, or low-carb tortillas. Lettuce leaves also make a great gluten-free alternative for these Cheesy Garlic Chicken Wraps.
How do I prevent the wraps from falling apart?
Warm the tortillas slightly before filling to make them more pliable. Do not overfill, and roll them tightly. Secure with parchment paper or foil if needed for easier handling.


Saving this for my lunch prep next week! The cheesy garlic chicken combo sounds way better than my usual boring sandwich.
★★★★