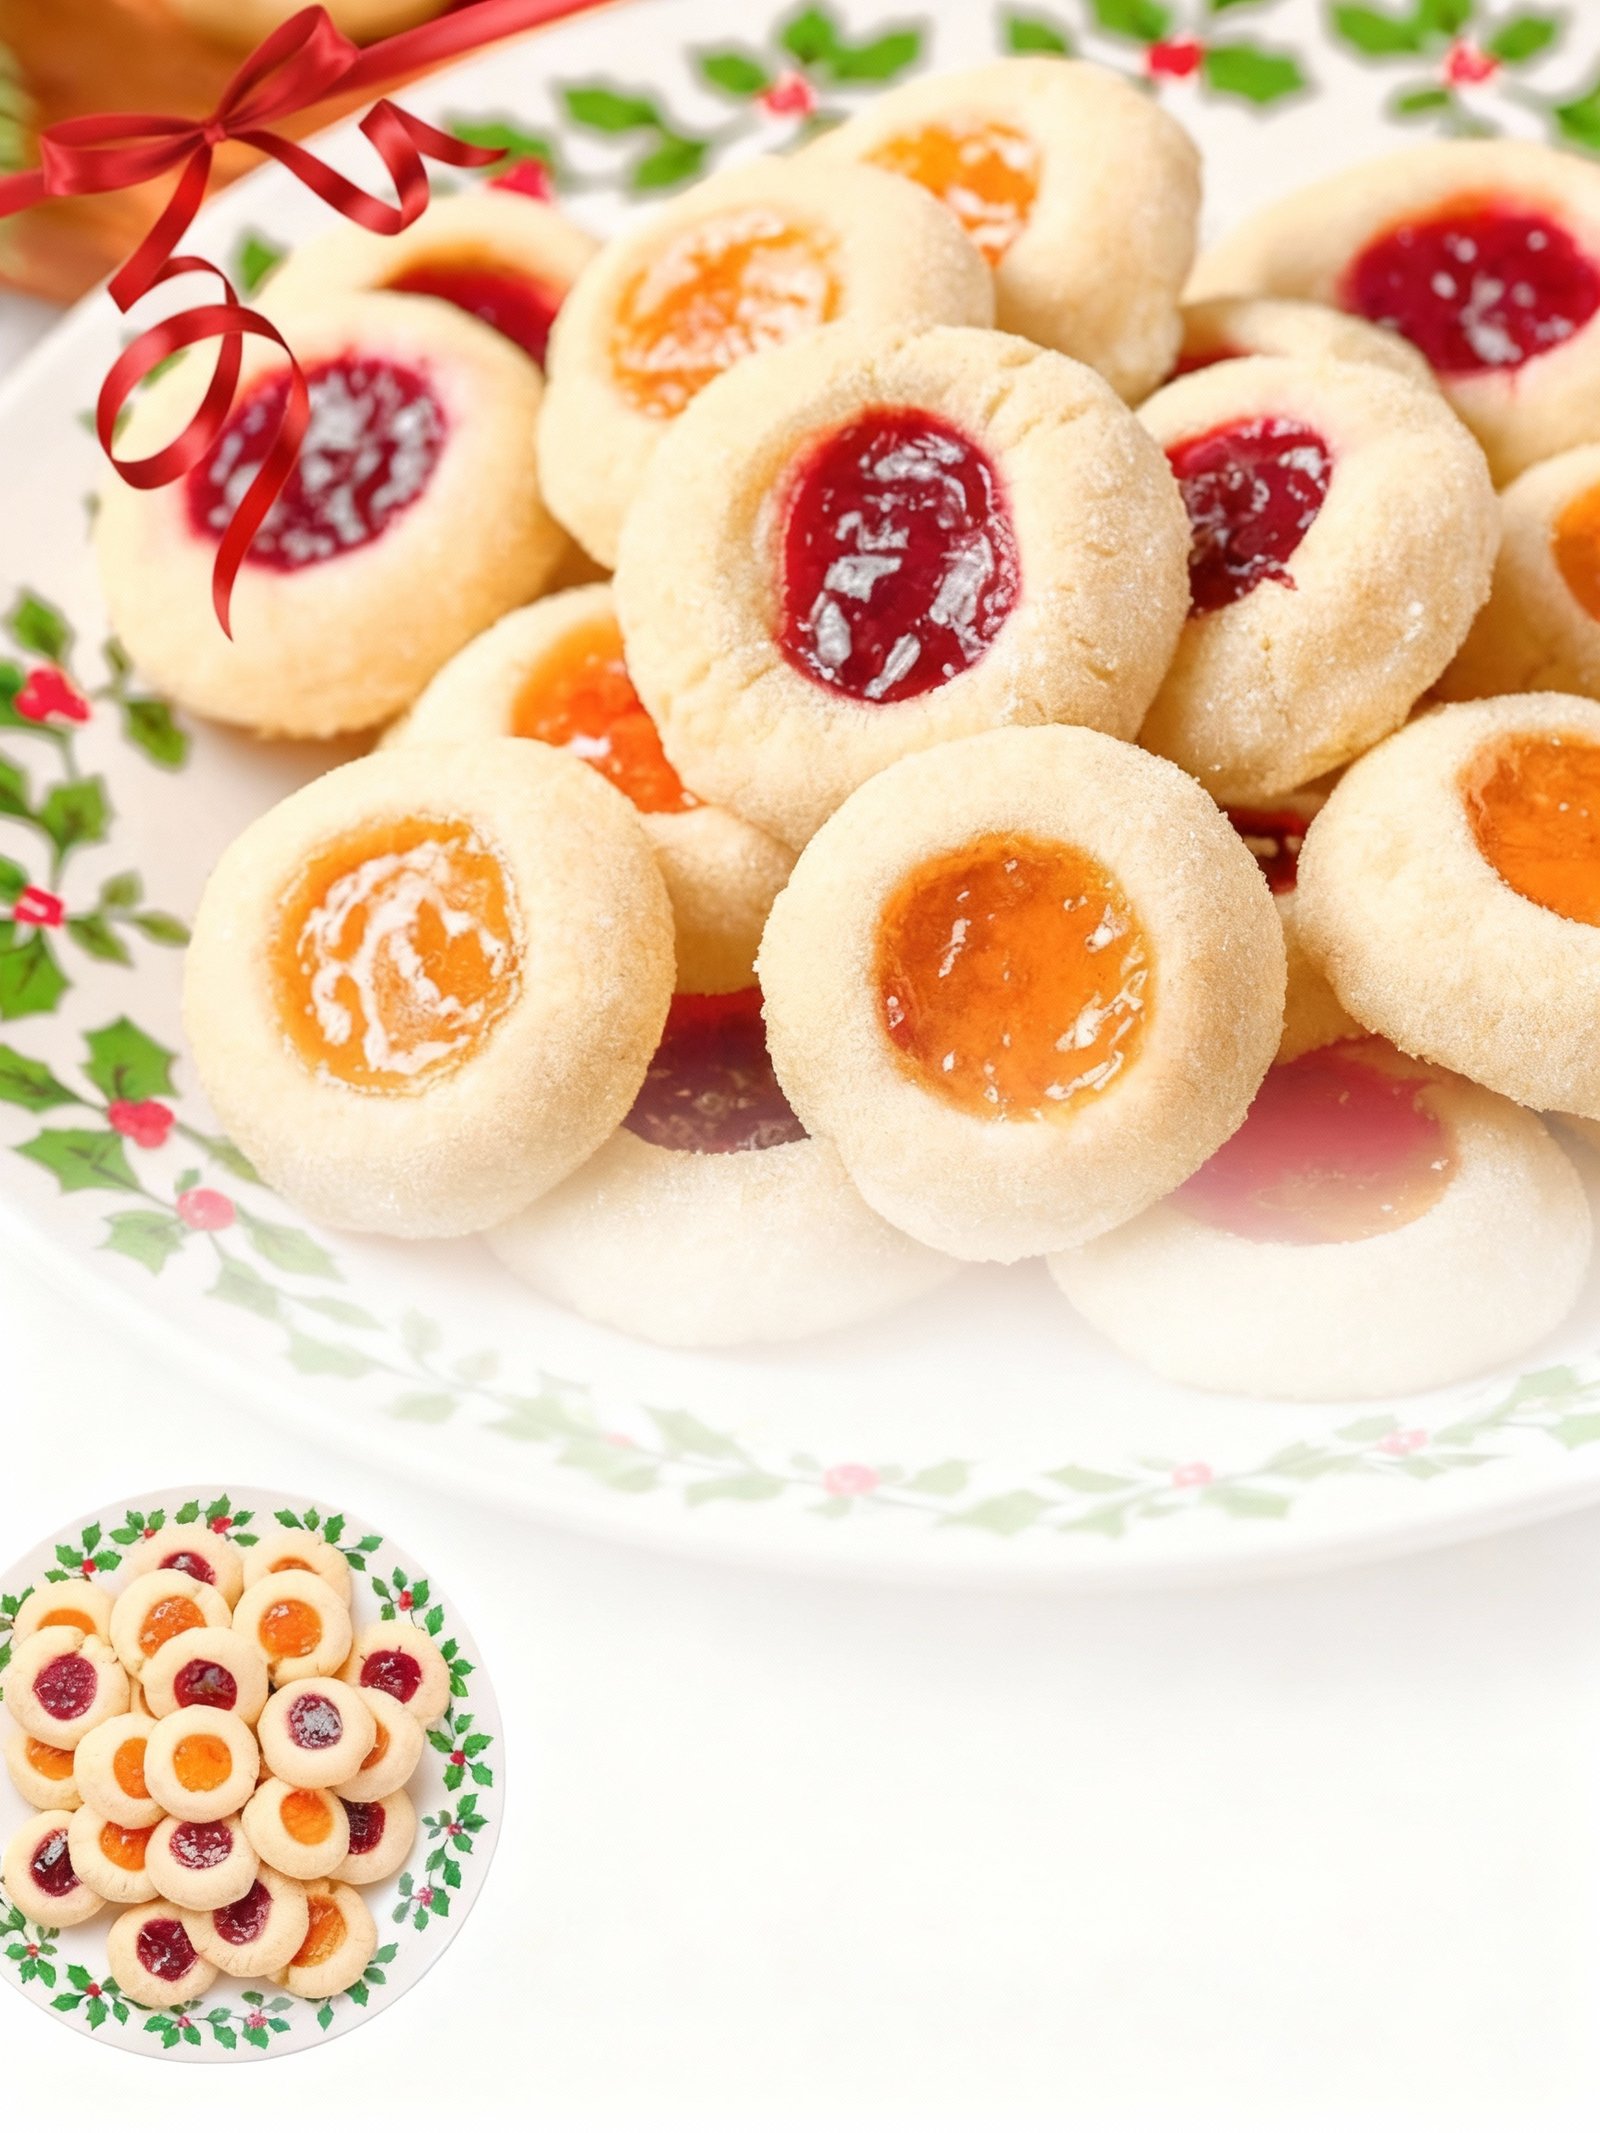
Classic Thumbprint Cookies Recipe
Introduction
These classic thumbprint cookies are simple & delicious, featuring a buttery shortbread base with a sweet jam center. Perfect for holiday baking or everyday treats, this easy recipe requires minimal ingredients and yields impressive results. If you enjoy fruit-filled desserts, you might also like these White Chocolate Raspberry Cookies Recipe for another delightful option.
Ingredients
These classic Thumbprint Cookies feature a rich, buttery shortbread base with a sweet, jewel-like jam center that creates the perfect balance of tender crunch and fruity sweetness.
- 1 cup unsalted butter, softened
- 1/2 cup granulated sugar
- 1 large egg yolk
- 1 teaspoon vanilla extract
- 2 cups all-purpose flour
- 1/4 teaspoon salt
- 1/2 cup seedless jam (such as raspberry or strawberry)

Timing
| Prep Time | 15 minutes |
| Cook Time | 12 minutes |
| Total Time | 27 minutes |
Context: This Thumbprint Cookies recipe is about 20% faster than similar recipes, making it a great choice for a quick and easy homemade treat.
Step-by-Step Instructions
Step 1 — Prepare Your Ingredients
Gather all ingredients: butter, sugar, flour, vanilla extract, and your choice of jam or preserves. Ensure the butter is softened to room temperature for easy creaming. Measure the flour accurately by spooning it into the cup and leveling it off.
Step 2 — Cream Butter and Sugar
In a mixing bowl, beat the softened butter and sugar together until light and fluffy, about 2–3 minutes. This step incorporates air into your Thumbprint Cookies, giving them a tender texture. Scrape down the sides of the bowl to ensure even mixing.
Step 3 — Add Dry Ingredients
Gradually mix in the flour and a pinch of salt until just combined. Be careful not to overmix, which can make the cookies tough. The dough should be soft but not sticky. If it feels too soft, chill it for 15 minutes before shaping.
Step 4 — Shape the Cookies
Roll tablespoon-sized portions of dough into balls and place them on a parchment-lined baking sheet. Use your thumb or the back of a small spoon to make an indentation in the center of each ball. Keep the edges neat to hold the filling.
Step 5 — Fill with Jam
Spoon about ½ teaspoon of your favorite jam into each thumbprint. Avoid overfilling, as the jam can bubble over during baking. For variety, use different flavors like raspberry, apricot, or strawberry in the same batch of Thumbprint Cookies.
Step 6 — Bake to Perfection
Bake the cookies at 350°F (175°C) for 12–15 minutes, or until the edges are lightly golden. The jam should be bubbly. Rotate the baking sheet halfway through for even browning. Let the Thumbprint Cookies cool on the sheet for 5 minutes before transferring.
Step 7 — Cool and Serve
Transfer the cookies to a wire rack to cool completely. The jam filling will set as they cool. Store in an airtight container at room temperature for up to 5 days. These Thumbprint Cookies are perfect for gifting or enjoying with a cup of tea.
Nutritional Information
| Calories | 110 |
| Protein | 1g |
| Carbohydrates | 15g |
| Fat | 5g |
| Fiber | 0g |
| Sodium | 45mg |
Note: Estimates based on typical ingredients and serving size.
Healthier Alternatives
- Almond flour — A gluten-free swap that adds protein and a nutty flavor.
- Coconut sugar — A lower-glycemic sweetener with a caramel-like taste.
- Unsweetened applesauce — Reduces fat and adds moisture without refined sugar.
- Chia seed jam — A low-sugar, high-fiber filling alternative to traditional jam.
- Greek yogurt — A protein-rich, lower-fat substitute for butter in some recipes.
- Oat flour — A whole-grain, gluten-free option for a heartier texture.
- Coconut oil — A dairy-free fat alternative with a subtle tropical note.
- Protein powder — Boosts protein content; choose unflavored to keep the focus on Thumbprint Cookies.

Serving Suggestions
- Pair these classic Thumbprint Cookies with a hot cup of coffee or a glass of cold milk for a simple, comforting treat.
- Serve Thumbprint Cookies on a festive platter during holiday gatherings or cookie exchanges for a colorful, crowd-pleasing dessert.
- Create a dessert board with an assortment of Thumbprint Cookies, using different jam flavors like raspberry, apricot, and blueberry for visual appeal.
- Offer these cookies alongside a scoop of vanilla ice cream or a dollop of whipped cream for an elevated dessert experience.
- Package Thumbprint Cookies in decorative boxes or cellophane bags as thoughtful homemade gifts for friends and neighbors.
- Arrange these cookies on a tiered stand for afternoon tea parties or bridal showers for an elegant presentation.
However you choose to serve them, these versatile Thumbprint Cookies are sure to delight with their buttery texture and sweet jam centers.
Common Mistakes to Avoid
- Mistake: Using warm dough, which causes the thumbprint to spread and lose its shape. Fix: Chill the dough for at least 30 minutes before shaping and indenting.
- Mistake: Overfilling the thumbprint indent with jam, leading to messy overflow during baking. Fix: Use only about ½ teaspoon of filling per cookie to prevent spillage.
- Mistake: Pressing too hard when making the thumbprint, which can crack the cookie base. Fix: Gently press with your thumb or the back of a small spoon to create a shallow, even well.
- Mistake: Baking on a hot or unlined baking sheet, causing the bottoms to brown too quickly. Fix: Always use cool, parchment-lined baking sheets for even baking.
- Mistake: Using runny jam or jelly that doesn’t set properly after baking. Fix: Opt for thicker preserves or briefly cook down runny jam to concentrate it.
- Mistake: Over-creaming the butter and sugar, which can make the cookies spread excessively. Fix: Cream just until the mixture is light and fluffy, not greasy or overly aerated.
- Mistake: Skipping the re-indentation step after the cookies come out of the oven. Fix: Gently redefine the thumbprint wells immediately after baking for a perfect, deep fill.
- Mistake: Storing Thumbprint Cookies before the jam filling has fully cooled and set. Fix: Allow cookies to cool completely on a wire rack before stacking or storing.
Storing Tips
- Fridge: Store cooled Thumbprint Cookies in an airtight container for up to 1 week.
- Freezer: Place Thumbprint Cookies in a freezer-safe container or bag for up to 3 months.
- Reheat: Warm Thumbprint Cookies in a 300°F (150°C) oven for 5–10 minutes until heated through.
Always ensure cookies are fully cooled before storing to prevent sogginess. For food safety, reheat to an internal temperature of at least 165°F (74°C) if the filling contains dairy or eggs.
Conclusion
We hope you enjoy making these classic Thumbprint Cookies! If you love jam-filled treats, try our Best Hawaiian Pineapple Coconut Thumbprint Cookies Ready in 30 Minutes next. Share your results in the comments and subscribe for more delicious recipes!
PrintClassic Thumbprint Cookies

Buttery, tender cookies filled with a sweet jam center, perfect for holiday baking or any special occasion.
- Prep Time: 20 minutes
- Cook Time: 15 minutes
- Total Time: 35 minutes
- Yield: 36 cookies 1x
- Method: Dessert
- Cuisine: American
Ingredients
- 1 cup unsalted butter, softened
- 1/2 cup granulated sugar
- 1 large egg yolk
- 1 teaspoon vanilla extract
- 2 cups all-purpose flour
- 1/4 teaspoon salt
- 1/2 cup seedless jam (such as raspberry or strawberry)
Instructions
- Preheat oven to 350°F (175°C). Line baking sheets with parchment paper.
- In a large bowl, beat butter and sugar until light and fluffy. Beat in egg yolk and vanilla until well combined.
- Gradually add flour and salt, mixing until dough forms. Roll dough into 1-inch balls and place on prepared baking sheets.
- Press your thumb (or the back of a spoon) into the center of each ball to make an indentation. Fill each indentation with about 1/2 teaspoon of jam.
- Bake for 12-15 minutes, or until edges are lightly golden. Cool on baking sheets for 5 minutes, then transfer to wire racks to cool completely.
Notes
For best results, use room temperature butter and chill dough for 15 minutes if it’s too soft. These cookies freeze well before baking—just thaw and bake as directed.
Nutrition
- Calories: 90
- Sugar: 5
- Sodium: 40
- Fat: 5
- Saturated Fat: 3
- Unsaturated Fat: 2
- Trans Fat: 0
- Carbohydrates: 10
- Fiber: 0
- Protein: 1
- Cholesterol: 20
FAQs
Can I use a different jam for these Thumbprint Cookies?
Yes, you can use any flavor of jam or preserves you prefer. Raspberry, apricot, and strawberry are popular choices for Thumbprint Cookies. Just ensure the jam is thick enough to prevent excessive spreading during baking.
How do I prevent the thumbprint from collapsing during baking?
Make a deep, well-defined indentation with your thumb or the back of a small spoon. Chilling the shaped Thumbprint Cookies dough for 15-20 minutes before baking helps the cookies hold their shape and prevents the thumbprint from collapsing in the oven.
Can I make Thumbprint Cookies ahead of time?
Yes, you can prepare the dough, shape the cookies, and freeze them on a baking sheet. Once solid, transfer the unbaked Thumbprint Cookies to a freezer bag and store for up to 3 months. Bake directly from frozen, adding a few extra minutes to the baking time.


I’ve been craving a simple cookie recipe and these thumbprint cookies with jam sound perfect. I’m gonna try them with raspberry preserves this weekend.
★★★★