Pumpkin Spice Rice Krispie Treats Recipe
Introduction
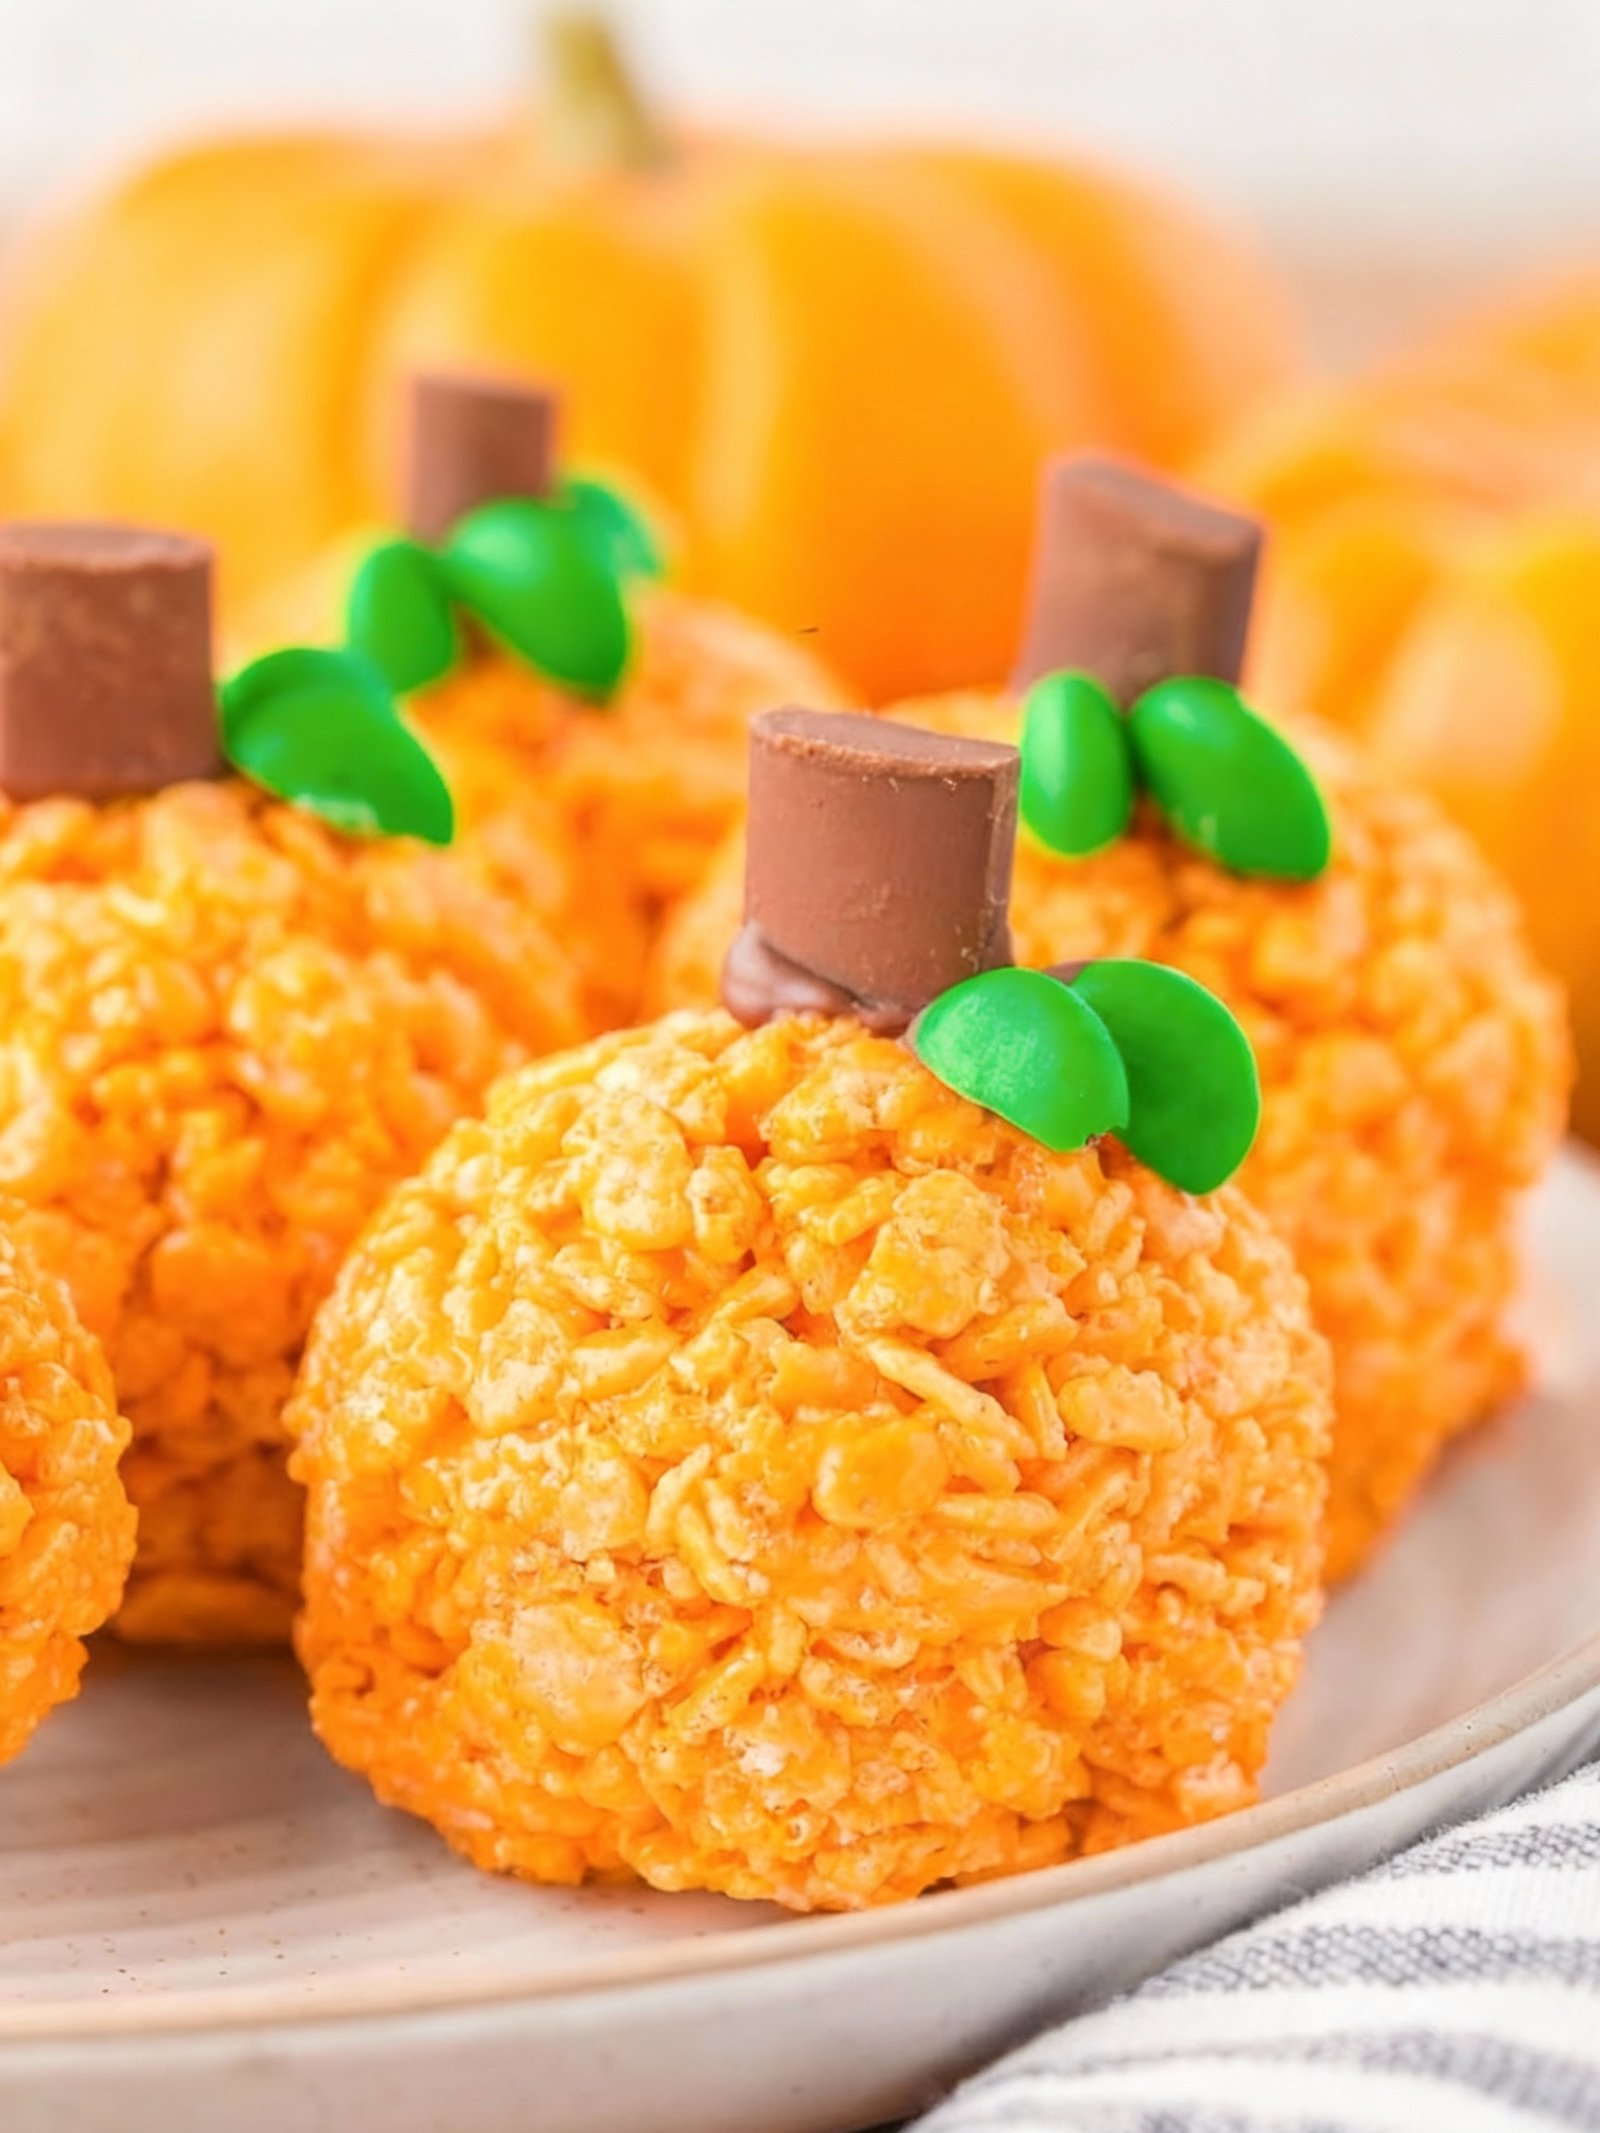
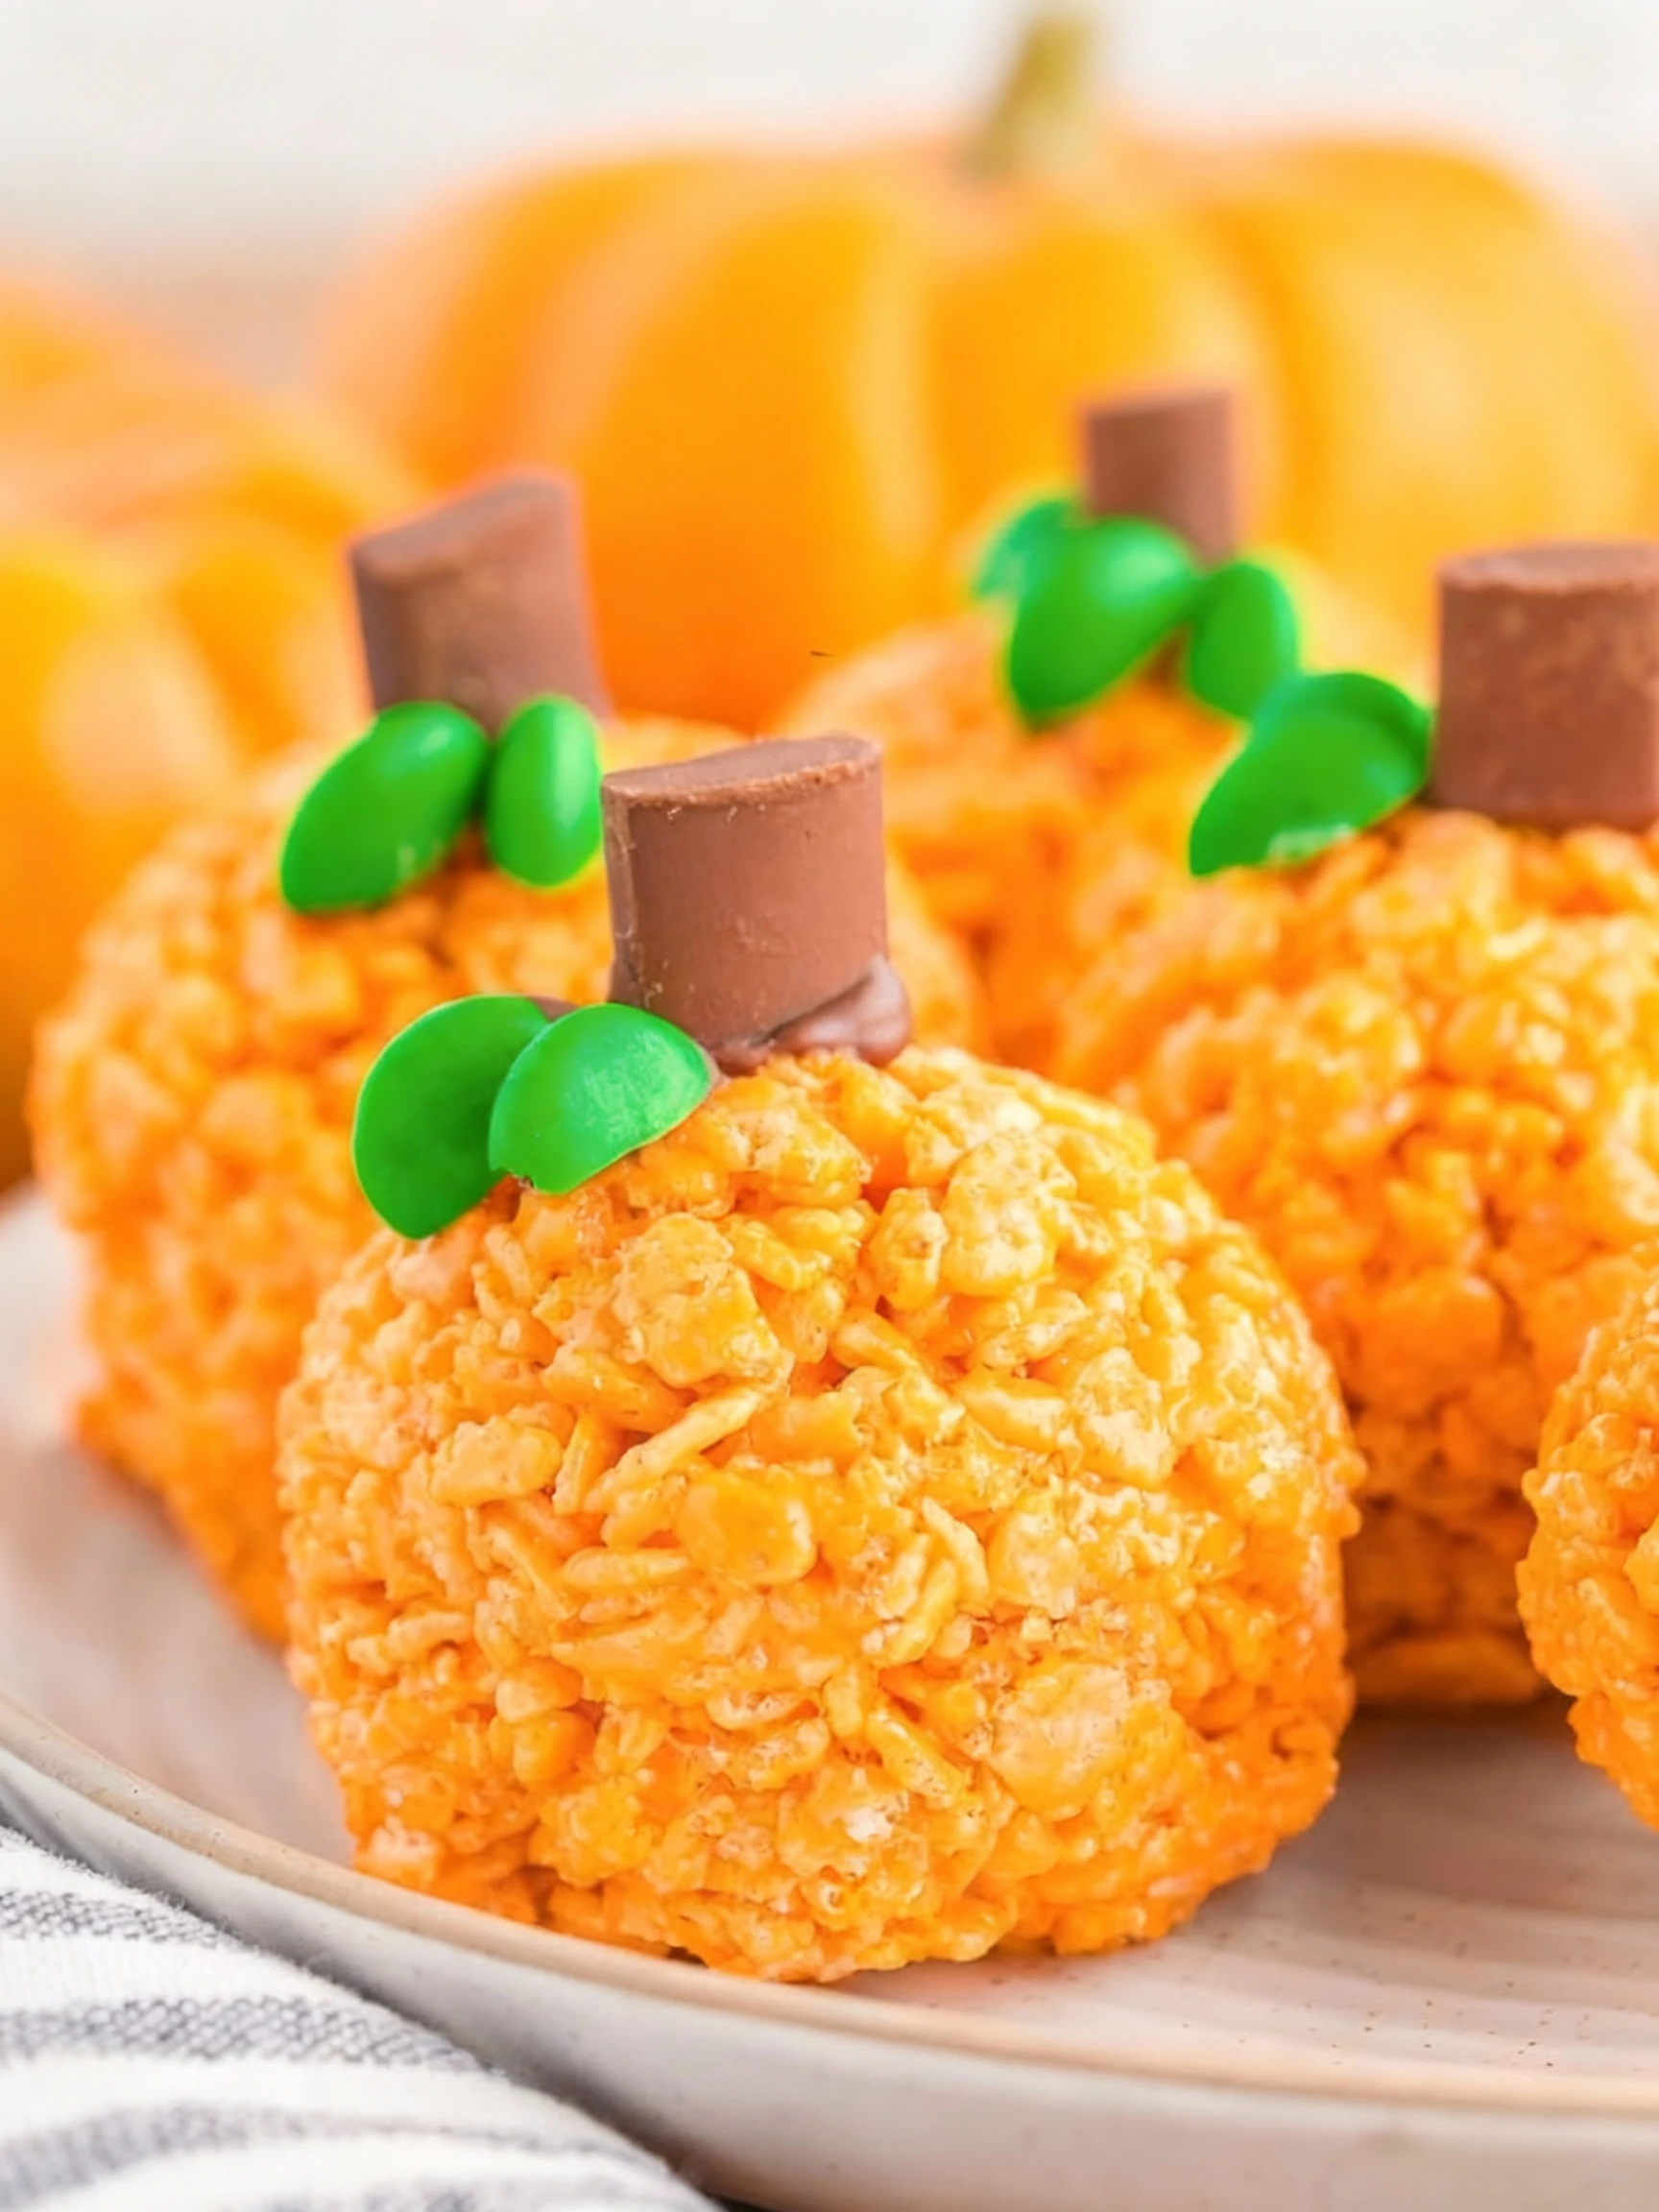
These Pumpkin Rice Krispie Treats are soft, sweet and so easy to make. Simple & delicious, they’re the perfect festive treat for Halloween or any autumn gathering. If you enjoy pumpkin desserts, you might also like this Mini Pumpkin Cheesecakes Recipe or this Cranberry Pecan Pumpkin Bread Recipe.
Ingredients
These soft, sweet pumpkin Rice Krispie treats combine the nostalgic crunch of cereal with warm autumn spices for a perfectly spooktacular no-bake Halloween dessert.
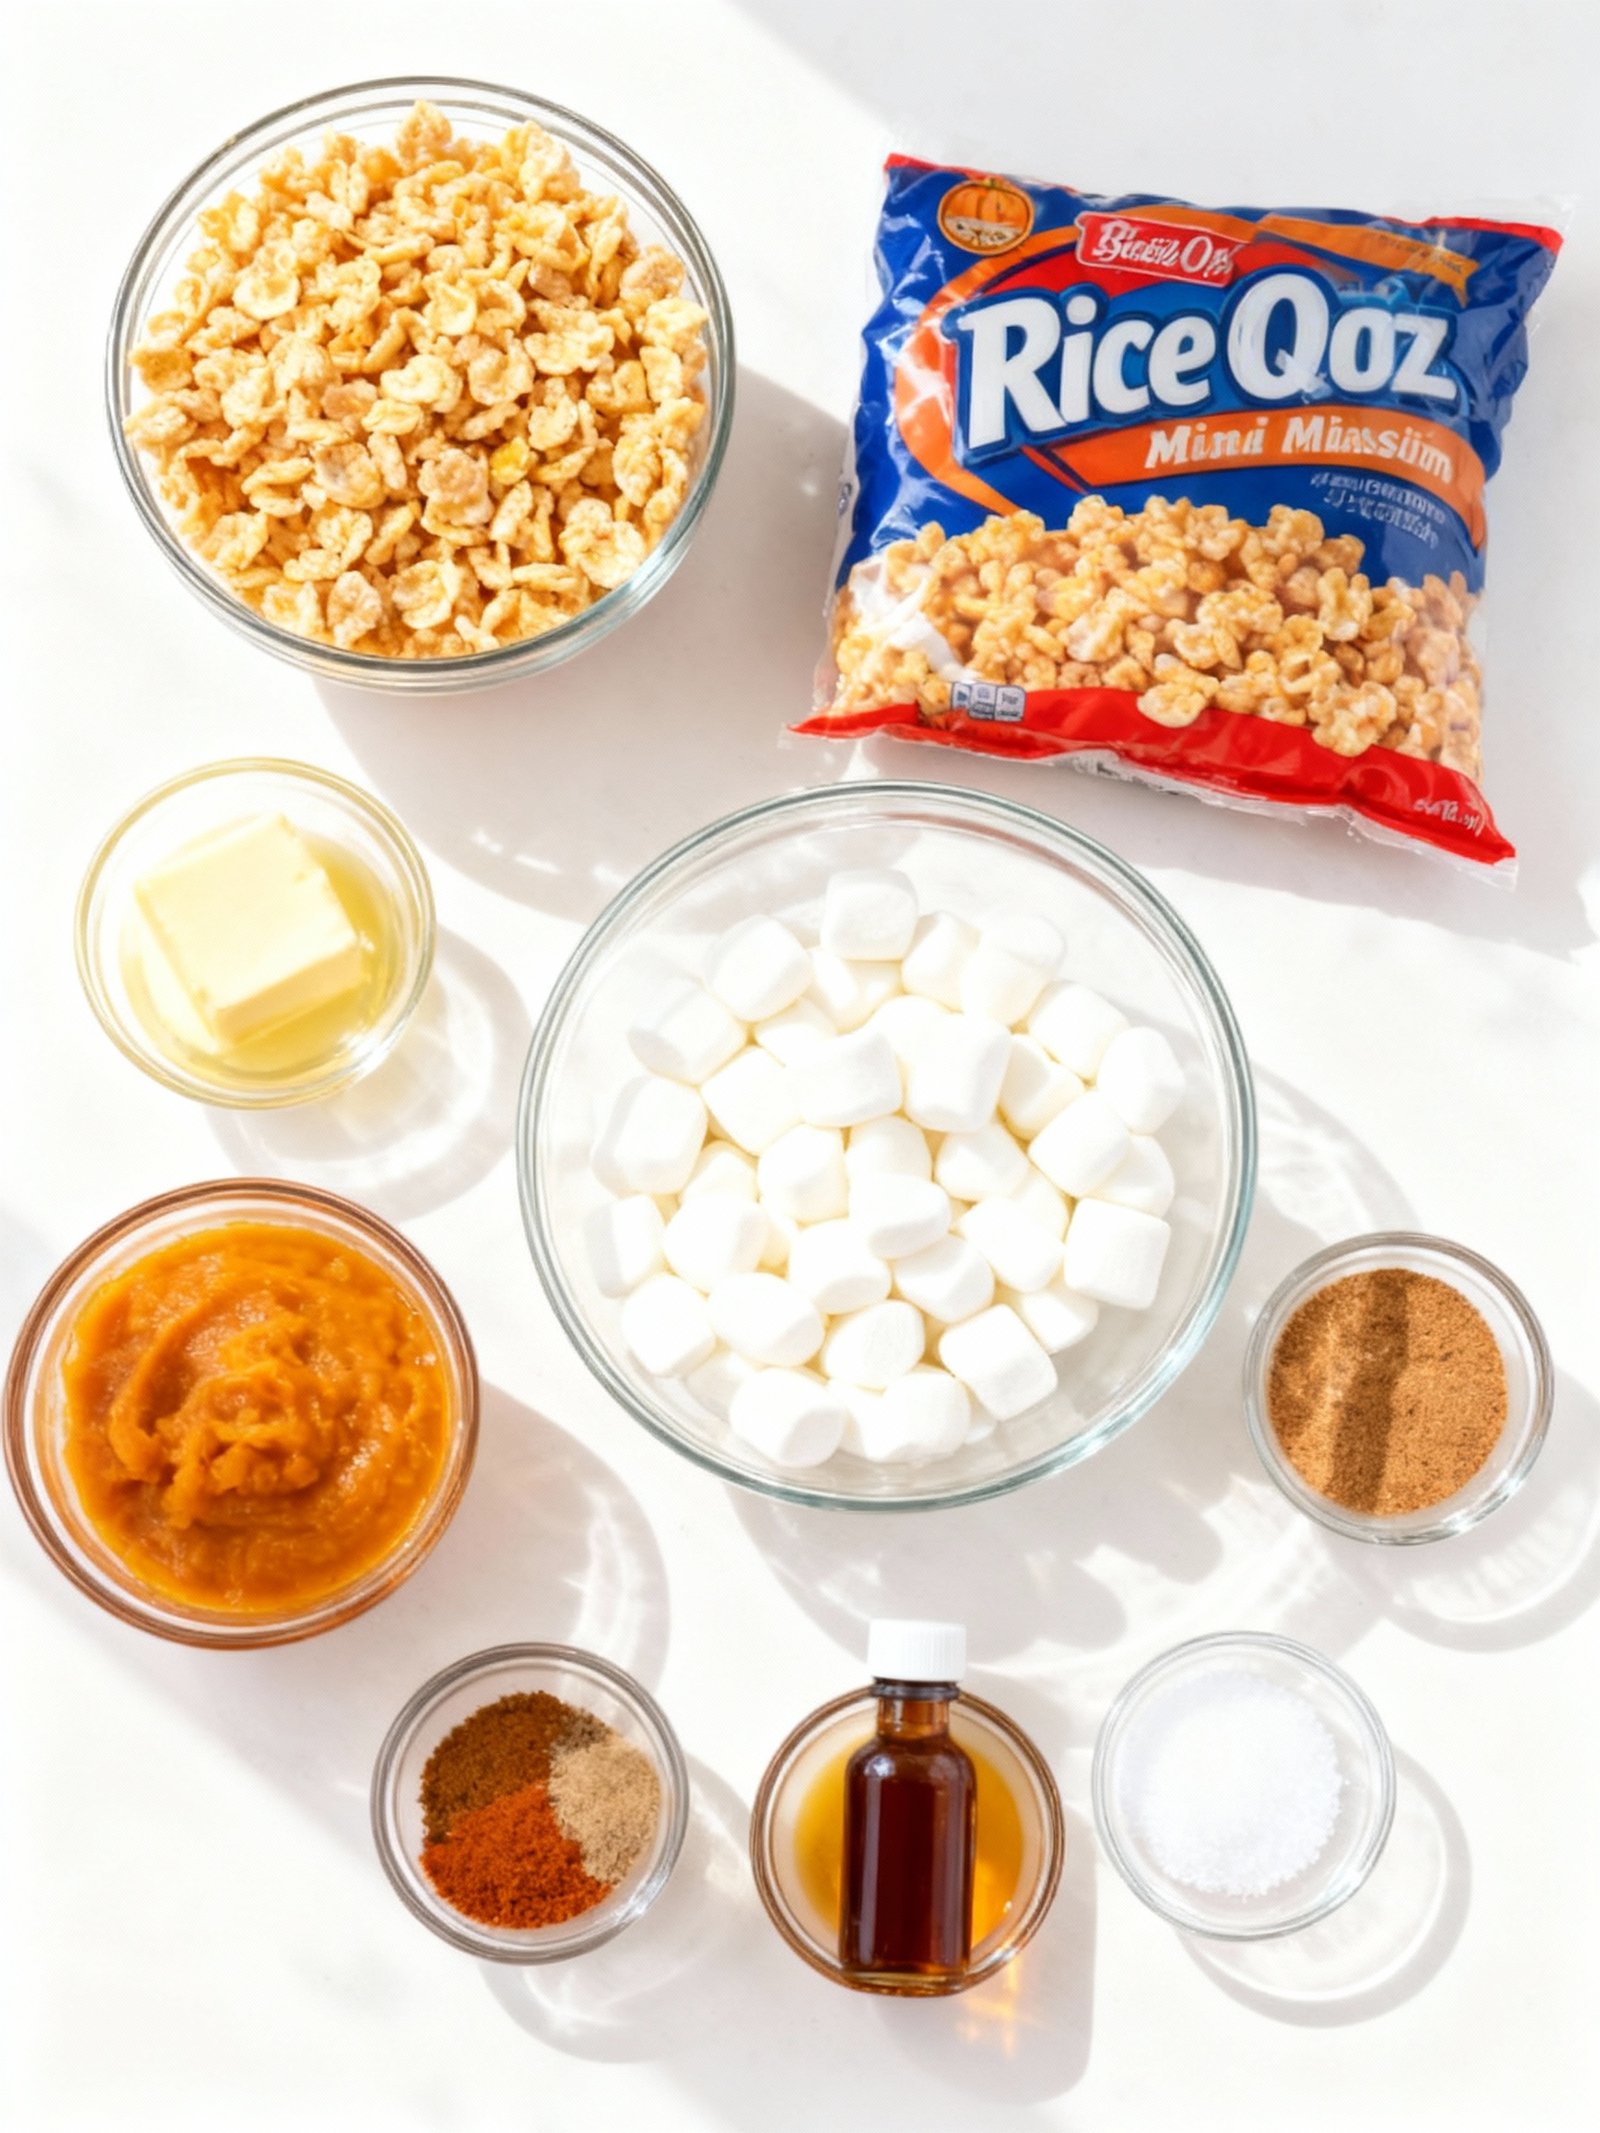
- 6 cups Rice Krispies cereal
- 3 tablespoons unsalted butter
- 1 (10 oz) bag mini marshmallows
- 1/2 cup pumpkin puree (not pumpkin pie filling)
- 1 teaspoon pumpkin pie spice
- 1/2 teaspoon ground cinnamon
- 1/4 teaspoon vanilla extract
- Pinch of salt (optional)
Timing
| Prep Time | 15 minutes |
| Cook Time | 5 minutes |
| Total Time | 20 minutes |
Context: These Pumpkin Rice Krispie Treats are approximately 20% faster to make than similar no-bake dessert recipes.
Step-by-Step Instructions
Step 1 — Prepare Your Ingredients and Tools
Gather 6 cups of Rice Krispies cereal, 10 ounces of marshmallows, 3 tablespoons of butter, orange food coloring, and green candy melts or frosting. You’ll also need a large saucepan, a spatula, a baking sheet lined with parchment paper, and pumpkin-shaped cookie cutters.
Having everything measured and ready before you start ensures a smooth process for these soft, sweet, and easy no-bake treats.
Step 2 — Melt the Butter and Marshmallows
In your large saucepan, melt the butter over low heat. Once melted, add the marshmallows and stir continuously until completely smooth and melted.
Keep the heat low to prevent the marshmallows from scorching. The mixture should be glossy and pourable.
Step 3 — Color the Marshmallow Mixture
Remove the saucepan from heat. Stir in orange food coloring, a few drops at a time, until you achieve a vibrant pumpkin orange hue.
Mix thoroughly to ensure even coloring throughout your spooktacular Halloween dessert.
Step 4 — Combine with Cereal
Immediately pour the Rice Krispies cereal into the colored marshmallow mixture. Use a spatula to gently fold until every piece is evenly coated.
Work quickly while the mixture is still warm and pliable for the best texture.
Step 5 — Press into Pan and Cool
Transfer the mixture to your prepared baking sheet. Lightly grease your hands or a spatula and press the mixture into an even layer, about 1-inch thick.
Allow it to cool at room temperature for at least 30 minutes until set and firm to the touch.
Step 6 — Cut Out Pumpkin Shapes
Once cooled and set, use pumpkin-shaped cookie cutters to press out your treats. If the mixture sticks, dip the cutter in warm water between cuts.
Gently push the cut-out shapes from the cutter onto a clean surface.
Step 7 — Add the Stems
Melt the green candy melts according to package directions. Use a small spoon or piping bag to add a dollop to the top of each pumpkin for the stem.
If using green frosting, simply pipe a small stem shape. Let the stems set completely.
Step 8 — Serve and Store
Your Pumpkin Rice Krispie Treats are ready to serve! They are best enjoyed the same day but can be stored in an airtight container at room temperature for up to 2 days.
For the softest texture, place a piece of bread in the container to help retain moisture.
Nutritional Information
| Calories | 150 |
| Protein | 1g |
| Carbohydrates | 28g |
| Fat | 4g |
| Fiber | 0.5g |
| Sodium | 105mg |
Note: Estimates based on typical ingredients and serving size.
Healthier Alternatives
- Brown Rice Cereal — Provides more fiber and nutrients while maintaining the classic crispy texture.
- Protein-Enriched Marshmallows — Adds extra protein while keeping the soft, sweet consistency.
- Almond Butter or Sunflower Butter — A dairy-free alternative that adds healthy fats and rich flavor.
- Coconut Oil — A dairy-free substitute for butter that complements the pumpkin flavor beautifully.
- Low-Sodium Marshmallows — Reduces sodium content without sacrificing the sweet, sticky base.
- Stevia-Sweetened Marshmallows — Lowers the sugar content for a lower-carb version of this treat.
- Gluten-Free Oat Cereal — A certified gluten-free alternative for those with dietary restrictions.
- Pumpkin Puree with No Added Sugar — Controls sweetness levels while maintaining the festive pumpkin flavor.
Serving Suggestions
- Pair these soft, sweet pumpkin Rice Krispie treats with a warm mug of apple cider or hot chocolate for a cozy fall dessert.
- Serve these spooktacular no-bake treats at a Halloween party alongside other themed desserts like ghost cookies and caramel apples.
- Arrange these cute Halloween desserts on a tiered stand with orange and black napkins for a festive party display.
- Pack these easy-to-make treats in individual treat bags as party favors or classroom snacks for school Halloween celebrations.
- Create a pumpkin patch display by placing these pumpkin-shaped treats on a bed of green coconut “grass” for an adorable dessert table centerpiece.
- Serve these soft pumpkin Rice Krispie treats with a scoop of vanilla ice cream for an extra special dessert that combines warm fall flavors.
These pumpkin Rice Krispie treats are perfect for any Halloween gathering, from casual family nights to elaborate costume parties, making them the ultimate spooktacular no-bake dessert.
Common Mistakes to Avoid
- Mistake: Using stale marshmallows that don’t melt smoothly. Fix: Always use fresh, soft marshmallows for a perfectly gooey, pliable mixture that holds its shape.
- Mistake: Overheating the marshmallow-butter mixture, making it hard and chewy. Fix: Melt over low heat just until smooth; residual heat will finish the job off the stove.
- Mistake: Not properly greasing your hands before shaping the pumpkins. Fix: Coat your palms lightly with butter or cooking spray to prevent the treats from sticking as you form them.
- Mistake: Adding too much orange food coloring, which can make the treats taste bitter. Fix: Use gel food coloring and add it drop by drop until you achieve a vibrant, pumpkin-like hue.
- Mistake: Compacting the Rice Krispie mixture too firmly when mixing. Fix: Gently fold the cereal in until just coated to maintain a light, soft, and airy texture.
- Mistake: Using warm mixture to shape pumpkins, causing them to lose definition. Fix: Let the mixture cool for 5-7 minutes until it’s manageable but still pliable for easy molding.
- Mistake: Skipping the chilling step before adding the stem, leading to droopy pumpkins. Fix: Refrigerate the shaped pumpkins for 15-20 minutes to firm up before inserting the pretzel stems.
- Mistake: Storing the finished treats uncovered, making them dry and hard. Fix: Keep them in an airtight container at room temperature to preserve their soft, fresh texture for days.
Storing Tips
- Fridge: Store in an airtight container for up to 5 days. Refrigeration helps maintain their soft texture.
- Freezer: Wrap tightly or place in a freezer-safe container for up to 2 months. Thaw at room temperature before serving.
- Reheat: For a fresh-from-the-kitchen feel, microwave individual treats for 5-10 seconds. Always ensure they are heated to a food-safe temperature of at least 165°F if adding any perishable ingredients.
Proper storage keeps your pumpkin Rice Krispie treats deliciously soft and ready for any Halloween celebration.
Conclusion
These Pumpkin Rice Krispie Treats are the perfect soft, sweet, and easy no-bake dessert for Halloween. If you love simple treats, try our No Bake Ritz S’mores Cookies Recipe next! We hope you enjoy making this spooktacular recipe—please leave a comment and subscribe for more fun ideas!
PrintPumpkin Spice Rice Krispie Treats

Soft, sweet, and easy no-bake treats with a cozy pumpkin spice twist—perfect for Halloween or fall gatherings.
- Prep Time: 10 minutes
- Cook Time: 5 minutes
- Total Time: 45 minutes
- Yield: 12 1x
- Method: Dessert
- Cuisine: American
Ingredients
- 6 cups Rice Krispies cereal
- 3 tablespoons unsalted butter
- 1 (10 oz) bag mini marshmallows
- 1/2 cup pumpkin puree (not pumpkin pie filling)
- 1 teaspoon pumpkin pie spice
- 1/2 teaspoon ground cinnamon
- 1/4 teaspoon vanilla extract
- Pinch of salt (optional)
Instructions
- Grease a 9×13-inch baking dish with butter or cooking spray, or line with parchment paper for easy removal.
- In a large saucepan, melt the butter over medium heat. Add the mini marshmallows and stir continuously until fully melted and smooth. Remove from heat and add the pumpkin puree, pumpkin pie spice, cinnamon, vanilla extract, and salt (if using). Stir until fully combined.
- Gradually add the Rice Krispies cereal, stirring gently to coat the cereal with the spiced marshmallow mixture. Transfer the mixture to the prepared baking dish. Use wax paper or the back of a spoon to press the mixture evenly into the pan. Let cool at room temperature for at least 30 minutes, then cut into squares and serve.
Notes
For best texture, do not press the mixture too firmly into the pan. These treats are best enjoyed the same day but can be stored in an airtight container for up to 2 days. Perfect for lunchboxes or a sweet fall snack with hot cider.
Nutrition
- Calories: 150
- Sugar: 15
- Sodium: 100
- Fat: 3
- Saturated Fat: 2
- Unsaturated Fat: 1
- Trans Fat: 0
- Carbohydrates: 30
- Fiber: 1
- Protein: 1
- Cholesterol: 8
FAQs
Can I make these Pumpkin Rice Krispie Treats ahead of time?
Yes, you can prepare these soft and sweet treats a day or two in advance. Store them in an airtight container at room temperature to maintain their texture. This makes them a convenient, no-bake Halloween dessert.
How do I shape the treats into pumpkins?
After mixing, let the Rice Krispie mixture cool slightly until it’s safe to handle. Then, roll portions into balls and gently press the sides to form a pumpkin shape. Use a small piece of green candy or licorice for the stem to complete the look.
Can I use something other than pumpkin candy melts?
Yes, you can substitute orange candy melts with orange frosting or colored white chocolate. The key is to use a coating that hardens so your Pumpkin Rice Krispie Treats hold their adorable shape as a spooktacular no-bake treat.


Can you be more specific about the content of your article? After reading it, I still have some doubts. Hope you can help me.
★★★★
Your article helped me a lot, is there any more related content? Thanks!
★★★★
I’ve been craving a fall treat that’s easy to make. Pumpkin spice in Rice Krispie treats is such a clever idea, and I can’t wait to try them this weekend.
★★★★