


Ultimate New York-Style Cheesecake: Family Favorite Recipe
The Ultimate New York-Style Cheesecake is the pinnacle of dessert indulgence, boasting a creamy texture and a rich, tangy flavor that has earned it nationwide acclaim. With its origins rooted in the bustling streets of New York City, this iconic dessert captures the essence of restaurant-quality satisfaction in every bite. Whether you’re celebrating a special occasion or simply indulging in a classic delight, this cheesecake promises to deliver pure bliss.
Crafted for both seasoned bakers and novice enthusiasts, this New York-Style Cheesecake recipe has become a family favorite, adored for its smooth, dense interior beneath a beautiful golden-brown surface. One whiff of its buttery aroma invites nostalgia, while the harmonious blend of cream cheese, vanilla, and a hint of lemon zest brings a taste profile to be remembered. Paired with a classic graham cracker crust or a more creative base, this cheesecake is versatile enough to adapt to a range of palates.
Quick Recipe Highlights
- Flavor Profile: The Ultimate New York-Style Cheesecake combines the tanginess of cream cheese with the sweetness of sugar, creating an unforgettable creamy taste.
- Texture: Its dense yet smooth consistency sets it apart, providing a luxurious mouthfeel with each bite.
- Aroma: The scent of warm vanilla and cream is immediately enticing, filling the kitchen with an inviting sweetness.
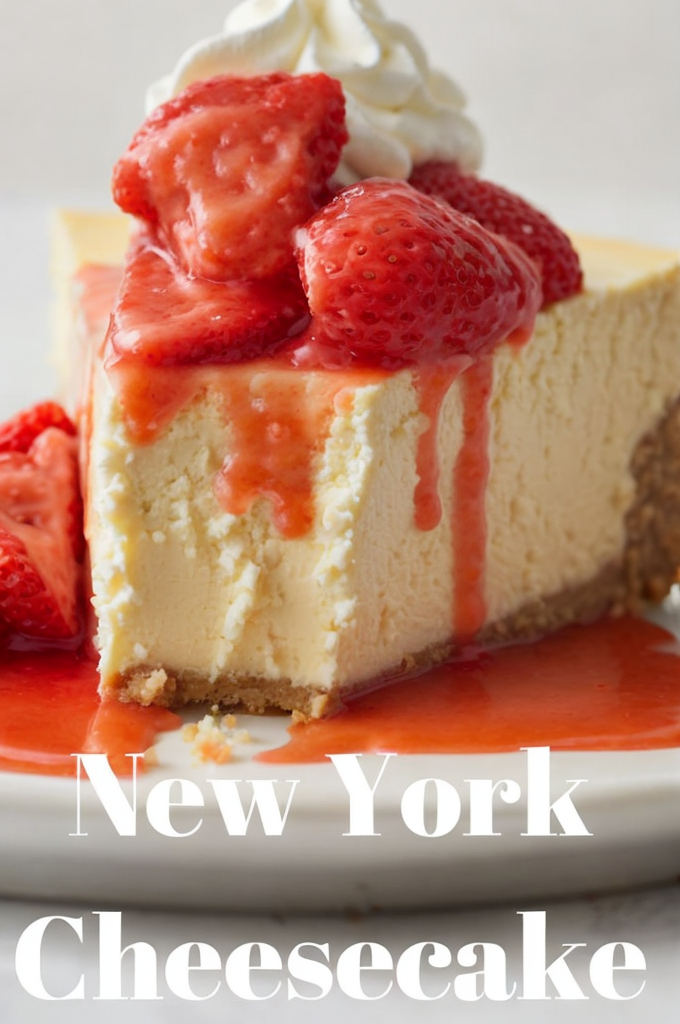
- Visual Appeal: A perfectly browned crust on top gives way to a beautiful ivory center, making it as pleasing to the eye as it is to the palate.
- Skill Level Needed: Intermediate baking skills are recommended, focusing on proper mixing techniques and baking times.
- Special Equipment: You’ll need a springform pan and an electric mixer to achieve the ideal cheesecake texture.
Recipe Overview
- Difficulty Level: The recipe is moderately challenging, requiring careful attention to detail and patient cooling time to ensure a crack-free surface.
- Category: This recipe falls under the classic dessert category, perfect for family gatherings and festive dinners.
- Cuisine: Rooted in American culinary tradition, the New York-Style Cheesecake has become famous worldwide for its unique style.
- Cost: This recipe is moderately priced, with quality cream cheese being the most significant expense.
- Season: Best enjoyed year-round but particularly delightful in cooler months when richer desserts are favored.
- Occasion: Ideal for birthdays, celebrations, and holiday feasts, this cheesecake is a showstopper that guest will remember.
Why You’ll Love This Recipe
The velvety texture and rich taste of the Ultimate New York-Style Cheesecake deliver a sensory delight that makes it irresistible. Its creamy interior melts in the mouth, contrasting perfectly with the slight crunch of the crust. Every bite offers a balance of sweetness and tanginess, inviting you to savor each, making it a beloved choice for dessert enthusiasts.
Convenience plays a significant role in its appeal. With straightforward ingredients and a simple preparation process, this cheesecake can be assembled with ease, even by those less experienced in baking. The recipe’s straightforward instructions remove any anxiety, allowing you to enjoy the process and achieve rewarding results every time.
The cheesecake’s rich ingredients offer a nutritious indulgence, providing calcium and protein from cream cheese and eggs. However, the recipe also allows for flexible modifications to suit various dietary needs, ensuring everyone can partake in this velvety delight.
Socially, the cheesecake serves as a centerpiece for gatherings, providing an occasion to celebrate culinary craftsmanship. It’s a conversation starter and a shared experience, as guests discuss its flavor nuances while enjoying each other’s company. Plus, it photographs beautifully, making it a popular choice for social media postings.
Cost-effectiveness is another advantage, as the primary ingredients are readily available and reasonably priced. While the recipe yields a beautiful, restaurant-quality dessert, its home preparation is both budget-friendly and rewarding. This cheesecake’s ability to retain quality over several days also enhances its value, offering enjoyment beyond the initial serving.
Historical Background and Cultural Significance
The roots of the New York-Style Cheesecake trace back to ancient Greece, where a simple form of cheesecake was served to athletes during the first Olympic Games. When the Romans conquered Greece, they adapted the recipe to suit their tastes, spreading it throughout Europe as they expanded their empire.
This culinary tradition experienced significant evolution when immigrants brought cheesecake recipes to America in the late 19th century. New York City chefs began developing their unique version, focusing on cream cheese as the main ingredient. Arnold Reuben, a restaurant owner, is widely credited with popularizing the New York-Style Cheesecake, giving us the version that we cherish today.
Over the decades, this iconic dessert has diversified, with variations appearing throughout the U.S. due to regional culinary influences and ingredient availability. However, the classic New York-Style Cheesecake remains the definitive and most recognized form, appreciated for its dense, creamy texture that sets the benchmark for cheesecake excellence.
In contemporary culture, the cheesecake symbolizes indulgence and celebration, often enjoyed during special occasions and gatherings. Its unwavering appeal and renown as a symbol of New York’s rich culinary heritage make it an enduring favorite among dessert lovers worldwide.
Ingredient Deep Dive
**Cream Cheese** – Central to the velvety texture that defines New York-Style Cheesecake, cream cheese plays a crucial role in achieving its rich flavor. Originating from American dairy innovation in the late 1800s, cream cheese provides a smooth and dense foundation, balancing sweetness with a hint of tang. When selecting cream cheese, opt for full-fat varieties for the richest flavor and best texture. It’s best stored in the refrigerator and can be kept frozen, though freezing may alter texture slightly. For substitutions, mascarpone can be used, although it results in a slightly different taste and texture.
**Graham Cracker Crust** – A staple of American dessert culture, the graham cracker crust adds a contrasting crunch to the creamy cheesecake. Made from crushed graham crackers, sugar, and butter, it’s the perfect base for supporting the dense filling. Opt for freshly crushed graham crackers to ensure optimal freshness and crispness. If graham crackers aren’t available, alternatives like digestive biscuits or crushed vanilla wafers work beautifully.
Common Mistakes to Avoid
- Skipping the water bath can lead to cracking on the cheesecake’s surface due to uneven heat distribution.
- Overmixing the batter leads to incorporating too much air, causing the cheesecake to rise and fall, resulting in cracks.
- Rushing the cooling process may cause the cheesecake to collapse; allow ample time to cool slowly.
- Using cold ingredients: Ensure all ingredients are at room temperature for a smoother batter.
- Uneven crust: Press the crust mixture firmly and evenly for a stable base.
- Not properly preheating the oven can result in uneven baking.
- Opening the oven door frequently during baking disrupts the cooking temperature, risking cracks.
- Neglecting to scrape the bowl during mixing can leave lumpy ingredients unincorporated.
Essential Techniques
**Water Bath Baking** – Baking a cheesecake in a water bath ensures consistent, even cooking, preventing the top from cracking. This technique also helps keep the cheesecake moist. To master it, wrap your springform pan securely in foil to prevent water seepage, and fill the roasting pan with enough hot water to reach halfway up the cheesecake pan.
**Mixing the Batter** – Achieving the perfect cheesecake batter requires patience and precision. It’s crucial to beat cream cheese until light and fluffy before incorporating other ingredients. Use a low speed to avoid over-whipping, which introduces unnecessary air and results in a cracked top.
**Cooling Techniques** – A gradual cooling process is pivotal in achieving the perfect texture. Once your cheesecake is finished baking, turn off the oven, crack the door open, and let it cool for an hour before removing it. Then, refrigerate it for at least four hours, or preferably overnight, for full setting.
Pro Tips for Perfect Ultimate New York-Style Cheesecake
Room Temperature Ingredients: Ensure all ingredients are at room temperature to prevent lumps and achieve a smooth batter.
Foil-Wrapped Pan: Wrap your springform pan securely in heavy-duty aluminum foil to prevent water from seeping into the crust during the water bath baking.
Avoid Overbaking: The center of your cheesecake should still wobble slightly when jiggled; it will continue to cook after being removed from the oven.
Resting for Flavor: Allow your cheesecake to sit in the refrigerator overnight to develop its flavors fully.
Minimizing Cracks: To minimize the risk of cracks, run a thin knife around the edge of the cheesecake as it cools, preventing it from sticking to the sides of the pan.
Serving Temperature: Let the cheesecake sit at room temperature for about 30 minutes before serving for the best texture.
Variations and Adaptations
**Regional Variations** – Explore regional spins by incorporating flavors like honey and pistachio for a Middle Eastern twist or adding green tea powder for a Japanese-inspired cheesecake.
**Seasonal Adaptations** – Adapt the recipe with seasonal ingredients such as spiced pumpkin puree in the fall or fresh berry coulis in the summer for a refreshing touch.
**Dietary Modifications** – Create a gluten-free version by using gluten-free cookies for the crust, and a vegan option using almond or coconut milk-based alternatives for cream cheese and eggs.
**Flavor Variations** – Enhance the baseline flavor with an infusion of citrus zest, almond extract, or chocolate swirl to tailor to different palates.
**Texture Modifications** – Adjust the creaminess level by incorporating extra egg yolks or introducing tangier notes with a dash of sour cream.
**Presentation Alternatives** – Present your cheesecake with a dusting of powdered sugar or an elegant drizzle of homemade caramel sauce for a visually sophisticated finish.
Serving and Presentation Guide
**Plating Techniques** – For a perfect slice, use a warm knife wiped clean between cuts to maintain a smooth, clean edge.
**Garnishing Ideas** – Elevate the presentation with toppings such as fresh berries, mint leaves, or even edible flowers for a touch of elegance.
**Traditional Accompaniments** – Serve with a dollop of lightly sweetened whipped cream or a side of fruit compote for classic flair.
**Modern Serving Suggestions** – Pair your cheesecake with a light espresso or herbal tea to amplify the dessert’s nuances without overpowering its delicate flavor profile.
**Temperature Considerations** – Ideally, serve slightly chilled but not too cold, as extreme cold may mute the flavor; aim for 30 minutes out of the fridge before serving.
**Portion Control Tips** – A thin slice goes a long way due to its richness, especially when served after dinner.
Wine and Beverage Pairing
**Wine Pairings** – A glass of Sauternes or a late-harvest Riesling complements the sweet and creamy notes of the cheesecake. For a red option, consider a gently sparkling Lambrusco to contrast with its richness.
**Non-Alcoholic Alternatives** – Pair with a robust cold brew coffee or an artisanal root beer to match its intensity with complementary flavors.
**Coffee/Tea Pairings** – Espresso or a rich, dark roast coffee enhances the cheesecake’s dense texture and creaminess, while a vanilla or chai tea highlights its sweet and spicy dimensions.
**Temperature Considerations** – Serve beverages chilled when pairing with an icy dessert or warm to contrast with chilled servings.
**Serving Suggestions** – Small, elegant glasses or cups suitable for sipping add a touch of sophistication to your presentation.
Storage and Shelf Life
**Storage Methods** – Store tightly covered in the refrigerator to prevent drying and absorb flavors, ensuring maximum freshness and taste.
**Temperature Requirements** – Keep refrigerated at all times to maintain its creamy consistency, preventing potential spoilage.
**Container Recommendations** – Use airtight containers or cover with plastic wrap to lock in moisture and prevent crust from turning soggy.
**Signs of Spoilage** – Discoloration, an off smell, and rubbery texture are indicators that the cheesecake is spoiled and should not be consumed.
**Reheating Instructions** – Avoid reheating cheesecakes, as it can compromise its texture; instead, enjoy it served fresh from refrigeration or at room temperature.
**Freezing Guidelines** – Freeze leftovers wrapped in plastic and foil for up to 3 months, and thaw overnight in the refrigerator for best results.
Make Ahead Strategies
**Prep Timeline** – Prepare the cheesecake 1-2 days in advance to allow sufficient chilling and flavor development.
**Storage Between Steps** – After mixing the batter, the cheesecake can be stored in the pan in the fridge overnight before baking if necessary.
**Quality Impact Assessment** – Some softening of the crust is expected when made ahead, but overall quality remains consistent.
**Assembly Tips** – Ensure crust is adequately pressed and filling is smoothed out before setting to maintain an even appearance.
**Reheating Guidelines** – No reheating is needed, but allow time for the cheesecake to sit at room temperature for optimal flavor before serving.
**Fresh Element Additions** – Add fresh fruit toppings just before serving to ensure vibrant and crisp presentation.
Scaling Instructions
**Halving the Recipe** – Divide ingredients and use a smaller springform pan to create a smaller cheesecake, adjusting baking time as needed by observing doneness cues.
**Doubling or Tripling** – When increasing the batch, bake multiple cheesecakes rather than in one large pan to maintain consistency in texture and cooking.
**Equipment Adjustments** – Larger batches may require additional mixing times and tools, such as larger mixing bowls or a stand mixer, to handle increased volume.
**Timing Modifications** – Larger quantities require careful temperature and time management; extend cooling and possibly increasing baking duration slightly to ensure thorough doneness.
**Storage Considerations** – Larger quantities may require extra fridge space; consuming within one week is recommended to maintain optimal freshness when refrigerated.
Nutritional Deep Dive
**Macro Breakdown** – Rich in fats and proteins, the cheesecake provides energy and satiety, but portion control is essential due to its calorie density.
**Micronutrient Analysis** – Source of calcium and vitamin A from cream cheese, with minimal fibers from the crust.
**Health Benefits** – Enjoyed as an occasional treat within a balanced diet, it contributes to calcium intake.
**Dietary Considerations** – Contains dairy and wheat, making it unsuitable for those with lactose intolerance or gluten sensitivity without modifications.
**Portion Analysis** – Often served in thin slices given the richness for a balanced indulgent experience.
**Weight Management Tips** – Offset indulgence with more nutritious meal choices earlier or later in the day.
Dietary Adaptations
**Gluten-Free** – Substitute the graham cracker crust with a mixture of almond flour and gluten-free oats for those avoiding gluten.
**Dairy-Free** – Use dairy-free cream cheese and plant-based yogurt alternatives to cater to lactose intolerance or dairy-free preferences.
**Vegan** – Substitute traditional cream cheese and eggs with vegan cream cheese and flax eggs to recreate the rich, creamy texture.
**Low-Carb** – Replace sugar with sugar alternatives such as erythritol or stevia to reduce carbohydrate content without sacrificing flavor.
**Keto** – An almond flour crust paired with a cheesecake filling utilizing coconut cream can fit a keto-friendly diet.
**Paleo** – Use natural sweeteners like maple syrup or honey and a nut-based crust to align with paleo eating principles.
**Low-FODMAP** – Chose lactose-free cream cheese and avoid high-FODMAP granulated sugar for a tummy-friendly version suitable for those with IBS.
The Recipe
Ultimate New York-Style Cheesecake
Serves: 12
Prep Time: 30 mins
Cook Time: 60 mins
Total Time: 90 mins
Kitchen Equipment Needed
- Springform pan
- Electric mixer
- Mixing bowls
- Rubber spatula
- Measuring cups and spoons
- Baking sheet
- Aluminum foil
Ingredients
- 2 cups crushed graham crackers
- 1/2 cup melted butter
- 1/4 cup sugar
- 4 packages (8 oz each) cream cheese, softened
- 1 cup sugar
- 1 teaspoon vanilla extract
- 4 large eggs
Directions
- Preheat oven to 325°F (163°C). Grease a 9-inch springform pan.
- Mix the graham cracker crumbs, melted butter, and sugar in a bowl until combined. Press into the bottom of the springform pan.
- In a large mixing bowl, beat the softened cream cheese until creamy. Add sugar and vanilla, beat until combined.
- Add eggs one at a time, mixing gently after each addition.
- Pour the cheesecake mixture over the crust in the springform pan. Smooth the top with a spatula.
- Bake for 55-60 minutes, or until the center is set but still slightly jiggly.
- Turn off the oven, let the cheesecake cool in the oven with the door cracked open for about an hour.
- Remove from the oven, cool to room temperature, then refrigerate for at least 4 hours before serving.
Recipe Notes
- Ensure all ingredients are at room temperature for the best mixing results.
- If cracks form, consider a sour cream topping to smooth the cheesecake’s surface.
- The cheesecake can be stored in the fridge for up to 5 days or frozen for longer preservation.
Troubleshooting Guide
**Texture Issues** – If your cheesecake feels too firm, it may have been overbaked. Ensure you test the center for a slight jiggle before removing it from the oven.
**Flavor Balance** – If the cheesecake seems too sweet or tangy, adjust your sugar or cream cheese quantities slightly in future attempts to match personal preference.
**Temperature Problems** – Cheesecake cracking can occur when exposed to sudden temperature changes; allow gradual cooling in the oven followed by refrigeration.
**Equipment Challenges** – Use a high-quality electric mixer to avoid under-mixing, which can leave lumps in your batter.
**Ingredient Substitutions** – If using light cream cheese for a healthier version, increase baking time slightly and expect a slightly less creamy texture.
**Timing Concerns** – Be patient in the cooling process; rushing leads to structural inconsistencies. Allow thorough chilling before serving.
Recipe Success Stories
Our readers describe the Ultimate New York-Style Cheesecake as a cornerstone for their family gatherings time and again. One baker adjusted the crust using a blend of ginger snaps and walnuts for a festive twist, receiving raving feedback. Another enthusiast personalized the classic by adding a blueberry topping, sharing photographs widely.
With reader suggestions and experiences, the cheesecake’s adaptability is praised, proving it remains a reliable go-to recipe for a variety of occasions. Enthusiasts commend the instructions for their clarity, inviting creativity while ensuring a successful outcome.
Frequently Asked Questions
Can I use a different crust besides graham crackers? Yes, you can experiment with vanilla wafers, ginger snaps, or even chocolate sandwich cookies for the crust.
Why is my cheesecake lumpy? Mixing room temperature ingredients at a controlled speed prevents lump formation. Ensure cream cheese is sufficiently softened.
How do I store leftovers? Cover the cheesecake with plastic wrap or store slices in an airtight container in the refrigerator for up to five days.
Can I freeze the cheesecake? Yes, wrap it tightly in plastic wrap and foil, then freeze for up to three months. Thaw in the fridge before eating.
How can I make this recipe gluten-free? Substitute the graham cracker crust with a gluten-free alternative like almond flour or gluten-free digestive biscuits.
Is it possible to make the cheesecake lighter? For a lighter version, incorporate reduced-fat cream cheese, but the flavor and texture might differ slightly.
How do I know when the cheesecake is done? Look for a slight jiggle in the center. It will continue to set as it cools.
Should my cheesecake batter be runny? No, it should be thick and smooth. If too runny, double-check your ingredient proportions.
Do I need to line the springform pan? Greasing should suffice, but lining the base with parchment paper can aid in easier removal.
Can I add flavors to the batter? Certainly, introducing ingredients such as lemon zest or cocoa powder can provide exciting new flavors.
What is the purpose of the water bath? It maintains even baking temperature, crucial for preventing the cake from drying out or cracking.
Additional Resources
Explore further with our array of related recipes such as delicate lemon ricotta cheesecake and a decadent chocolate swirl cheesecake. Hone your skills with our technique-focused guides, offering insights into baking fundamentals and advanced dessert techniques.
Our ingredient spotlight pages offer detailed knowledge about the best cream cheeses and alternatives to enrich your baking repertoire. Be inspired by seasonal adaptations and explore how different spices, fruits, and base ingredients can transform basic recipes into personalized culinary delights.
Join the Conversation
Engage with a vibrant baking community by sharing your cheesecake creations on social media, tagged with our recipe handle. We encourage feedback, images, and suggestions to enhance future publications and drive collective creativity.
Participate in our monthly baking challenge, where we showcase variations of staple recipes, featuring input from our readers. Your insights guide adaptations and transformations we publish for current and future enthusiasts, celebrating diverse and innovative baking experiences.